With just a few basic steps, you'll have turned those dull brown rolls into beautiful and vibrant peacocks in no time at all!

This peacock art project requires only a few simple supplies and will have your little ones laughing as they bring this majestic creature to life.

Is your child looking for a fun craft to do? With the kids likely spending much of their summer indoors, coming up with creative projects and activities is key.
If you’re stuck on crafting ideas that don’t involve too many materials, then this toilet roll peacock craft idea is perfect! Not only does it require minimal materials but it also gives your little one an interesting project they can proudly show off when finished. All you need are some empty toilet rolls, paint colors of choice, cardstock paper, glue and patience!
Read on to see how you can put together this recycled peacock craft in no time! I’ve even included a FREE printable for our readers to enjoy. Happy crafting, my friends!
With just a few basic steps, you’ll have turned those dull brown rolls into beautiful and vibrant peacocks in no time at all!
Craft Supplies:
- Empty Toilet Paper Rolls
- Peacock Printable – on our landing page
- White Cardstock Paper
- Yellow Cardstock Paper
- Paint Crayons or Acrylic Paint
- Coloring Pencils, Crayons or Markers
- Yellow Jewels
- Googly Eyes
- Scissors
- Stapler or Glue
Directions:
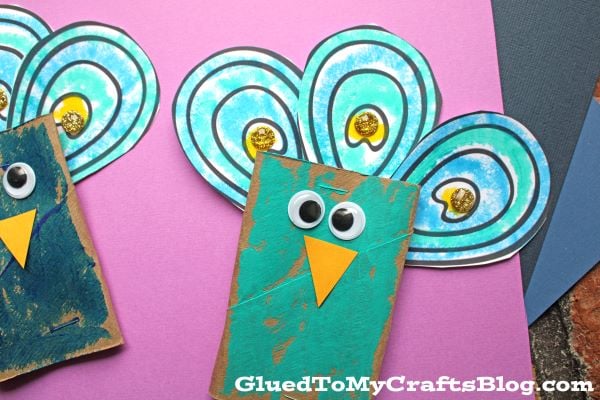
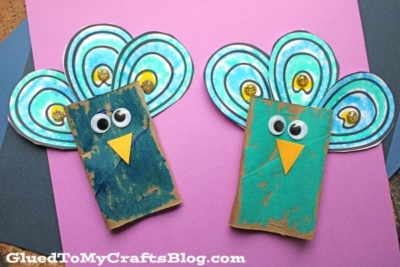
- First flatten out your cardboard tube and staple it on each end, to make a rectangle shape. This will be the peacock’s body.
- Next paint on side of the toilet paper roll with a blue or teal paint crayon.
- Set it aside.
- Now grab your printed printable and choice of coloring materials.
- Color in THREE of the feather designs and trim them out afterwards.
- At this point in time, you can also add some yellow jewels to each of the peacock’s feathers.
- When ready, go ahead and now staple those three pieces, to the back of the flattened cardboard piece from earlier, to create the peacock’s tail.
- Now for the final assembling step! Cut out a small triangle piece for the peacock’s nose from the remaining yellow paper.
- Go ahead and glue the beak to the center of the decorated cardboard tube, along with the wiggle eyes.
- Finally, add other embellishments you see fit before displaying/playing with your toilet paper roll peacock proudly!!!
RELATED —> Handprint Peacock

Don’t let the fun stop here with this toilet paper roll craft! Be sure to also check out our coffee filter peacock and paint splatter peacock tutorials for two more “feather” kid friendly craft ideas to make today!!!

Toilet Paper Roll Peacock Craft
With just a few basic steps, you'll have turned those dull brown rolls into beautiful and vibrant peacocks in no time at all!
Here’s your checklist of supplies to bring this craft to life:
- Empty Toilet Paper Rolls
- SUMMER PRINTABLE - LANDING PAGE
- Cardstock Paper
- Embellishments
- Googly Eyes
Prepare your creative haven by laying down a protective cover before the crafting magic begins!
Directions:
- First flatten out your cardboard tube and staple it on each end, to make a rectangle shape. This will be the peacock's body.
- Next paint on side of the toilet paper roll with a blue or teal paint crayon.
- Set it aside.
- Now grab your printed printable and choice of coloring materials.
- Color in THREE of the feather designs and trim them out afterwards.
- At this point in time, you can also add some yellow jewels to each of the peacock's feathers.
- When ready, go ahead and now staple those three pieces, to the back of the flattened cardboard piece from earlier, to create the peacock's tail.
- Now for the final assembling step! Cut out a small triangle piece for the peacock's nose from the remaining yellow paper.
- Go ahead and glue the beak to the center of the decorated cardboard tube, along with the wiggle eyes.
- Finally, add other embellishments you see fit before displaying/playing with your toilet paper roll peacock proudly!!!


NEED MORE HELP DOWNLOADING OUR FREE PRINTABLES? PLEASE REFER TO OUR FAQ PAGE
If you've enjoyed our content or have any thoughts to share, we'd love to hear from you! Mention @gluedtomycrafts or tag #gluedtomycrafts on Instagram!