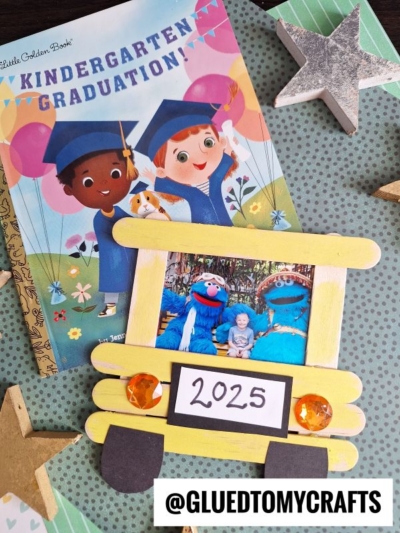
Get the kids super excited for the first day of school with today's Popsicle Stick Bus Picture Frame kids craft idea!

Get your children pumped up for the back-to-school season with this delightful and simple yellow bus picture frame tutorial! Join us as we take you through the step-by-step process for fantastic results in our blog post.

Are you looking for a creative way to display those precious memories of your children’s school days? If so, we have the solution!
Our latest “school bus frame” craft tutorial is boredom buster AND a great keepsake to hang on the fridge throughout the year {or maybe even turn it into an ornament for the Christmas tree instead!}
So on that note, are you ready to make it happen?! Well then – follow our step by step tutorial below and help your child “build” a one-of-a-kind yellow school bus picture frame today! I just know you are going to love making it together!
Happy crafting my friends! Don’t forget to share pictures with us of your school bus picture frame made from craft sticks, with us on our Facebook page!!!! #gluedtomycrafts

Get your kids creative juices flowing with this craft idea! Have fun making a school bus photo frame together and make memories that will last forever.
Craft Supplies:
- Jumbo Craft Sticks – 6 per craft
- School Glue
- Yellow Craft Paint
- Paint Brush
- Small Paper Plate
- Craft Scissors
- Gray Cardstock Paper
- White Cardstock Paper
- Craft Markers
- Large Red Craft Jewels
- Printed 4×6″ Picture
Directions:
- First assemble the base of your school bus. You will need SIX jumbo popsicle sticks per craft. The best way I explain this step, is to make a fence but with a large gap in between. Please use my picture above for an example.
- Once you have your piece assembled, set aside to let it dry completely.
- While it’s drying, go ahead and cut out the embellishments from your cardstock paper to give your school bus piece that one-of-a-kind look. You will want TWO school bus wheels and a small, rectangle license plate piece.
- Go ahead and use a marker to write the year on the license plate piece.
- When the craft stick piece is dry enough, squirt some paint on a paper plate.
- Now paint your popsicle stick shape completely yellow.
- To finish off the School Bus Photo Frame – trim down the printed first day of school picture and secure it in place, to the back of the frame opening.
- Follow that up by gluing down the paper cutouts and rhinestone brake lights.
- Add any other embellishments you see fit {like adhesive magnets or string for hanging!}
- Then set aside to let it dry completely before displaying proudly!
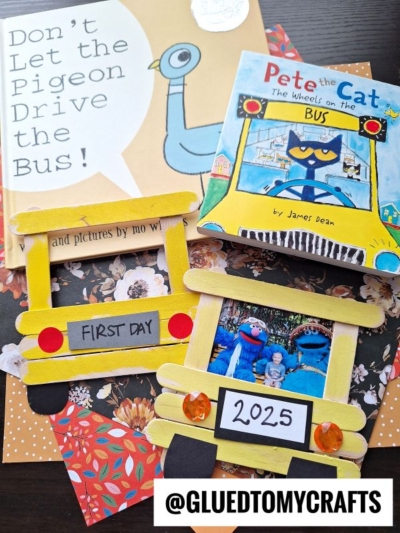
RELATED —> Don’t Let Pigeon Drive The Bus Craft
If you are looking for even MORE “back to school” themed crafts, similar to this wood stick school bus frame craft tutorial, be sure to check out these great blog posts, listed below, on Glued To My Crafts right now!
Back To School Printables
Tissue Paper Apple
Back To School Gnome
Craft Stick School Bus Friends
School Bus Photo Ornament
Paint Splat Apples
Decorative Ruler Frame

Popsicle Stick School Bus Frame
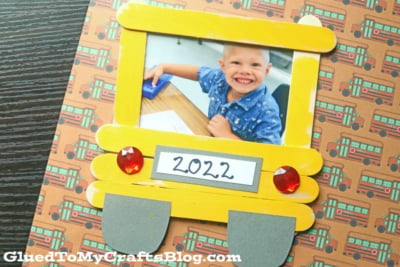
Get the kids super excited for the first day of school with today's Popsicle Stick Bus Picture Frame kids craft idea!
Here’s your checklist of supplies to bring this craft to life:
- 6 Jumbo Craft Sticks
- Craft Paint yellow
- Cardstock Paper gray and white
- Rhinestone Stickers red
- Printed Picture
- School Glue
Prepare your creative haven by laying down a protective cover before the crafting magic begins!
Directions:
- First assemble the base of your school bus. You will need SIX jumbo popsicle sticks per craft. The best way I explain this step, is to make a fence but with a large gap in between.
- Once you have your piece assembled, set aside to let it dry completely.
- While it's drying, go ahead and cut out the embellishments from your cardstock paper to give your school bus piece that one-of-a-kind look. You will want TWO wheels and a small, rectangle license plate piece.
- Go ahead and use a marker to write the year on the license plate piece.
- When the craft stick piece is dry enough, squirt some paint on a paper plate.
- Now paint your popsicle stick shape completely yellow.
- To finish off the School Bus Photo Frame - trim down the printed first day of school picture and secure it in place, to the back of the frame opening.
- Follow that up by gluing down the paper cutouts and rhinestone brake lights.
- Add any other embellishments you see fit {like adhesive magnets or string for hanging!}
- Then set aside to let it dry completely before displaying proudly!

CLICK HERE TO PRINT THE DIRECTIONS FOR THIS CRAFT
If you've enjoyed our content or have any thoughts to share, we'd love to hear from you! Mention @gluedtomycrafts or tag #gluedtomycrafts on Instagram!