Glued To My Crafts

Join thousands of others who have gotten GLUED to our craft tutorials!

  • Home
  • Privacy Policy
  • Craft Safety Guidelines
  • Craft Themes
    • New Years
    • Valentine’s Day
    • St. Patrick’s Day
    • Spring
    • Easter
    • Mother’s Day
    • Summer
    • Father’s Day
    • Patriotic
    • Halloween
    • Thanksgiving
    • Fall
    • Winter
    • Christmas
    • Snowmen
    • Story Time
  • Favorite Craft Materials
    • Cupcake Liners
    • Torn Paper Crafts
    • Paper Plates
    • Popsicle Sticks
    • Sidewalk Chalk
    • Clothespin Crafts
    • Tulip Puffy Paint
    • Paper Bags
    • Craft Foam Hearts
    • Puffy Paint
  • About Us
  • Most Popular Tutorials

Fork Painted Tree Craft Idea For Kids

When engaging in craft activities, it is important for young children to have adult supervision at ALL times. It is also recommended to use supplies that are suitable for your child's age. Feel free to modify materials or steps to meet your specific requirements. Please refer to our safety guidelines for more information.

As an Amazon Associate I earn from qualifying purchases. This post may contain affiliate links. For more information, please see our disclosure policy.

Get creative and make memories with your kiddos — try out this fork painted tree craft!

It’s a simple way to keep those young hands busy and create something beautiful in the process.

Fork Painted Tree - Kid Craft Idea

Fork Painted Pine Tree Craft Idea For Kids

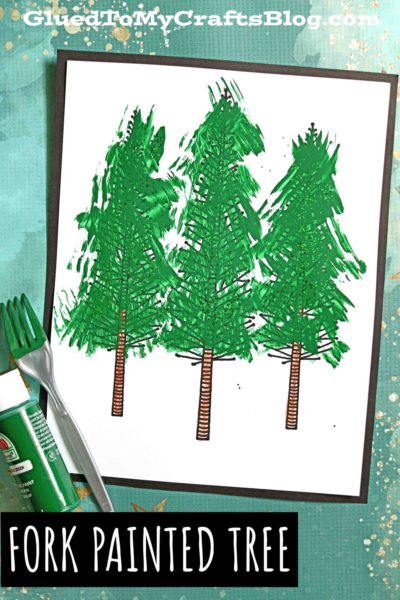
An inexpensive plastic fork and green craft paint merge together on white cardstock paper, for this Fork Painted Tree kid craft idea from Glued To My Crafts!

Keep scrolling for ALL the details, as well as the FREE pine tree printable, so you can recreate it with your young crafter today!

RELATED —> Plastic Fork Spring Flowers

Fork Painted Tree Craft Idea

A plastic fork and craft paint merge together on white cardstock paper, for this Fork Painted Tree kid craft idea from Glued To My Crafts!

Craft Supplies:

  • Plastic Fork
  • Green Craft Paint
  • Small Paper Plate
  • White Cardstock Paper
  • Free Printable  – on our landing page
  • Brown Crayon or Marker
  • Green Craft Glitter

You can find ALL our favorite craft supplies via our AMAZON SHOP link!

Directions:

  • First things first – print the pine tree printable listed above in the supply list. You only need ONE print per tree craft.
  • Now that you have it printed, use a brown crayon {or marker} to color in the three tree trunks in the printable.
  • When done coloring, go ahead and squirt some green craft paint on your paper plate.
  • Next take your fork, which is your “paint brush, to make “pine needless” all over the printed tree design on your printable. You basically want every branch to be covered in green craft paint.
  • Finally – the last step of this fork painted pine tree craft is to shake some loose craft glitter on top of the wet paint for some dimension and extra sparkle.
  • When done decorating the paper, set it aside to let it dry completely before displaying proudly!

RELATED —> Pine Cone Christmas Trees

Customize It:

  • Change up the color of your cardstock paper and/or craft paint to make a wintery scene instead! You can also for blue cardstock paper and white craft paint for the fork design, to create your winter wonderland on paper! Hopefully that tidbit inspires you to add it to your winter plans as well!

RELATED —> Fork Painted Bear

Fork Painted Tree Craft Idea

If you LOVE this fork painted tree craft idea, you may also enjoy our Broccoli Stamped Christmas Tree and Cupcake Liner Snowy Tree craft posts as well!

BE SURE TO FOLLOW US ON PINTEREST SO YOU NEVER MISS A NEW TUTORIAL FROM US!

stacey-signature-2023

Craft Activity Safety Guidelines:

Always Ensure Adult Supervision - Young children should be supervised at all times when engaging in craft activities. This is essential to keep them safe and ensure materials are used correctly. Use Age-Appropriate Supplies - Choose craft supplies that are suitable for your child’s age. Check labels for recommendations and avoid items with small parts or sharp edges for younger children. Modify as Needed - Feel free to adapt materials or steps to meet your child's abilities and safety needs. For example, substitute scissors with safety scissors if necessary. Keep an Eye on Allergies - Be mindful of potential allergens in craft materials like glue, paint, or certain fabrics. Opt for non-toxic and hypoallergenic options whenever possible. Organize and Secure Supplies - Keep all craft tools and materials organized. Store sharp objects, small parts, and potentially hazardous items out of reach when not in use. Following these guidelines will ensure that crafts remain fun, creative, and, most importantly, safe for everyone involved!


OUR PRIVACY POLICY

  • Email
  • Facebook
  • Instagram
  • Pinterest
  • Twitter
  • YouTube

LOOKING FOR SOMETHING?

EXPLORE OUR SITE:

© 2012–2025 Glued To My Crafts
All activities should be supervised by an adult at all times. Please refer to our safety guidelines for more information.


Please note that all the content of the website, including printables, are for classroom and personal use only. This means that any digital item you download from our site can be used for non-commercial use only. We kindly request that you do not reproduce or sell our creations. We appreciate your understanding and cooperation in respecting our content and intellectual property rights.