
Making salt dough ornaments is a fun and easy way to get into the Christmas spirit with your kids.
This tutorial provides an easy recipe for making salt dough, as well as step-by-step instructions for shaping and decorating your ornaments.
Let the whole family join in on the fun as you make some one-of-a-kind pieces together!
Looking for a fun and easy Christmas craft to do with your kids? Look no further than salt dough ornaments! This tutorial provides the perfect recipe, as well as step-by-step instructions on how to make these adorable ornaments. Your kids will love helping you create these festive decorations!
Hi friends! Welcome to another awesome DIY that children {and adults} will love recreating this holiday season. This time we are sharing a crafty idea that is perfect for decorating the tree as well!
Today we are are going to ROLL UP those crafty sleeves and make a few DIY salt dough ornaments that not only perfect for ON the Christmas tree BUT you can also add them to your favorite presents and gift bags UNDER it as well. Think of this tutorial as something you can make in bulk {just like cookies} and share the finished creations with others to enjoy as well!
Not to mention, since the supplies and steps are so easy to do, the older kids can help out too. In fact, you can make it a whole family affair and maybe even throw in a small competition of who made the best ornament of them all. You could even challenge it a bit more and have them ONLY use items that are already in the home. Kinda like a “top chef” type thing. Just a thought and hopefully I got those wheels spinning – wink wink!
Well enough chit chat from me, it’s time to get at it. Just check out the full salt dough ornament recipe below and make it happen! I’m sure you have most to all of the needed supplies in the pantry right now. Just remember – these ornaments are not to be eaten. Please supervise kids during and after {as well as pets who might eye them on the tree!}
Happy crafting, my dear friends! Please don’t forget to share pictures of the finished salt dough ornaments on our Facebook page or tag us on Instagram to see! I can’t wait to admire your beautiful Christmas creations! #gluedtomycrafts
RELATED —> Cookie Sheet Craft


This easy salt dough recipe is perfect for kids who want to make Christmas ornaments this year!
Craft Supplies:
- 1 cup Flour
- 1 cup Salt
- 1/2 cup Warm Water
- Christmas Cookie Cutters
- Plastic Straw
- Wax Paper
- Craft Paint
- Paint Brushes
- Small Paper Plate
- Loose Craft Glitter or Glitter Glue
- Twine and/or Ribbon
- Scissors
Directions:
- First things first – get out a large mixing bowl and a cooking spoon.
- Combine the measured out flour, salt and water in the bowl.
- Begin mixing/kneading the ingredients until they are smooth and well combined. This will take some elbow grease and patience! If the mixture is too sticky – add more flour. If too dry – add more water. I highly suggest a tablespoon at a time.
- Once you have the consistency you like, go ahead and set your oven to the lowest temperature it will go.
- Roll out your dough mixture on a clean, flat surface.
- Go ahead and cut various shapes out of it. I find that a little bit of flour on the cookie cutters will help with the process. Also – remember you can easily re-roll/flatten out the remaining dough {again and again} to get a decent amount of ornaments from one recipe.
- Before you get ready to place them in the oven, use the straw to make a hole in each one, where the ribbon will go through.
- Now place a single sheet of wax paper on a clean cookie sheet.
- Using a spatula, carefully lay out your salt dough pieces on the cookie sheet. You don’t necessarily need a lot of space between them but some distance is good.
- When ready, place your cookie sheet in the oven.
- Bake the ornaments for three hours, turning them over every hour till they are hard.
- When the time is up, pull them out and let them cool completely on the cookie sheet.
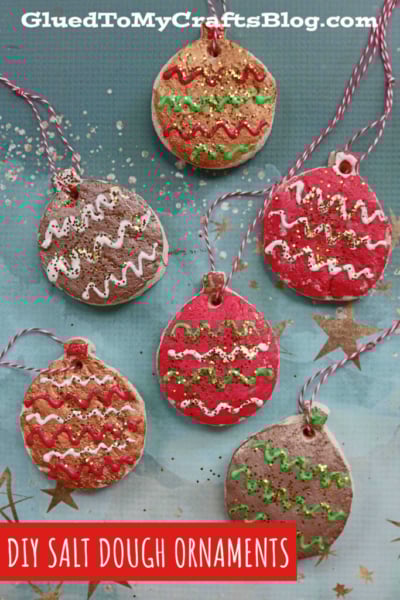
- When ready – decorate them with the craft paint or other embellishments. Really get those creativity juices out with glitter, craft paint and embellishments! We painted ours with a base coat of acrylic paint first, then we added squiggle lines of puffy paint and follow that up with a sprinkle of loose craft glitter. Very basic. My goal was to really make them look like Christmas bulbs on the tree.
- After you make them your own, let them dry completely in an undisturbed area.
- Then string some twine through the pre-cut holes and use the finished salt dough ornaments on the tree or even as gift tags for your presents.
RELATED —> Ribbon Height Keepsake

We made quite a few salt dough ornaments on the day I took these pictures, so I’m planning on tying a few of these salt dough pieces to some fabric gift bags, with some pretty Christmas ribbon and then gifting them with a small grocery store gift card inside. I figured it would be a nice gesture, as well as presentation for the lucky receiver.
And my last tip for this very handmade ornament tutorial post is that with a thin-tip Sharpie marker, you can easily address your gifts to a receiver or write a special message on the back. I always like to throw out that dates and names are ALWAYS needed on finished crafts like this. This way you NEVER forget when it was made or by who. Makes finding these types of handmade ornaments in the Christmas decor box even more special when you pull them out next year.
BTW – If you are looking for a few more gift ideas for kids to make this holiday season, please check out our Christmas keepsake roundup post! #gluedtomycrafts
RELATED —> Hot Chocolate Play Dough

Salt Dough Ornaments For The Tree
Here’s your checklist of supplies to bring this craft to life:
- 1 cup Flour
- 1 cup Salt
- 1/2 cup Warm Water
- Craft Paint
- Ribbon or String
- Loose Craft Glitter
- Plastic Straw
Prepare your creative haven by laying down a protective cover before the crafting magic begins!
Directions:
- First things first - get out a large mixing bowl and a cooking spoon.
- Combine the measured out flour, salt and water in the bowl.
- Begin mixing/kneading the ingredients until they are smooth and well combined. This will take some elbow grease and patience! If the mixture is too sticky - add more flour. If too dry - add more water. I highly suggest a tablespoon at a time.
- Once you have the consistency you like, go ahead and set your oven to the lowest temperature it will go.
- Roll out your dough mixture on a clean, flat surface.
- Go ahead and cut various shapes out of it. I find that a little bit of flour on the cookie cutters will help with the process. Also - remember you can easily re-roll/flatten out the remaining dough {again and again} to get a decent amount of ornaments from one recipe.
- Before you get ready to place them in the oven, use the straw to make a hole in each one, where the ribbon will go through.
- Now place a single sheet of wax paper on a clean cookie sheet.
- Using a spatula, carefully lay out your salt dough pieces on the cookie sheet. You don't necessarily need a lot of space between them but some distance is good.
- When ready, place your cookie sheet in the oven.
- Bake the ornaments for three hours, turning them over every hour till they are hard.
- When the time is up, pull them out and let them cool completely on the cookie sheet.
- When ready - decorate them with the craft paint or other embellishments. Really get those creativity juices out with glitter, craft paint and embellishments! We painted ours with a base coat of acrylic paint first, then we added squiggle lines of puffy paint and follow that up with a sprinkle of loose craft glitter. Very basic. My goal was to really make them look like Christmas bulbs on the tree.
- After you make them your own, let them dry completely in an undisturbed area.
- Then string some twine through the pre-cut holes and use the finished salt dough ornaments on the tree or even as gift tags for your presents.


CLICK HERE TO PRINT THE DIRECTIONS FOR THIS CRAFT