Craft a charming Popsicle Stick Zebra using simple materials! A fun, creative activity kids will love - perfect for imaginative and easy crafting at home!

This kids craft project is perfect for a day spent reading safari themed books. All you need is some paint, popsicle sticks, and cardstock paper! Let your child’s imagination run wild as they create their very own zebra masterpiece within minutes!

Are you looking for a fun and easy craft idea to keep your little ones entertained? Look no further! We have the perfect project that will not only ignite their creativity, but it will also introduce them to a new animal – the black and white striped zebra!
In this blog post, we will show you how to make a zebra using just a few simple materials such as craft sticks, paper and glue!
Whether you’re a parent, teacher or caregiver, this is an enjoyable and educational activity that children of all ages can enjoy.
So roll up your sleeves and get ready to discover an exciting world of stripes and imagination with our “Popsicle Stick Zebra” tutorial!


Get creative with your kiddos and make this fun zebra craft! It’s a great opportunity to use up some popsicle sticks, and you can even let the kids paint them however they want.
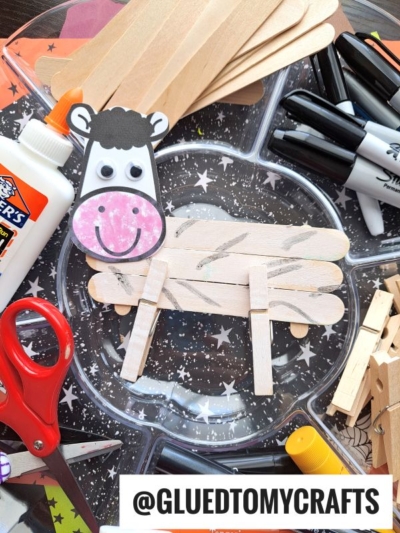
Craft Supplies:
- Jumbo Popsicle Sticks – 4 per craft
- Mini Popsicle Sticks – 2 per craft
- Mini Clothespins – 2 per craft
- Low Temp Glue Gun
- White Craft Paint
- Black Craft Paint
- Small Paper Plate
- Foam Paint Brush
- Small Paint Brush
- White Cardstock Paper
- Zebra Printable – on our landing page
- Gray Crayon
- Craft Scissors
Directions:
- Start by gathering all your wooden craft materials and heating up your glue gun.
- To create the base of your zebra, glue FOUR jumbo popsicle sticks side by side. Then glue TWO mini popsicle sticks across them horizontally, forming a fence-like structure.
- Set the base aside and allow it to dry completely. Repeat this step for each zebra puppet you plan to make.
- Once the popsicle stick base is dry, pour black and white craft paint onto a paper plate.
- Using a foam brush, paint the flat side of the popsicle stick base completely white.
- Paint TWO mini clothespins black, then add simple black stripes to the white popsicle stick base to mimic a zebra’s pattern. Let all the pieces dry fully.
- While the paint dries, grab the zebra head printable and scissors. Cut out one zebra head (the printable allows for up to four zebras, so save the rest for later).
- Color the zebra’s nose area gray to add detail.
- Once the painted popsicle stick base is dry, place it flat on your workspace with the long side facing you. This will serve as the zebra’s body.
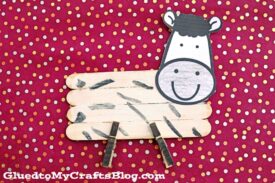
- Glue the paper zebra head to one end of the painted popsicle stick base.
- To finish your popsicle stick zebra, attach the TWO black clothespins to the bottom of the base for legs.
- Add any extra embellishments you’d like—maybe a small bow or some glitter for a fun touch!
- Allow everything to dry completely before displaying your adorable zebra creation with pride!
RELATED —> Paper Plate Zebra
Our house runs on love, coffee and crafts. LOTS OF CRAFTS and most of them centered around popsicle sticks!
If this describes your family and you need more creative ways to use up the stash of craft sticks – you might also enjoy our Popsicle Stick Sloth, Popsicle Stick Alien and Popsicle Stick Macaroon craft tutorials!
Heck – while you are at it, you should also check out our NEWEST Popsicle Stick Hippo post as well!

Popsicle Stick Zebra Craft Idea For Kids
Craft a charming Popsicle Stick Zebra using simple materials! A fun, creative activity kids will love - perfect for imaginative and easy crafting at home!
Here’s your checklist of supplies to bring this craft to life:
Prepare your creative haven by laying down a protective cover before the crafting magic begins!
Directions:
- Start by gathering all your wooden craft materials and heating up your glue gun.
- To create the base of your zebra, glue FOUR jumbo popsicle sticks side by side. Then glue TWO mini popsicle sticks across them horizontally, forming a fence-like structure.
- Set the base aside and allow it to dry completely. Repeat this step for each zebra puppet you plan to make.
- Once the popsicle stick base is dry, pour black and white craft paint onto a paper plate.
- Using a foam brush, paint the flat side of the popsicle stick base completely white.
- Paint TWO mini clothespins black, then add simple black stripes to the white popsicle stick base to mimic a zebra’s pattern. Let all the pieces dry fully.
- While the paint dries, grab the zebra head printable and scissors. Cut out one zebra head (the printable allows for up to four zebras, so save the rest for later).
- Color the zebra’s nose area gray to add detail.
- Once the painted popsicle stick base is dry, place it flat on your workspace with the long side facing you. This will serve as the zebra’s body.
- Glue the paper zebra head to one end of the painted popsicle stick base.
- To finish your popsicle stick zebra, attach the TWO black clothespins to the bottom of the base for legs.
- Add any extra embellishments you’d like—maybe a small bow or some glitter for a fun touch!
- Allow everything to dry completely before displaying your adorable zebra creation with pride!


NEED MORE HELP DOWNLOADING OUR FREE PRINTABLES? PLEASE REFER TO OUR FAQ PAGE
If you've enjoyed our content or have any thoughts to share, we'd love to hear from you! Mention @gluedtomycrafts or tag #gluedtomycrafts on Instagram!