There will be NO CRYING when you get your hands on this unique paper plate cactus fairy house craft idea from us!

There will be NO CRYING when you get your hands on this unique cactus house craft idea from Glued To My Crafts!
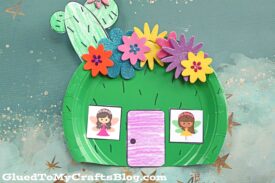
Keep scrolling for the full how-to on this FIRST SEEN HERE Paper Plate Cactus Fairy House craft tutorial! We even have a free printable to get you started even faster!

If you’re looking for a creative and enchanting craft idea to keep your little ones entertained, then look no further! Our Paper Plate Cactus Fairy House craft tutorial is the perfect combination of imagination, nature, and artistic expression.
In this blog post, we will guide you through the step-by-step process of creating a whimsical fairy house using simple materials such as paper plates, paint, and a dash of magic.
Not only will this green cactus inspired craft project provide hours of entertainment, but it also encourages children to explore their creativity and connect with nature.
So, gather your supplies and get ready to embark on a magical crafting adventure that will surely become a favorite among your little ones!


Calling all moms, teachers and creative people looking for a fun craft project to do with kids – have we got an idea for you!
Craft Supplies:
- Large Paper Plate – 1 per craft
- Fairy House Printable {on our spring landing page}
- White Cardstock Paper
- Scissors
- Markers/Crayons
- Flower Stickers
- School Glue
- Stapler
- Embellishments
Directions:
- First things first – cut off a small section of your large paper plate to make the bottom of the fairy house flat.
- Discard the small piece you just cut off.
- Next up – if need be – paint the paper plate completely green with craft paint. If you bought pre-colored green paper plates, skip this step.
- If painting, set aside the paper plate to let it dry completely.
- Now download and print the FREE fairy house printout listed above in the supply list.
- Print out the file in color on a single sheet of white cardstock. You only need to print one out per craft.
- Go ahead and color in the cactus pieces GREEN and the single door piece however you like.
- Use the Sharpie marker to draw on “spikes” on paper pieces you just colored green green.
- Once everything is colored, use scissors to trim out each section in the printable.
- Now decide which windows you are going to use for your craft {you only need two windows.} There are several different versions of fairies in windows.
- Next up – grab your trimmed down paper plate piece from earlier, the stapler and the school glue.
- Start gluing and stapling your paper pieces to the paper plate, in their designated spots. The cactus pieces will go towards the top/sides and I highly suggest you start with the large oval pieces & work from there.
- Now go ahead and also glue/staple the flowers on top of the paper plate to create a roof line.
- At this point in time you can use the black Sharpie marker again, to draw on “spikes” in any blank areas that you think need some filler.
- Now add anything else you like for that custom look {like some stickers or glitter!} before displaying proudly!
RELATED —> Puffy Paint Cactus

Come get extra crafty with us with our unique craft ideas!
Come check out the super popular Chalk Art Troll Hair and Popsicle Stick Koala posts on Glued To My Crafts right now!

Paper Plate Cactus Fairy House Craft Idea For Kids
There will be NO CRYING when you get your hands on this unique paper plate cactus fairy house craft idea from us!
Here’s your checklist of supplies to bring this craft to life:
Prepare your creative haven by laying down a protective cover before the crafting magic begins!
Directions:
- First things first - cut off a small section of your large paper plate to make the bottom of the fairy house flat.
- Discard the small piece you just cut off.
- Next up - paint the paper plate completely green with craft paint.
- Set aside the paper plate to let it dry completely.
- Now print out our provided printable, in color, on a single sheet of white cardstock paper.
- Go ahead and color in the cactus pieces GREEN and the single door piece however you like.
- Use the Sharpie marker to draw on "spikes" on paper pieces you just colored green green.
- Once everything is colored, use scissors to trim out each section in the printable.
- Now decide which windows you are going to use for your craft {you only need two windows.} There are several different versions of fairies in windows.
- Next up - grab your trimmed down paper plate piece from earlier, the stapler and the school glue.
- Start gluing and stapling your paper pieces to the paper plate, in their designated spots. The cactus pieces will go towards the top/sides and I highly suggest you start with the large oval pieces & work from there.
- Now go ahead and also glue/staple the flowers on top of the paper plate to create a roof line.
- At this point in time you can use the black Sharpie marker again, to draw on "spikes" in any blank areas that you think need some filler.
- Now add anything else you like for that custom look {like some stickers or glitter!} before displaying proudly!


NEED MORE HELP DOWNLOADING OUR FREE PRINTABLES? PLEASE REFER TO OUR FAQ PAGE
If you've enjoyed our content or have any thoughts to share, we'd love to hear from you! Mention @gluedtomycrafts or tag #gluedtomycrafts on Instagram!