
Looking for a fun and easy craft idea for kids? This paper plate strawberry craft is perfect for spring!

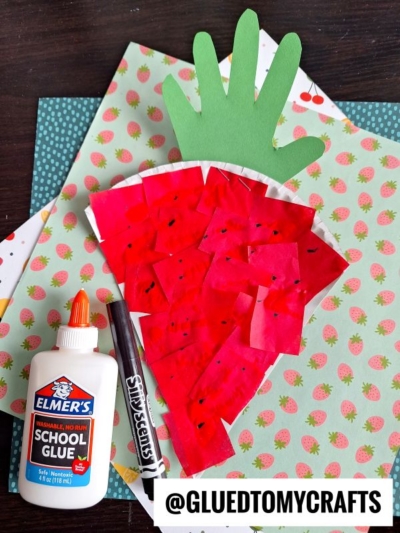
Paper Plate Red Strawberry
Now that you landed on today’s Paper Plate Strawberry post, did you know that May is National Strawberry Month?
Yup – that means strawberries are officially in season and are going to be popping up everywhere in your grocery stores, on your kitchen table & even on your Pinterest feed! It’s going to be STRAWBERRY everything, everywhere!
This makes my heart super happy because I personally LOVE fresh strawberries.
Whether in a yummy dessert or on their own – I can personally eat them all day. It’s a sweet reminder that summer is on it’s way! {Another fun fact – I use to help pick strawberries from my German grandmother’s backyard and she would make fresh jam with them afterwards. I guess that’s why I love strawberries so much. It reminds me of my childhood!}
Another thing I love? Doing easy crafts with my son. It’s the perfect excuse to grab some supplies and sit down for some “us” time. Recently we did this Paper Plate Red Strawberry themed craft together {in honor of National Strawberry Month} and it’s what I’m sharing with you all today!
Though it’s not as tasty as the real deal – it’s still fun, BERRY SWEET and I hope you are inspired to put it into your craft plans today. So find the full tutorial below, so you can make it happen! Happy crafting, my dear friends!
RELATED —> Paper Plate Pineapple

Get in the spring spirit with this fun paper plate strawberry craft for kids! They’ll love learning how to make this sweet treat.
Craft Supplies:
- Large Paper Plate – 1 per craft
- Scissors
- Red Tissue Paper
- School Glue
- Black Marker
- White Cardstock Paper
- Green Craft Paint
- Large Paint Brush
- Small Paper Plate
- Baby Wipes
- Stapler
Directions:
- First trim your LARGE paper plate, to look like a triangle/pizza slice. This is the body of the strawberry.
- Next – grab the red tissue paper and scissors.
- Cut your tissue paper into 1×1″ squares.
- Now put a good layer of school glue on the paper plate triangle.
- Have your child stick their red squares on the paper plate, until it’s completely covered.
- Next – use the black sharpie marker to give the strawberry some dimension by making “dots” all over the tissue paper covered paper plate.
- When done decorating the paper plate, set it aside to let dry completely.
- Next up – the handprint greenery. Grab the craft paint, paint brush, paper and smaller paper plate.
- Squirt some green craft paint on the small paper plate.
- Using the green paint, make one or two handprints from your child on the white paper.
- Use baby wipes to clean off excess craft paint from their hands {as well as sending them to the sink for a quick wash down!}
- After their hands are clean, go ahead and set aside the paper with the painted handprint on it.
- When it’s dry enough, cut out the print with the scissors. This is now the greenery for the strawberry.
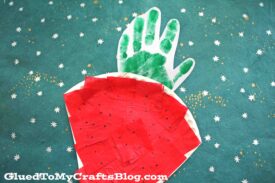
- The last step – staple the handprint cutout{s} to the top of the “strawberry” to complete the craft!
- Then display your finished paper plate and tissue paper red strawberry proudly for ALL to see!
RELATED —> Strawberry Fairies

BTW – this paper plate craft idea is also perfect to turn into a carrot {see our Paper Plate Carrot post for the details on that!!!}
I hope my paper plate strawberry craft post inspired you! Be sure to also check out our Cheerio Corn on the Cob and Popsicle Stick Strawberry craft posts for TWO more DIY ideas to recreate with your child today!
Paper Plate Strawberry Craft Idea
Here’s your checklist of supplies to bring this craft to life:
Prepare your creative haven by laying down a protective cover before the crafting magic begins!
Directions:
- First trim your LARGE paper plate, to look like a triangle/pizza slice. This is the body of the strawberry.1 Large Paper Plate
- Next - grab the red tissue paper and scissors.Tissue Paper
- Cut your tissue paper into 1x1" squares.
- Now put a good layer of school glue on the paper plate triangle.
- Have your child stick their red squares on the paper plate, until it's completely covered.
- Next - use the black sharpie marker to give the strawberry some dimension by making "dots" all over the tissue paper covered paper plate.
- When done decorating the paper plate, set it aside to let dry completely.
- Next up - the handprint greenery. Grab the craft paint, paint brush, paper and smaller paper plate.Craft Paint
- Squirt some green craft paint on the small paper plate.
- Using the green paint, make one or two handprints from your child on the white paper.Cardstock Paper
- Use baby wipes to clean off excess craft paint from their hands {as well as sending them to the sink for a quick wash down!}
- After their hands are clean, go ahead and set aside the paper with the painted handprint on it.
- When it's dry enough, cut out the print with the scissors. This is now the greenery for the strawberry.
- The last step - staple the handprint cutout{s} to the top of the "strawberry" to complete the craft!
- Then display your finished paper plate and tissue paper strawberry proudly for ALL to see!

Grab our favorite books via our Amazon affiliate link! In our Amazon storefront you will find books, toys and craft supplies we absolutely love using for our Glued To My Crafts tutorials!
