Let your kiddos creative spirit run wild this winter and help them make beautiful paper trees on paper, with this easy craft tutorial!
Winter Tree Landscape Paper Craft Idea
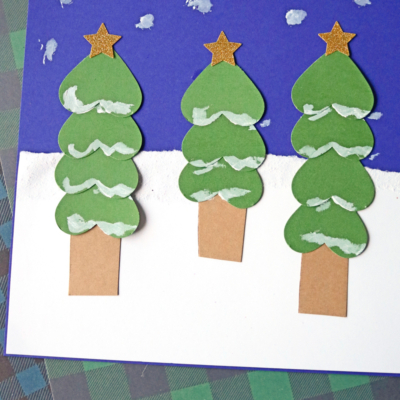
Today’s paper winter tree landscape craft tutorial, makes use of a simple idea that many of us can recreate with ease. We are stacking various paper heart cutouts to make them look like trees and then adding some white elements to the mix, to make the snowy landscape appear underneath.
It’s a great craft idea to do indoors with the kids to pass the time this season. I bet you don’t even need to rush to the craft store for supplies!
Our paper winter tree craft is super easy and fun for a wide-range of crafters! I highly encourage the adults to join their child in the making!
Keep scrolling for more details and my suggestions of craft supplies, so you can recreate it today. Then, when you are done, come share some pictures of the end result on our Facebook page to admire! I just know you are going to make some beautiful paper landscape pieces! #gluedtomycrafts
RELATED: Broccoli Stamped Winter Tree and Popsicle Stick Christmas Tree Wagon

Here is an easy way to turn plain paper into a winter tree landscape. This craft idea would be great for kids or even adults who are just beginning with arts and crafts!
Craft Supplies:
- Blue Cardstock Paper
- Green Cardstock Paper
- White Cardstock Paper
- Brown Cardstock Paper
- Heart Craft Punch
- Glue Stick
- Paint Crayon
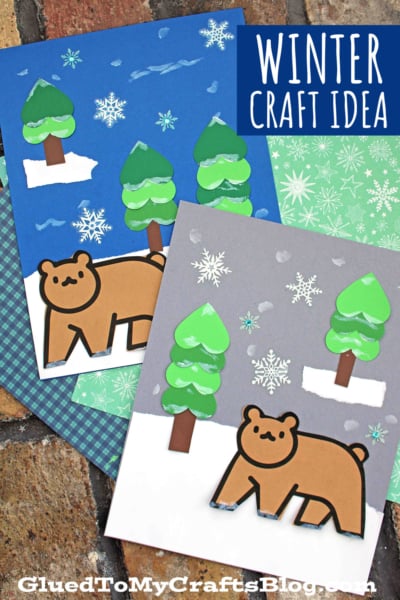
- Bear Printable – on our landing page
Directions:
- First things first – grab your green cardstock paper and heart craft punch.
- Punch out several heart shapes for your “trees.” You want two-three heart cutouts per tree you are putting in your landscape.
- Set them aside.
- Now grab your brown cardstock and scissors.
- Cut out a rectangle “tree stump” for each tree you are making.
- Set those aside.
- Now grab your blue and white cardstock paper.
- TEAR your white cardstock paper to create the “snow” on the bottom of the craft.
- Go ahead and glue the white piece to the blue cardstock paper to start setting the scene.
- Once you have that done, go ahead and start gluing your tree shapes, along with the tree stumps, on your cardstock in various places to make your field of trees.
- If desired, cut out one of the bear shapes from our FREE bear printable and glue him in place in your winter scene.
- Finally – grab the white paint crayon and gently color in some “snow” on the trees, as well as in the sky for “snow flurries.”
- Add anything else you like, to the paper piece, to set the winter scene.
- Then display it proudly for all to see!
- Don’t forget to snap a few pictures of your paper winter tree creations and share them on your social media sites with us! #gluedtomycrafts
RELATED —> Snowmen Poem Keepsake

Don’t click away just yet! We have the BEST of the BEST kid craft tutorials for winter! Check out our Reindeer Star, Snowman Sleigh and Winter Tree craft posts!
We also have a great PRIVATE FACEBOOK GROUP, where I share ideas that haven’t made it to Glued To My Crafts just yet!
Come join us in the sneak peeks, as well as having the opportunity to easily share pictures of your paper winter tree landscape creations with us, when you are done! #gluedtomycrafts

Paper Winter Tree Landscape Craft
Here’s your checklist of supplies to bring this craft to life:
- Cardstock Paper
- Craft Paint
- Embellishments
Prepare your creative haven by laying down a protective cover before the crafting magic begins!
Directions:
- First things first - grab your green cardstock paper and heart craft punch.
- Punch out several heart shapes for your "trees." You want two-three heart cutouts per tree you are putting in your landscape.
- Set them aside.
- Now grab your brown cardstock and scissors.
- Cut out a rectangle "tree stump" for each tree you are making.
- Set those aside.
- Now grab your blue and white cardstock paper.
- TEAR your white cardstock paper to create the "snow" on the bottom of the craft.
- Go ahead and glue the white piece to the blue cardstock paper to start setting the scene.
- Once you have that done, go ahead and start gluing your tree shapes, along with the tree stumps, on your cardstock in various places to make your field of trees.
- Go ahead and at this time adding the star stickers on top of each tree.
- Finally - grab the white paint crayon and gently color in some "snow" on the trees, as well as in the sky for "snow flurries."
- Add anything else you like, to the paper piece, to set the winter scene.
- Then display it proudly for all to see!

NEED MORE HELP DOWNLOADING OUR FREE PRINTABLES? PLEASE REFER TO OUR FAQ PAGE