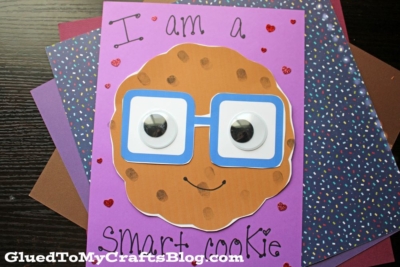
You are one SMART COOKIE for checking out our latest thumbprint craft tutorial for kids! Just keep on scrolling to recreate it with your kiddo today!
Fingerprint Cookie Craft Idea
One inspiration leads to another. My “cupcake liner tough cookie” post has been so popular the last few days, that I decided to brainstorm on how I can expand on that. Hence today’s Thumbprint Smart Cookie post. I’ve even included TWO free printable templates to get you started on this crafty idea!
And as I was making this cookie craft come to life with my son, he brought up some interesting points!
When I asked him to make the black thumbprints on the cookie, he said “I’m going to make 100 thumbprints on mine!”
Although he didn’t reach his goal {he kinda went off the beaten path at one point} it did get me thinking that this would be a great 100 days of school activity. Then I got to thinking some more – you could have children pull random numbers from a hat or use their age for the thumbprint “chocolate chips.”
So many ideas – I just hope you are inspired by this post! On that note, check out the full tutorial and free templates below! Happy crafting, my friends!
RELATED —> Popsicle Stick Cookie Monster
Let your little ones flex their creativity with this fun and unique thumbprint smart cookie craft!
Craft Supplies:
- Cooke Printables – on our landing page
- White Cardstock Paper
- Washable Black Ink Pad
- Baby Wipes
- Scissors
- Adhesive
- Black Marker
- Large Wiggle Eyes
Directions:
- First print the two provided printables listed above in the supply list. Print them both in color, on simple white cardstock paper. You will need both printables for the craft. This is two pieces of paper per child.
- Now grab the tan cookie printout and black ink pad.
- Have children use their finger or thumb to make “chocolate chip” prints all over the inside of the cookie.
- Use baby wipes to clean off excess ink from their fingers.
- Set aside the cookie print.
- Next, using scissors, trim out the glasses from the other printable but DON’T cut out the inside lenses {you can if you want but it can be tricky for younger kids!}
- Once the glasses are cut out, adhere them to the center of the cookie printable.
- Now grab your wiggle eyes. Adhere those to the center of the glasses.
- Finally and the last step for this Paper Smart Cookie craft, take the black Sharpie marker and draw a smiley face on your newly made friend.
- Then display proudly for all to see!
RELATED —> Thumbprint Dandelion
Do you love this “thumbprint chocolate chip smart cookie” craft idea? Then you might also enjoy our Tissue Paper Chocolate Chip Cookie craft tutorial!
Thumbprint Smart Cookie Craft Idea For Kids
Here’s your checklist of supplies to bring this craft to life:
Prepare your creative haven by laying down a protective cover before the crafting magic begins!
Directions:
- First print the two provided printables listed above in the supply list. Print them both in color, on simple white cardstock paper. You will need both printables for the craft. This is two pieces of paper per child.
- Now grab the tan cookie printout and black ink pad.
- Have children use their finger or thumb to make "chocolate chip" prints all over the inside of the cookie.
- Use baby wipes to clean off excess ink from their fingers.
- Set aside the cookie print.
- Next, using scissors, trim out the glasses from the other printable but DON'T cut out the inside lenses {you can if you want but it can be tricky for younger kids!}
- Once the glasses are cut out, adhere them to the center of the cookie printable.
- Now grab your wiggle eyes. Adhere those to the center of the glasses.
- Finally and the last step for this Paper Smart Cookie craft, take the black Sharpie marker and draw a smiley face on your newly made friend.
- Then display proudly for all to see!


NEED MORE HELP DOWNLOADING OUR FREE PRINTABLES? PLEASE REFER TO OUR FAQ PAGE


