
Looking for a fun and easy kids craft idea? This one is perfect! Let your child create their own creepy crawly bugs using thumbprints. Super simple and lots of fun!
These are the ONLY creepy crawly bugs I want to see – EVER! Check out my Mixed Media Picnic Ants craft idea!
It ALL started from a single pack of red “picnic print” napkins I found at my local Dollar Tree.
Then I got to brainstorming and today I present to you my Thumbprint Ants kid craft idea {boy is that a mouth full but I promise it’s not as complicated!}
Don’t let the ants spoil this picnic! The more ants on the picnic blanket, the better it is! You could even add some fruit and veggie stickers around the craft, for even MORE crafty fun! We just hope we inspired you along the way as you make our idea come to life 🙂
Happy crafting my friends! Don’t forget to share pictures of your paper picnic creations w/fingerprint ants with us! You can ALWAYS tag us on Instagram for easy sharing! I can’t wait to see what you make with your little crafter today! #gluedtomycrafts
RELATED —> Wooden Spoon Ant Puppet

Get creative with the kids and make these adorable thumbprint ant craft! The perfect boredom buster craft activity!
Craft Supplies:
- Green Cardstock Paper
- White Cardstock Paper
- Picnic Print Napkins
- Washable Black Craft Paint
- Small Paper Plate
- Baby Wipes
- Black Marker
- Small Wiggle Eyes
- School Glue
- Craft Scissors
Directions:
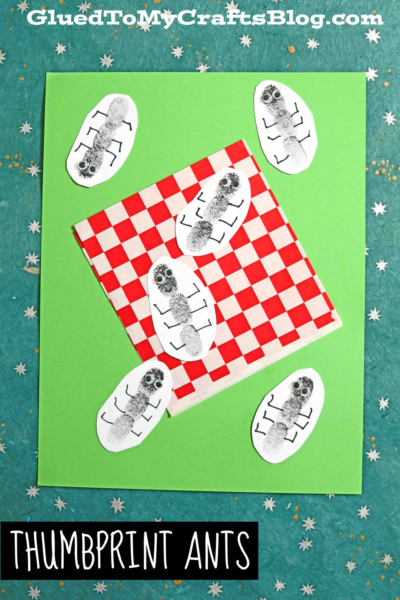
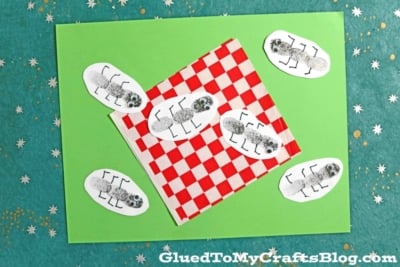
- First glue down your napkin to the center of the green color cardstock. Set aside for later.
- Next grab your white cardstock, paper plate and black craft paint. Squirt some paint on the paper plate.
- Have children dip their thumb in the black craft paint, then on the white cardstock, three times in a row to create a body for an ant. Repeat, leaving space between each “ant” body. You will want lots of ants!
- Once done, set aside to let it dry a bit.
- When it’s dry enough, draw on legs to each thumbprint stack, with the black Sharpie and glue on wiggle eyes for the ants to see.
- Then use scissors to trim out each cardstock ant piece. It doesn’t need to be perfect. Some white around the edges is ok and totally perfect 🙂
- Finally, to finish off the mixed media picnic craft – glue your finished ant pieces all over the original napkin piece. Add other embellishments you see fit.
- Then display proudly for ALL to see!
RELATED —> Counting Ants Game For Toddlers

We LOVE mixed media pieces! It’s the best kind of craft time when random ideas come together for masterpieces!!!
Be sure to check out our Snowy Birdhouse and Teddy Bear Picnic craft posts! If you do make any of our crafty tutorials, be sure to share your images using the #gluedtomycrafts on your various social media sites for us to find and share from!

Thumbprint Ants Picnic Craft
Here’s your checklist of supplies to bring this craft to life:
- Cardstock Paper
- Picnic Print Napkins
- Washable Ink Pads
- Wiggle Eyes
Prepare your creative haven by laying down a protective cover before the crafting magic begins!
Directions:
- First glue down your napkin to the center of the green color cardstock. Set aside for later.
- Next grab your white cardstock, paper plate and black craft paint. Squirt some paint on the paper plate.
- Have children dip their thumb in the black craft paint, then on the white cardstock, three times in a row to create a body for an ant. Repeat, leaving space between each "ant" body.
- Once done, set aside to let it dry a bit.
- When it's dry enough, draw on legs to each thumbprint stack, with the black Sharpie and glue on wiggle eyes for the ants to see.
- Then use scissors to trim out each cardstock ant piece. It doesn't need to be perfect. Some white around the edges is ok and totally perfect 🙂
- Finally, to finish off the mixed media picnic craft - glue your finished ant pieces all over the original napkin piece. Add other embellishments you see fit.
- Then display proudly for ALL to see!

CLICK HERE TO PRINT THE DIRECTIONS FOR THIS CRAFT