Let your child's creativity BLOSSOM with our simple "Cherry Blossom Tree Branch" craft tutorial! It's perfect for spring celebrations!


Let your child’s creativity BLOSSOM with today’s simple Popsicle Stick Cherry Blossom Tree Branch craft idea! It’s super unique and a first-seen-here idea for Glued To My Crafts!
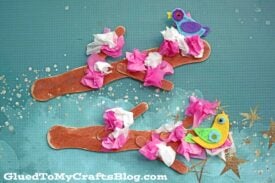
Using just simple supplies like wooden craft sticks, colored tissue paper and glue – you and your child can “grow” a one of a kind piece that is perfect to welcome spring into your home this season! Top it with a fun spring themed “bird sticker” and you will have the perfect craft to welcome the next season into your home!
So let’s stop the small chit chat. Go grab our craft supplies, check out the full cherry blossom tree tutorial below and get ready to make some stunning spring flower tree art pieces, just like the real thing!
Happy crafting my friends!!! Please don’t forget to share pictures with us of your child’s finished craft stick cherry blossom branches, by tagging us on Instagram! We can’t wait to see what you both create! #gluedtomycrafts

Learn how to make this beautiful cherry blossom tree branch craft with popsicle sticks! This craft is perfect for kids of all ages.
Craft Supplies:
Gather these supplies before starting your popsicle stick cherry blossom branch craft:
- Wavy Craft Stick – 1 per craft
- Mini Popsicle Sticks – 3 per craft
- Brown Craft Paint
- Small Paint Brush
- Small Paper Plate
- Pink Tissue Paper
- White Tissue Paper
- Paper Scissors
- School Glue
- Small Bird Sticker
Directions:
- First have children design and glue their popsicle stick tree base together. This is done by gluing mini popsicle sticks {branches} all over a single wavy popsicle stick {the trunk.}
- Once done, have them set it aside to let it dry completely.
- Once dry, go ahead and have children paint their new popsicle stick design completely brown. Simply squirt the brown craft paint on the paper plate and have them use a small paint brush for this task.
- While they are working on the painting step, grab your scissors and the pink & white tissue paper.
- Cut a small amount of each color, into small 2×2 inch squares {maybe even a bit smaller.}
- Have children take a single piece of tissue paper, crumble it up a bit with their hands and then glue it on their popsicle stick design, to represent the cherry blossoms.
- Repeat until you have a nice full tree.
- Finally – add the bird sticker anywhere on the cherry blossom tree piece.
- When done, set it all side to let it dry completely before displaying proudly!
- Don’t forget to share pictures of your popsicle stick cherry blossom branch with us! #gluedtomycrafts
RELATED —> Thumbprint Cherry Card

If you are looking for even MORE easy cherry blossom themed kids craft ideas, be sure to check out these fun posts listed below. All of which are conveniently located on our website right now!
- Bubble Wrap Cherry Blossom Tree
- Thumbprint Cherry Blossom Tree Branch
- Q-Tip Painted Cherry Blossom Tree
- Confetti Cherry Blossom Tree
- Cherry Blossom Popcorn Tree
- Cherry Blossom Tree Crafts
- Paper Plate Cherry Blossom Tree

Popsicle Stick Cherry Blossom Tree Branch Craft Idea
Let your child's creativity BLOSSOM with our simple "Cherry Blossom Tree Branch" craft tutorial! It's perfect for spring celebrations!
Here’s your checklist of supplies to bring this craft to life:
- 1 Wavy Paddle Fan Stick
- 3 Mini Popsicle Sticks
- Tissue Paper
- Craft Paint
- Embellishments
- School Glue
Prepare your creative haven by laying down a protective cover before the crafting magic begins!
Directions:
- First have children design and glue their popsicle stick tree base together. This is done by gluing mini popsicle sticks {branches} all over a single wavy popsicle stick {the trunk.}
- Once done, have them set it aside to let it dry completely.
- Once dry, go ahead and have children paint their new popsicle stick design completely brown. Simply squirt the brown craft paint on the paper plate and have them use a small paint brush for this task.
- While they are working on the painting step, grab your scissors and the pink & white tissue paper.
- Cut a small amount of each color, into small 2x2 inch squares {maybe even a bit smaller.}
- Have children take a single piece of tissue paper, crumble it up a bit with their hands and then glue it on their popsicle stick design, to represent the cherry blossoms.
- Repeat until you have a nice full tree.
- Finally - add the bird sticker anywhere on the cherry blossom tree piece.
- When done, set it all side to let it dry completely before displaying proudly!

Grab our favorite books via our Amazon affiliate link! In our Amazon storefront you will find books, toys and craft supplies we absolutely love using for our Glued To My Crafts tutorials!
If you've enjoyed our content or have any thoughts to share, we'd love to hear from you! Mention @gluedtomycrafts or tag #gluedtomycrafts on Instagram!