
This fox kids craft idea is so easy and fun! You can make these little cuties in minutes and they’ll brighten up your home today!
Popsicle Stick & Paper Fox Craft
So what does the fox say?!? Do you remember that catchy song from awhile back?!
I’ve noticed that this time of year, foxes seem to make their appearance more and more with the winter season, so that’s exactly what inspired our latest kid craft post {it also may have started with a fun cookie jar from World Market but that’s a story for another day….}
So without further ado – check out the full paper & wood fox craft tutorial below so you and your child can make some friendly wood craft stick woodland creatures with just a few simple supplies and creative spirit!
Then easily add some ribbon to the back of these Popsicle Stick Foxes for instant Christmas ornaments or maybe even add some magnets to the back so you can display your adorable red & orange foxes proudly on the fridge. Whatever you do – I sure hope we inspire you! Happy crafting my “foxy” friends!!!
RELATED —> Paper Bag Fox

This is a fun and easy kids craft that will keep them entertained for hours. All you need are some popsicle sticks and cardstock paper. Let kids get creative with the colors and have fun displaying their new fox creations on the fridge.
Craft Supplies:
Before we start, gather the following supplies. Most of these items are easy to find at home or can be purchased at any craft store.
- Jumbo Popsicle Sticks – 3 per craft
- School Glue
- Craft Scissors
- Orange Cardstock Paper
- Black Cardstock Paper
- Orange {or red} Scrapbook Paper
- Orange {or red} Craft Paint
- Paint Brush
- Small Paper Plate
- Small Wiggle Eyes
- Brown Pom Poms
Directions:
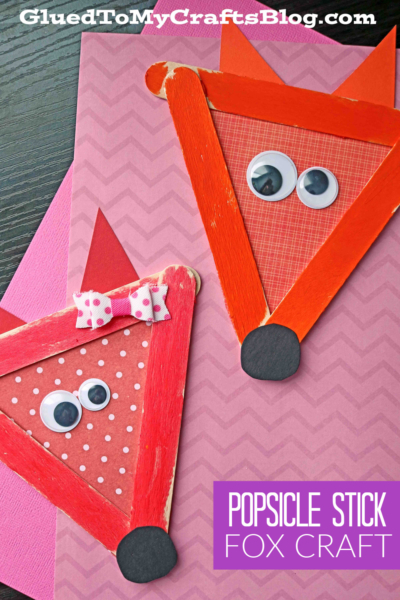
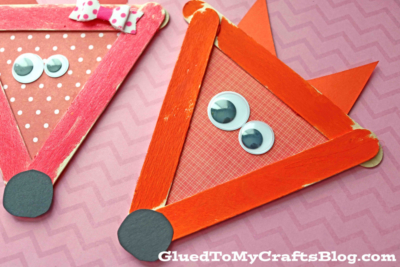
- First grab three popsicle sticks {three per fox} and glue them together to look like a triangle.
- Set aside to let it dry completely. Repeat for each fox you want to make today.
- While those are drying, grab your scrapbook paper and cut a triangular shape that will be placed within the popsicle stick design and be the face of the fox.
- At this time, you should also cut out two smaller triangles and a small circle nose from the remaining cardstock paper for the fox’s ears & nose.
- To finish off the Popsicle Stick Fox – have children paint their popsicle stick design completely with the craft paint, as well as gluing the paper pieces and eyes/nose in place.
- Once done, set aside to let it dry completely before displaying proudly!
RELATED —> Burlap Woodland Gift Tags
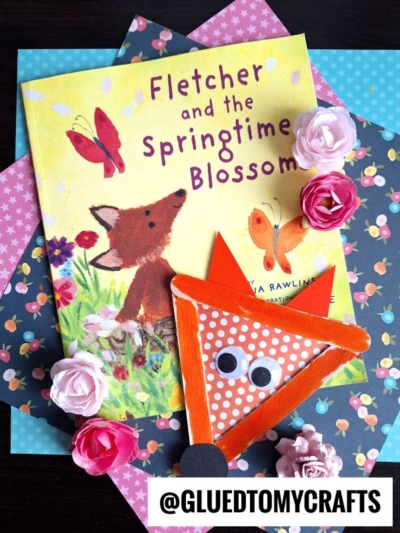
AFFILIATE LINK – PAIR OUR CRAFT IDEA WITH “FLETCHER AND THE SPRINGTIME BLOSSOMS” BOOK
This paper and popsicle stick fox craft is not just a fun activity but a way to bond, create memories, and teach kids new skills. With simple supplies and easy-to-follow steps, it’s the perfect weekend or classroom project.
Why not give it a try this week? Gather your materials, roll up your sleeves, and start creating adorable fox friends!
If you enjoyed this craft, make sure to check out more DIY ideas on our blog for endless creative inspiration. Happy crafting, my friends!
Popsicle Stick Fox Craft Idea For Kids
Here’s your checklist of supplies to bring this craft to life:
- School Glue
- 1 Scissors
Prepare your creative haven by laying down a protective cover before the crafting magic begins!
Directions:
- First grab three popsicle sticks {three per fox} and glue them together to look like a triangle.3 Jumbo Popsicle Sticks
- Set aside to let it dry completely. Repeat for each fox you want to make today.
- While those are drying, grab your scrapbook paper and cut a triangular shape that will be placed within the popsicle stick design and be the face of the fox.Scrapbook Paper
- At this time, you should also cut out two smaller triangles and a small circle nose from the remaining cardstock paper for the fox's ears & nose.Cardstock Paper
- To finish off the Popsicle Stick Fox – have children paint their popsicle stick design completely with the craft paint, as well as gluing the paper pieces and eyes/nose in place.Craft Paint, 2 Wiggle Eyes, 1 Small Pom Pom
- Once done, set aside to let it dry completely before displaying proudly!

Grab our favorite books via our Amazon affiliate link! In our Amazon storefront you will find books, toys and craft supplies we absolutely love using for our Glued To My Crafts tutorials!
