Glued To My Crafts

Join thousands of others who have gotten GLUED to our craft tutorials!

  • Home
  • Privacy Policy
  • Craft Safety Guidelines
  • Seasonal Themes
    • New Years
    • Valentine’s Day
    • St. Patrick’s Day
    • Spring
    • Easter
    • Mother’s Day
    • Summer
    • Father’s Day
    • Patriotic
    • Halloween
    • Thanksgiving
    • Fall
    • Winter
    • Christmas
    • Snowmen
    • Story Time
  • Favorite Craft Materials
    • Cupcake Liners
    • Torn Paper Crafts
    • Paper Plates
    • Popsicle Sticks
    • Sidewalk Chalk
    • Clothespin Crafts
    • Tulip Puffy Paint
    • Paper Bags
    • Craft Foam Hearts
    • Puffy Paint
  • About Us
  • Monthly Themes
    • January Craft Ideas
    • February Craft Ideas
    • March Craft Ideas
    • April Craft Ideas
    • May Craft Ideas
    • June Craft Ideas
    • July Craft Ideas
    • August Craft Ideas
    • September Crafts
    • October Crafts
    • November Crafts
    • December Crafts

Fork Painted Christmas Tree Craft

When engaging in craft activities, it is important for young children to have adult supervision at ALL times. It is also recommended to use supplies that are suitable for your child's age. Feel free to modify materials or steps to meet your specific requirements. Please refer to our safety guidelines for more information.

As an Amazon Associate I earn from qualifying purchases. This post may contain affiliate links. For more information, please see our disclosure policy.

It's the perfect excuse to get messy & make an awesome piece to show off on the fridge ALL month long
SKIP THE FLUFF AND PRINT THE DIRECTIONS
Fork Painted Christmas Tree - Free Printable Included!

Get crafty this Christmas! Make a fun and festive fork-painted tree to brighten up your home for the holidays.

Fork Painted Christmas Tree - Free Printable Included!

Fork Painted Holiday Tree Craft Idea For Kids

At Glued To My Crafts, we are so excited to be finally hitting publish today on this Fork Painted Holiday Tree craft idea! Although it’s not a unique idea to our website, I sure hope the free tree shape printable I’ve included below, will get you excited to recreate it “our” way today!

On that note, this latest “fork painted” craft idea from us, is the perfect excuse to get messy with the kids AND make an awesome piece to show off on the fridge ALL month long. No two plastic fork designed Christmas trees on paper will be alike and I think that’s my favorite part of it all!

Below you will find the free printable, so all you need to do is print the file, grab some green craft paint and have children use a plastic fork as their paint brush to complete the Christmas craft within minutes. It’s so simple, you have NO excuse NOT to do it!

So what are you waiting for? Go ahead and access the freebie file below & get to work on creating a one-of-a kind Fork Painted Christmas Tree pieces today.

Happy crafting this upcoming holiday season, my friends! Don’t forget to share pictures of your child’s fork painted holiday tree crafts with us on our Facebook page. I can’t wait to see them! #gluedtomycrafts

RELATED —> Handprint Fireplace Keepsake

Fork Painted Christmas Tree Craft IdeaFork Painted Christmas Tree Craft Idea

Get your kids in the holiday spirit with this fun and easy Christmas craft using forks!

Craft Supplies:

  • Tree Printable – on our landing page
  • White Cardstock Paper
  • Brown Crayon or Marker
  • Green Craft Paint
  • Plastic Fork
  • Small Paper Plate
  • Baby Wipes
  • Craft Glitter
  • Rhinestone Stickers
  • Large Star Sticker

Directions:

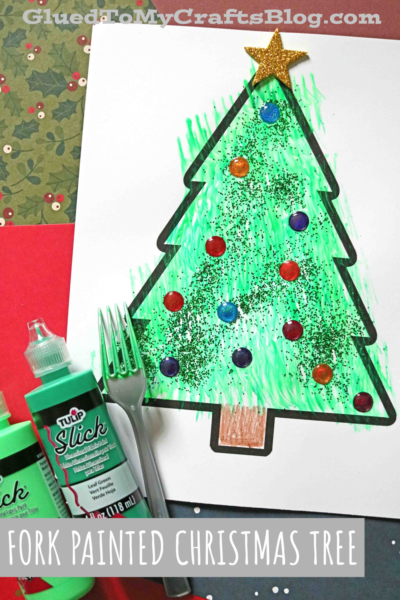
  • First print out the Christmas Tree printable, in color, on a single sheet of white cardstock paper. You need one print per Christmas craft.
  • Next grab your brown crayon or marker and color in the “tree stump” on the printable.
  • Now we are ready for the paint! Grab your green craft paint, the plastic fork and the small paper plate.
  • Squirt some craft paint on the paper plate.
  • Go ahead and rub the plastic fork in the green paint.
  • Next, using the plastic fork, make several “pine needles” inside the tree design on your cardstock paper. Add as much or as little as you like. Just keep dipping the plastic fork in the paint and then on the paper.
  • When done with the above step, go ahead and shake on some loose craft glitter on top of the wet paint on the paper.
  • To finish off the paper Christmas tree craft, glue on the remaining elements {the star and rhinestones} to complete the holiday look!
  • And of course – add any other embellishments you see fit.
  • Then allow your piece to dry completely before you display it proudly!

RELATED —> Fork Painted Santa Beard

Fork Painted Snowy Tree - Kid Craft Idea For Winter

Don’t forget – “if” you decide to make our Fork Painted Christmas Tree craft this season, please share a picture of the finished piece on our Facebook page for us to see.

We love seeing our inspiration come to life and can’t wait to admire your child’s finished fork Christmas tree painting from a far!

And one last thing – be sure to also tell your friends and family about the great craft idea you found on Glued To My Crafts today! We would really appreciate it!

stacey-signature-2023


Fork Painted Christmas Tree - Free Printable Included!

Fork Painted Christmas Tree

PRINT THIS TUTORIAL
It's the perfect excuse to get messy & make an awesome piece to show off on the fridge ALL month long
SHARE ON FACEBOOK SHARE ON TWITTER PIN ON PINTEREST SHARE BY EMAIL SAVE VIA SLICKSTREAMSAVE VIA SLICKSTREAM SHOP OUR AMAZON STOREFRONT
click-here-to-head-to-our-landing-page-gluedtomycrafts

NEED HELP DOWNLOADING OUR FREE PRINTABLES? PLEASE REFER TO OUR FAQ PAGE

If you've enjoyed our content or have any thoughts to share, we'd love to hear from you!Mention @gluedtomycrafts or tag #gluedtomycrafts!
PRINT THIS TUTORIAL

Craft Activity Safety Guidelines:

Always Ensure Adult Supervision - Young children should be supervised at all times when engaging in craft activities. This is essential to keep them safe and ensure materials are used correctly. Use Age-Appropriate Supplies - Choose craft supplies that are suitable for your child’s age. Check labels for recommendations and avoid items with small parts or sharp edges for younger children. Modify as Needed - Feel free to adapt materials or steps to meet your child's abilities and safety needs. For example, substitute scissors with safety scissors if necessary. Keep an Eye on Allergies - Be mindful of potential allergens in craft materials like glue, paint, or certain fabrics. Opt for non-toxic and hypoallergenic options whenever possible. Organize and Secure Supplies - Keep all craft tools and materials organized. Store sharp objects, small parts, and potentially hazardous items out of reach when not in use. Following these guidelines will ensure that crafts remain fun, creative, and, most importantly, safe for everyone involved!


OUR PRIVACY POLICY

  • Email
  • Facebook
  • Instagram
  • Pinterest
  • Twitter
  • YouTube

LOOKING FOR SOMETHING?

EXPLORE OUR SITE:

© 2012–2025 Glued To My Crafts
All activities should be supervised by an adult at all times. Please refer to our safety guidelines for more information.


Please note that all the content of the website, including printables, are for classroom and personal use only. This means that any digital item you download from our site can be used for non-commercial use only. We kindly request that you do not reproduce or sell our creations. We appreciate your understanding and cooperation in respecting our content and intellectual property rights.