
Get creative with the kiddos this weekend and make adorable ladybug cards! Use potato stamps to make them unique, and your friends and family will love the one-of-a-kind results
Ladybug Cards Stamped With A Raw Potato
Hi my crafty friends! It’s that time of the month again! The Kids Craft Stars and I are joining forces to bring you our MONTHLY craft challenge post.
Every month we have a challenge between us bloggers to in-cooperate a different craft medium or technique into a simple kid craft tutorial. This month’s challenge was to use fruits and/or veggies as stamps and I had a blast with this one!
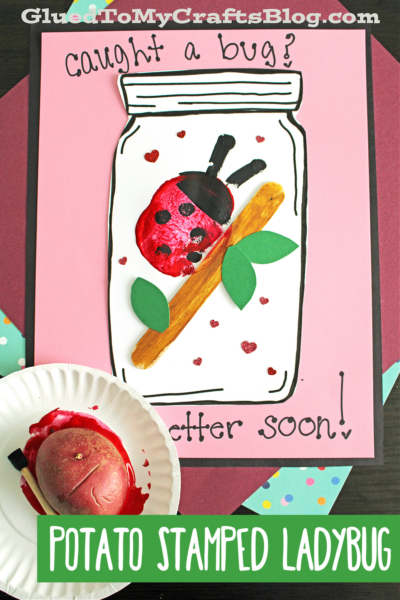
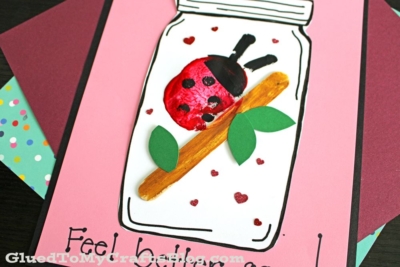
Continuing on with the ladybug theme from last month’s challenge, I decided to create these Potato Stamped Ladybug Cards. Not only are they pretty easy to make {and cute, if I do say so myself} but with the catchy phrase I added towards the bottom – they make great “Get Well” cards as well.
If you would like to make this easy and affordable card craft with your child today, check out the full tutorial below, as well as grabbing the provided free printable. BTW – there are also links to the other bloggers participating in this challenge, so be sure to click around to check them out as well!
Happy crafting my friends! Don’t forget to share pictures of your stamped bug cards with us on our Facebook page afterwards, so I can give you a virtual high five from afar! I can’t wait to see what you create with just a potato! #gluedtomycrafts
RELATED —> Paper Plate Ladybug

Not only are they pretty easy to make but with the catchy phrase, they make great “Get Well” cards as well.
Card Supplies:
- Small Potato/Knife
- Mason Jar Printable
- Printer
- White Cardstock Paper
- Choice of Color Cardstock Paper
- Green Cardstock Paper
- Jumbo Popsicle Stick
- Scissors
- Adhesive
- Paint Brushes
- Red Craft Paint
- Black Craft Paint
- Brown Craft Paint
- Small Paper Plate
- Black Sharpie Marker
Directions:
- First you will want to glue down the mason jar cutout to your choice of colored cardstock paper.
- Grab your jumbo popsicle stick and brown craft paint.
- Paint one side of it completely brown.
- Glue it to the center of the mason jar cutout.
- Cut out some leaves from the green cardstock paper and glue those onto the jumbo popsicle stick.
- Next up grab your small potato and cut it in half.
- Place some red paint on your paper plate and rub your potato half in it.
- Press it on the card where you want your ladybug to be.
- To finish the craft, grab the black paint and paint on ladybug features to give it life.
- Go ahead and also use the marker to write a sentiment around the finished design.
- Then set aside to let it dry completely before gifting.
- You can also add other embellishments like stickers, twine or even some glitter. I added the phrase “Caught a bug? Get well soon!” to mind but you can also use a phrase like “buggy for you” “ladybug hug” or “one of a kind.”
RELATED —> Paper Handprint Ladybug

Be sure to check out the fun blog posts below, to see what the other bloggers in the challenge came up with for our Fruit & Veggie Stamped Challenge!
- Celery Printed Fish – Crafty Morning
- Stamped Onion Prints – Fun Handprint Art
- Brussel Sprout Bunny Craft – I Heart Crafty Things
- Potato Stamped Pandas – I Heart Arts n Crafts
- Magically appearing Fruit & Veggie Prints – Pink Stripey Socks
- Fruit Stamped Lunch Bag – Hello, Wonderful
And “if” you decide to make our ladybug craft, please share a picture on our Facebook page or tag us on Instagram for us to see. We love seeing our inspiration come to life!
RELATED —> Potato Stamped Bear Cards

Potato Stamped Ladybug Card Craft Idea
Here’s your checklist of supplies to bring this craft to life:
- Large, Raw Potato
Prepare your creative haven by laying down a protective cover before the crafting magic begins!
Directions:
- First you will want to glue down the mason jar cutout to your choice of colored cardstock paper.
- Grab your jumbo popsicle stick and brown craft paint.
- Paint one side of it completely brown.
- Glue it to the center of the mason jar cutout.
- Cut out some leaves from the green cardstock paper and glue those onto the jumbo popsicle stick.
- Next up grab your small potato and cut it in half.
- Place some red paint on your paper plate and rub your potato half in it.
- Press it on the card where you want your ladybug to be.
- To finish the craft, grab the black paint and paint on ladybug features to give it life.
- Go ahead and also use the marker to write a sentiment around the finished design.
- Then set aside to let it dry completely before gifting.
- You can also add other embellishments like stickers, twine or even some glitter. I added the phrase "Caught a bug? Get well soon!" to mind but you can also use a phrase like "buggy for you" "ladybug hug" or "one of a kind."

CLICK HERE TO PRINT THE DIRECTIONS FOR THIS CRAFT