Take advantage of those empty soda bottles and turn them into something magical! Get crafty with your kiddos and whip up this adorable ladybug craft.


Want to teach kids about the importance of recycling while giving them a chance to channel their creativity? This Recycled Soda Bottle Ladybug craft is the perfect activity!
By turning an empty soda bottle into an adorable ladybug, you’ll help kids see how everyday items can be transformed into something beautiful and fun.
It’s a fantastic way to show that crafting can be both creative and eco-conscious. Here’s how you can guide them through this delightful project!

This simple craft project uses everyday materials such as plastic bottles and paint to create an adorable ladybug that is sure to shine no matter the occasion.
Craft Supplies:
- Clean, Empty 2-Litter Soda Bottle
- Red Craft Paint
- Black Craft Paint
- Small Paper Plate
- Foam Paint Brushes
- Black Cardstock Paper
- Black Pipe Cleaner
- Small Heart Punch
- Hot Glue Gun or School Glue
- Craft Scissors
Directions:
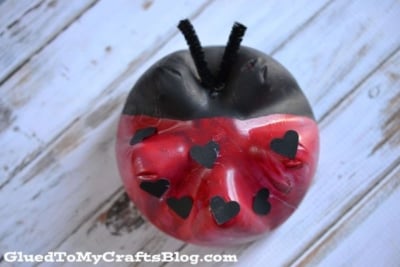
- If you haven’t already, use scissors to trim down your plastic bottle and make the ladybug’s body {you want the piece the bottle rests on} Our piece is about 3 inches tall.
- Next, paint your soda bottle piece completely red.
- Set aside to let it dry completely {you may have to do a second coat to really get it covered}
- Once your piece is dry, grab the black paint and paint 1/4 of the plastic bottle black. This is the head of the ladybug.
- Set aside to let it dry completely.
- While that is drying – punch out some hearts from the black cardstock, as well as cutting a small portion of the black pipe cleaner off.
- To finish off the soda bottle ladybug kid craft – hot glue the heart cutouts on the body, as well as bending the pipe cleaner to look like antennas and hot gluing it in place.
- Then display your finished piece proudly!
RELATED —> Potato Stamped Ladybug Cards

This Recycled Soda Bottle Ladybug craft is not just about the final product, but also about the process. Kids will love painting, gluing, and assembling their unique ladybugs, while learning about the importance of recycling in a hands-on way.
It’s a fun, eco-friendly activity that’s perfect for a rainy afternoon, classroom project, or even as a decoration for an outdoor garden space. Plus, no two ladybugs will look the same—each one is as unique as the kids who create them.
Happy crafting, and enjoy your recycled ladybug friends!

Recycled Soda Bottle Ladybug Craft
Take advantage of those empty soda bottles and turn them into something magical! Get crafty with your kiddos and whip up this adorable ladybug craft.
Here’s your checklist of supplies to bring this craft to life:
- Clean, Empty Recycled 2-Litter Soda Bottle
- Craft Paint
- Cardstock Paper
- Pipe Cleaner
Prepare your creative haven by laying down a protective cover before the crafting magic begins!
Directions:
- If you haven't already, use scissors to trim down your plastic bottle and make the ladybug's body {you want the piece the bottle rests on} Our piece is about 3 inches tall.
- Next, paint your soda bottle piece completely red.
- Set aside to let it dry completely {you may have to do a second coat to really get it covered}
- Once your piece is dry, grab the black paint and paint 1/4 of the plastic bottle black. This is the head of the ladybug.
- Set aside to let it dry completely.
- While that is drying - punch out some hearts from the black cardstock, as well as cutting a small portion of the black pipe cleaner off.
- To finish off the soda bottle ladybug kid craft - hot glue the heart cutouts on the body, as well as bending the pipe cleaner to look like antennas and hot gluing it in place.
- Then display your finished piece proudly!

Grab our favorite books via our Amazon affiliate link! In our Amazon storefront you will find books, toys and craft supplies we absolutely love using for our Glued To My Crafts tutorials!
If you've enjoyed our content or have any thoughts to share, we'd love to hear from you! Mention @gluedtomycrafts or tag #gluedtomycrafts on Instagram!