Get creative with the paint splat groundhog art project using puffy paint and cardstock for fun symmetrical designs.

Will he see his shadow or won’t he? It’s almost time for everyone’s favorite weather-predicting rodent to take center stage! Groundhog’s Day is a fantastic mini-holiday to celebrate with kids. It offers a great opportunity to talk about seasons, weather patterns, and the funny traditions we hold onto.
If you are looking for a creative way to celebrate this year, this Paint Splat Groundhog craft is the perfect activity. It combines the unpredictability of art with the cuteness of a woodland critter.

The best part about this craft is the “paint splat” technique. It’s a little messy, a lot of fun, and guarantees that no two groundhogs will ever look exactly the same. It’s perfect for toddlers working on fine motor skills or older kids who want to get creative with symmetry. Let’s get crafting before winter decides to stick around for six more weeks!
Craft Supplies:
- BROWN Tulip Brand Puffy Paint
- Blue Cardstock Paper
- Light Brown Cardstock Paper
- White Cardstock Paper
- Scissors
- School Glue
- Black Sharpie Marker
- Extra Large Wiggle Eyes – two per craft
Directions:
- First things first – fold your BLUE cardstock paper in half and open it back up.
- Grab your Tulip puffy paint and squirt some BROWN craft paint ON ONE SIDE before closing it up again.
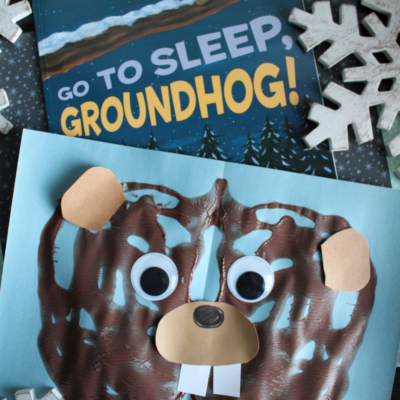
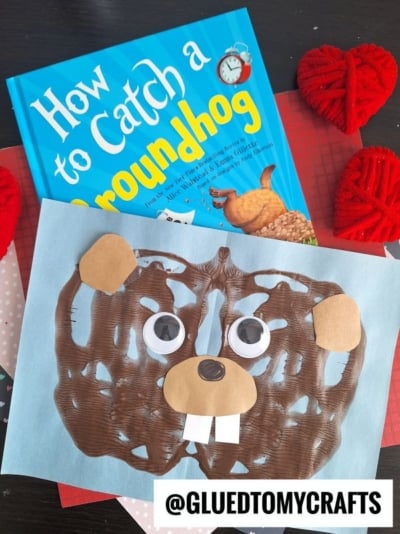
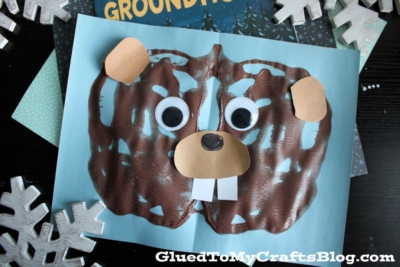
- Once the paper is closed for the second time, gently take your hand and “caress” the paper so the brown paint inside, makes a fun symmetrical print design on both sides of the paper {keep in mind – paint might ooze from the sides of the cardstock, so be sure to work in an area that can get dirty!}
- Now you are ready to open it back up and see the BEGINNING of what your groundhog’s head will eventually be. From there you decorate it to bring it to life and give it life.
- Next up, grab the remaining sheets of cardstock paper and your scissors.
- Out of the white cardstock, cut TWO rectangle teeth shapes.
- Out of the light brown cardstock paper, cut out two small half circle ears and his nose.
- Use the Sharpie marker to draw on more details for the nose paper piece.
- Finally – the last step in completing this groundhog paper splatter craft is to glue down ALL the cardstock cutout pieces and wiggle eyes, on top of the paint splat design. I would highly suggest starting with the nose in the center and going from there.
- Once finished with your custom groundhog masterpiece, set aside to let it dry completely, before displaying proudly! And of course – repeat as many times as you like! No two pieces will be the same and I think that’s what makes it even more fun!
RELATED —> Paint Splat Unicorn Hair
We hope you have a blast making these silly little groundhogs. It’s a low-stress, high-fun activity that brings a bit of cheer to the middle of winter. Whether your groundhog predicts early spring or more snow, at least you’ll have a cute decoration on the fridge!
Did you try this craft? We would love to see how your paint splats turned out! Snap a picture and tag us on social media so we can see your unique creations. Happy Groundhog’s Day!

Paint Splat Groundhog Craft Idea For Kids
Get creative with the paint splat groundhog art project using puffy paint and cardstock for fun symmetrical designs.
Here’s your checklist of supplies to bring this craft to life:
- School Glue
Prepare your creative haven by laying down a protective cover before the crafting magic begins!
Directions:
- First things first - fold your BLUE cardstock paper in half and open it back up.
- Grab your Tulip puffy paint and squirt some BROWN craft paint ON ONE SIDE before closing it up again.
- Once the paper is closed for the second time, gently take your hand and "caress" the paper so the brown paint inside, makes a fun symmetrical print design on both sides of the paper {keep in mind - paint might ooze from the sides of the cardstock, so be sure to work in an area that can get dirty!}
- Now you are ready to open it back up and see the BEGINNING of what your groundhog's head will eventually be. From there you decorate it to bring it to life and give it life.
- Next up, grab the remaining sheets of cardstock paper and your scissors.
- Out of the white cardstock, cut TWO rectangle teeth shapes.
- Out of the light brown cardstock paper, cut out two small half circle ears and his nose.
- Use the Sharpie marker to draw on more details for the nose paper piece.
- Finally - the last step in completing this groundhog paper splatter craft is to glue down ALL the cardstock cutout pieces and wiggle eyes, on top of the paint splat design. I would highly suggest starting with the nose in the center and going from there.
- Once finished with your custom groundhog masterpiece, set aside to let it dry completely, before displaying proudly! And of course - repeat as many times as you like! No two pieces will be the same and I think that's what makes it even more fun!

CLICK HERE TO PRINT THE DIRECTIONS FOR THIS CRAFT
If you've enjoyed our content or have any thoughts to share, we'd love to hear from you! Mention @gluedtomycrafts or tag #gluedtomycrafts on Instagram!