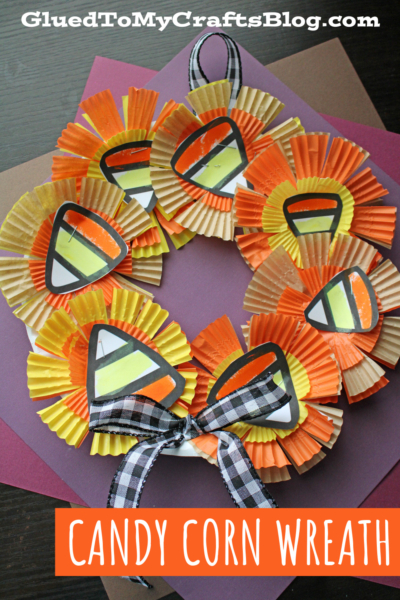
Craft a cupcake liner candy corn wreath with your kids! This fun and creative fall DIY project is perfect for little hands and adds charm to seasonal décor.

If you’re looking for a fun and easy Halloween craft, this candy corn wreath project is the perfect way to get creative with your family.
Whether it’s used as a classroom door decoration or placed in your living room to add some festive touches to your home, this low-budget craft will surely be a hit!
Welcome fall with a truly delightful craft idea that both you and your kids will love!
Create an eye-catching candy corn wreath out of paper plates, cupcake liners and other materials to make your home sparkle for the season.
Not only is this project fun and easy to do—it’s also quite festive as it brings together a whole array of colors in one place.
So go ahead and put on some autumn tunes, grab those supplies from around the house or hit up your closest store. It’s time to get creative with this one-of-a-kind candy corn wreath project from Glued To My Crafts!

With just some colorful cupcake liners and a large paper plate – supplies which can easily be purchased at any dollar store or art supply shop – kids (and adults alike) can take part in the process of cutting out shapes and gluing them together before hanging them proudly on display!
Craft Supplies:
- Large Paper Plate
- White Cardstock Paper
- Candy Corn Printable – on our landing page
- Orange/Yellow Crayons
- LARGE Cupcake Liners {tan, yellow, orange etc.}
- MINI Cupcake Liners {tan, yellow, orange etc.}
- Craft Scissors
- Stapler
- Craft Ribbon
Directions:
- First things first – cut out the center of your paper plate, leaving a simple ring shape for the wreath.
- Discard the center of the paper plate you just cut out.
- Now for the candy corn in the craft – go ahead and print out our provided candy shape printable on a single sheet of white cardstock paper. You only need one print per craft.
- Next use crayons {or markers} to color in the various pieces on the printable.
- When done, trim out each candy corn design out.
- Next up, start laying and planning out how many AND where you want each cutout to be on your paper plate wreath shape {btw – you won’t need to use every cutout for your wreath but I wanted to give you some choices by providing more on the printable.}
- Set aside the candy corn pieces for now.
- Now grab your various large and mini cupcake liners, stapler and scissors.
- For each “candy corn flower” on the wreath, you are going to want TWO large cupcake liners and ONE mini cupcake liner. You will want to change up the colors for each piece on the wreath so be sure to plan those out as well.
- Flatten each set out with your hands and stack them on top of each other.
- Use the stapler to secure them together in the center.
- Go ahead and also staple in ONE candy corn cutout to make it look like a flower.
- Next use the scissors to cut a simple fringe around the edge.
- Use your fingers to “fluff” it up and give it even more of the appearance of a flower.
- Now use your stapler again to staple the flower piece, in place, on the paper plate rim.
- Repeat for each “flower” on the wreath.
- Once the plate is completely covered and there are no blank spaces on the paper plate, staple on a ribbon “bow” to the bottom or top of the wreath to complete the fall wreath craft.
- Then display your beautiful candy corn wreath in your home or on the front door proudly for ALL to see!
RELATED —> Fingerprint Fall Wreath Craft

We deliver the BEST kids craft tutorials on the internet! I would like to think we have some fall favorites on the internet!
Don’t believe me? Just check out our popular Halloween Lantern, Leaf Butterfly In Jar, and Pumpkin Spice Latte Cups kids crafts to see what I’m talking about!
All three of which are absolutely perfect for fall crafting plans AND they would pair nicely with today’s Paper Plate Candy Corn Wreath craft idea – hint hint!
FOLLOW US ON PINTEREST SO YOU NEVER MISS A NEW TUTORIAL FROM US!

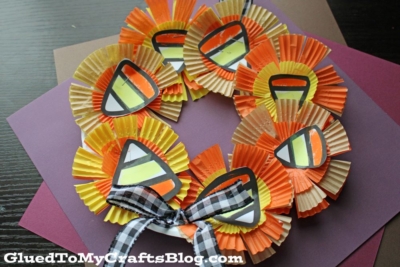
Cupcake Liner Candy Corn Wreath Craft Idea
Craft a cupcake liner candy corn wreath with your kids! This fun and creative fall DIY project is perfect for little hands and adds charm to seasonal décor.
Here’s your checklist of supplies to bring this craft to life:
- Large Paper Plate
- White Cardstock Paper
- Candy Corn Printable - Landing Page
- Large Cupcake Liners orange and yellow
- Mini Cupcake Liners orange and yellow
- Craft Ribbon
Prepare your creative haven by laying down a protective cover before the crafting magic begins!
Directions:
- First things first - cut out the center of your paper plate, leaving a simple ring shape for the wreath.
- Discard the center of the paper plate you just cut out.
- Now for the candy corn in the craft - go ahead and print out our provided candy shape printable on a single sheet of white cardstock paper. You only need one print per craft.
- Next use crayons {or markers} to color in the various pieces on the printable.
- When done, trim out each candy corn design out.
- Next up, start laying and planning out how many AND where you want each cutout to be on your paper plate wreath shape {btw - you won't need to use every cutout for your wreath but I wanted to give you some choices by providing more on the printable.}
- Set aside the candy corn pieces for now.
- Now grab your various large and mini cupcake liners, stapler and scissors.
- For each "candy corn flower" on the wreath, you are going to want TWO large cupcake liners and ONE mini cupcake liner. You will want to change up the colors for each piece on the wreath so be sure to plan those out as well.
- Flatten each set out with your hands and stack them on top of each other.
- Use the stapler to secure them together in the center.
- Go ahead and also staple in ONE candy corn cutout to make it look like a flower.
- Next use the scissors to cut a simple fringe around the edge.
- Use your fingers to "fluff" it up and give it even more of the appearance of a flower.
- Now use your stapler again to staple the flower piece, in place, on the paper plate rim.
- Repeat for each "flower" on the wreath.
- Once the plate is completely covered and there are no blank spaces on the paper plate, staple on a ribbon "bow" to the bottom or top of the wreath to complete the fall wreath craft.
- Then display your beautiful candy corn wreath in your home or on the front door proudly for ALL to see!


NEED MORE HELP DOWNLOADING OUR FREE PRINTABLES? PLEASE REFER TO OUR FAQ PAGE
If you've enjoyed our content or have any thoughts to share, we'd love to hear from you! Mention @gluedtomycrafts or tag #gluedtomycrafts on Instagram!