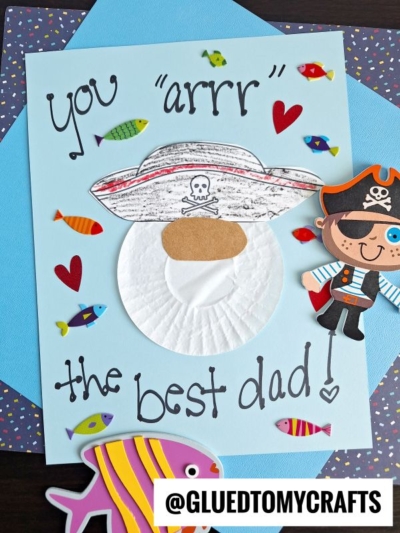
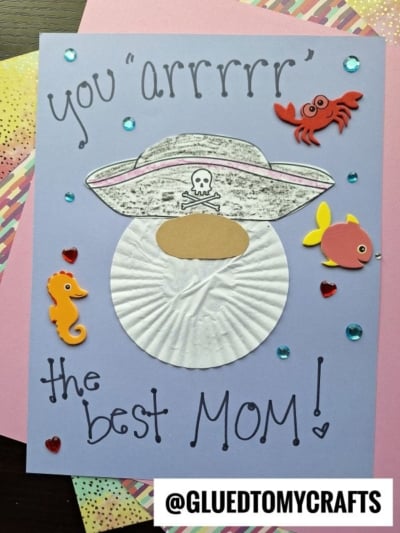
This simple and inexpensive cupcake liner pirate is so easy, even the littlest buccaneers in your family will be able to join in on the fun!

Ahoy mateys! Looking for a fun pirate craft to do with your kids? You don’t need to spend hours searching the web for ideas or trekking down to the store – you can make this delightful cupcake liner pirate craft right at home!
This simple and inexpensive DIY project is so easy, even the littlest buccaneers in your family will be able to join in on all the crafting fun.

Gnomes have taken the crafting world by storm, and for good reason. They’re adorable, versatile, and relatively simple to make. When you add a pirate twist, you get an enchanting character that can brighten any space. Whether it’s for a themed party, boredom buster, or a handmade gift, pirate gnomes crafted from cupcake liners are sure to impress!

This simple and inexpensive cupcake liner pirate is so easy, even the littlest buccaneers in your family will be able to join in on the fun!
Craft Supplies:
Before we start, let’s gather all the necessary materials. The best part? You probably already have most of these supplies at home.
- Red Cardstock Paper
- Light Brown Cardstock Paper
- White Cardstock Paper
- Pirate Hat Printable – on our landing page
- Large, White Cupcake Liners
- Glue Stick
- Scissors
- Markers, Crayons or Coloring Pencils
- Embellishments
Directions:
- First things first – download and print the provided file in the supply list above on your WHITE cardstock paper. One print gives you FOUR pirate hats to work with.
- Color in one of the hat designs and trim it out.
- Save the remaining printable to repeat the craft, while setting aside the finished hat cutout for now.
- Now grab your choice of RED cardstock paper and TWO white cupcake liners.
- Flatten each one of your muffin cup liners out with your hands.
- Glue them together, on top of each other, right in the center of the red cardstock paper. This is the pirate’s beard.
- Next grab your remaining light brown cardstock paper.
- Cut out an oval shape for his nose.
- The last step, is to glue the hat and nose in place on top of the cupcake liners. That’s it!
- Finally add any other embellishments you see fit.
- Then display your cupcake liner pirate gnome piece proudly for ALL to see!
RELATED —> Popsicle Stick Pirate Ships
If you are looking for even MORE easy summer themed craft ideas, from Glued To My Crafts, be sure to check out these fun posts listed below.
And “if” you decide to make our pirate cupcake liner craft, please share a picture on our Facebook page or tag us on Instagram with #gluedtomycrafts for us to see. We love seeing our inspiration come to life!
Ready to get started? Gather your materials, follow these steps, and watch as your cupcake liners transform into adorable pirate gnomes. Happy crafting!
Paper Plate Surf Board
Craft Stick Pirate
Paper Plate Ice Cream Cone
Paint Splat Ocean Scene
Pirate Treasure Hunt
Paper Plate Hermit Crab
Paper Plate Beach Ball
Treasure Chest Craft
Paper Bag Pirate Puppet

Cupcake Liner Pirate Gnome Craft Idea
This simple and inexpensive cupcake liner pirate is so easy, even the littlest buccaneers in your family will be able to join in on the fun!
Here’s your checklist of supplies to bring this craft to life:
Prepare your creative haven by laying down a protective cover before the crafting magic begins!
Directions:
- First things first - download and print the provided file ion your WHITE cardstock paper. One print gives you FOUR pirate hats to work with.
- Color in one of the hat designs and trim it out.
- Save the remaining printable to repeat the craft, while setting aside the finished hat cutout for now.
- Now grab your choice of RED cardstock paper and TWO white cupcake liners.
- Flatten each one of your muffin cup liners out with your hands.
- Glue them together, on top of each other, right in the center of the red cardstock paper. This is the pirate's beard.
- Next grab your remaining light brown cardstock paper.
- Cut out an oval shape for his nose.
- The last step, is to glue the hat and nose in place on top of the cupcake liners. That's it!
- Finally add any other embellishments you see fit.
- Then display your cupcake liner pirate gnome piece proudly for ALL to see!


NEED MORE HELP DOWNLOADING OUR FREE PRINTABLES? PLEASE REFER TO OUR FAQ PAGE
If you've enjoyed our content or have any thoughts to share, we'd love to hear from you! Mention @gluedtomycrafts or tag #gluedtomycrafts on Instagram!