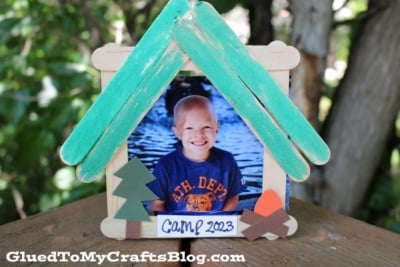
We think our latest Popsicle Stick Cabin Picture Frame tutorial is the BEST craft to do in honor of the summer camp season!
Cabin Picture Frame Craft Made From Craft Sticks
Today’s Craft Stick Camp Cabin kid craft idea is absolutely PERFECT as a summer boredom buster and for any camping adventures you might have this season.
Plus with your finished craft piece having the ability to hold your favorite picture inside {from the best summer ever!} you can ALWAYS look back on those fond memories – FOREVER!
Our tutorial and idea is super simple for all ages and it’s going to be a cinch for YOUR CHILD to pull together within minutes. So what are you waiting for? Grab those craft supplies and get to work on making your own special Popsicle Stick Cabin piece with your child today {maybe even make one of your own, as well!}
Happy crafting my friends! Don’t forget to share pictures of your creations with us! You can ALWAYS tag us on Facebook or Instagram for easy sharing! I can’t wait to see what you make with your young crafter today! #gluedtomycrafts
RELATED —> Popsicle Stick Camping Mug
Not only is it easy and fun, but at the end of the project, everyone will have something beautiful to show off.
Craft Supplies:
- Jumbo Popsicle Sticks
- School Glue or Hot Glue Gun
- Craft Paint
- Foam Paint Brushes
- Small Paper Plate
- 4×6″ Printed Picture
- Paper Craft Scissors
- Washi Tape
- Camping Themed Stickers
Directions:
- First grab your EIGHT jumbo popsicle sticks, small paper plate, foam brushes and two bottles of craft paint.
- Squirt your two shades of craft paint on the paper plate.
- Go ahead and divide your eight popsicle sticks equally in half.
- Four of the craft sticks will be painted dark brown and the other four will be painted a dark green. Use the foam brushes to complete this step.
- Set aside to let them dry a little.
- While those are drying, if you are working with a glue gun {adult supervision please} go ahead and get that hot & ready.
- To assemble the frame, start with the FOUR brown painted popsicle sticks. Lay them in a square formation and glue them together on the corners. This will be the opening of the picture frame.
- Now grab the remaining FOUR green popsicle sticks and glue them on the square design you just made, to make a roof for the cabin.
- To finish off the Popsicle Stick Cabin, trim down your printed 4×6″ picture and secure it in place on the back of the picture frame. You can do this with a little washi tape and/or glue.
- Finally, add some camping themed stickers to the front of the frame to tie it all together. You can also add a small paper rectangle shape with the date, to mark the year, as well.
- Once done, set aside to let it dry completely before displaying proudly for all to see!
RELATED —> Happy Camper Keepsake
Make It Your Own – for easy displaying, you can hot glue some ribbon and/or magnets to the back!
Make your summer crafty plans epic with the help of Glued To My Crafts! We have several different camping themed crafts for you to experiment with and recreate today. Check them out below!
Popsicle Stick Tent
Handprint Happy Camper
Popsicle Stick Campfire
Camping Themed Paper Tent
Popsicle Stick Smores
Stained Glass Camping Lanterns
Popsicle Stick Cabin Picture Frame Craft Idea
Here’s your checklist of supplies to bring this craft to life:
- 8 Jumbo Popsicle Sticks
- Craft Paint
- Cardstock Paper
- Embellishments
- 1 Printed Picture
- Washi Tape
- 1 Scissors
Prepare your creative haven by laying down a protective cover before the crafting magic begins!
Directions:
- First grab your EIGHT jumbo popsicle sticks, small paper plate, foam brushes and two bottles of craft paint.
- Squirt your two shades of craft paint on the paper plate.
- Go ahead and divide your eight popsicle sticks equally in half.
- Four of the craft sticks will be painted dark brown and the other four will be painted a dark green. Use the foam brushes to complete this step.
- Set aside to let them dry a little.
- While those are drying, if you are working with a glue gun {adult supervision please} go ahead and get that hot & ready.
- To assemble the frame, start with the FOUR brown painted popsicle sticks. Lay them in a square formation and glue them together on the corners. This will be the opening of the picture frame.
- Now grab the remaining FOUR green popsicle sticks and glue them on the square design you just made, to make a roof for the cabin.
- To finish off the Popsicle Stick Cabin, trim down your printed 4x6" picture and secure it in place on the back of the picture frame. You can do this with a little washi tape and/or glue.
- Finally, add some camping themed stickers to the front of the frame to tie it all together. You can also add a small paper rectangle shape with the date, to mark the year, as well.
- Once done, set aside to let it dry completely before displaying proudly for all to see!

CLICK HERE TO PRINT THE DIRECTIONS FOR THIS CRAFT


