
Although Glued To My Crafts is FILLED to the brim with so many craft ideas for Thanksgiving, I bet YOU are still hungry for new stuff, right?
Well no more grumbles in your “craft tummy” because today we are presenting our Cupcake Liner Pumpkin Pie Card kid craft tutorial!

Orange Baking Cup Pumpkin Pie Card For Thanksgiving
This Cupcake Liner Pumpkin Pie Card idea is a recipe for success! It’s also SUPER UNIQUE and a first seen here idea for Glued To My Crafts!
Our mixed media pumpkin slice kid craft idea only requires an orange cupcake liner {maybe leftover from your holiday baking?} some cardstock paper, glue and cotton balls! That’s it!
We are talking easy supplies that you more than likely have in your home right now. Hello cheap! Plus the materials won’t take over your holiday table or make a huge mess either. It’s just a matter of cutting and gluing to make custom fall cards today!
Every child can create their own “pie card” within minutes and have an “outside the traditional” piece to gift someone else this holiday season! So follow our tutorial below to BAKE it up with your young crafter today!
Happy crafting, my dear friends! Don’t forget to share pictures with us afterwards, on our Facebook page so we can give you a virtual high five from a far! Be sure to give us a follow on Pinterest, so you never miss a new tutorial from us!
RELATED —> Paper Plate Apple Pie Slice

Get creative with the kiddos this fall! We love this fun cupcake liner pumpkin pie card craft idea.
Craft Supplies:
- Orange Cupcake Liners
- Brown Cardstock Paper
- Cardstock Cards
- Glue Stick or Tape Runner
- Basic Craft Scissors
- White Cotton Balls
- Gold Glitter Glue
- Embellishments
Directions:
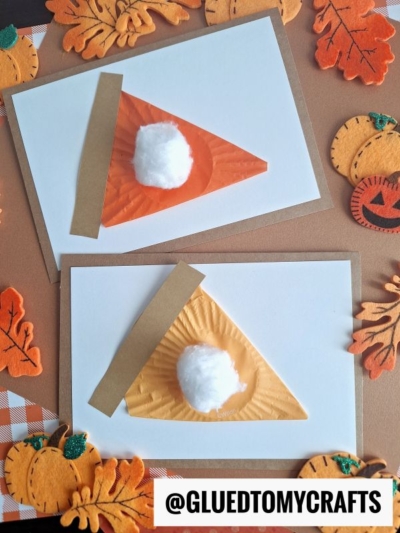
- First take ONE large, orange cupcake liner and flatten it out with your hands.
- Next take that flattened cupcake liner and fold it into thirds/a triangle shape, to create a “PIE” slice shape.
- Glue it down, in the center of a single sheet of white cardstock.
- Now trim down that particular cardstock piece to be placed on another colored cardstock card front.
- Use the glue stick to attach the two paper pieces together.
- Now grab your brown cardstock and scissors.
- Cut out a small, thin rectangle shape for the pie “crust.”
- Secure that piece towards the larger end of the folded cupcake liner. Now you should really see it coming together.
- Now grab the gold glitter glue and draw a squiggle of “cinnamon” on the cupcake liner design.
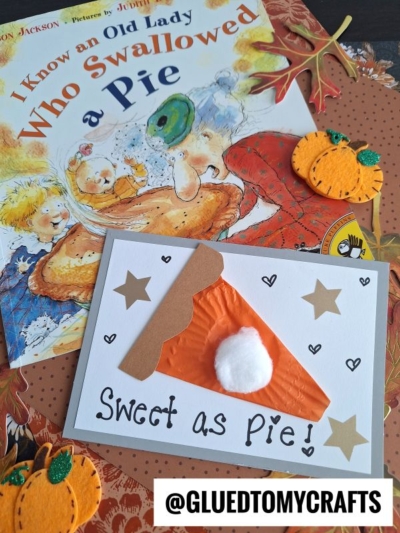
- To finish off the Cupcake Liner Pie Card – add a white cotton ball on top of the wet glitter glue to make the “whipped cream.”
- Add other embellishments you see fit {maybe some heart stickers} and display/gift away proudly!
- Don’t forget to snap a few pictures to share with us before you give them away! You can tag us on Instagram or Facebook! #gluedtomycrafts
Book Pairings:
Here are some recommended books that beautifully complement our craft idea. You can conveniently purchase them through our affiliate links on Amazon.
- The 12 Days of Thanksgiving by Jenna Lettice
- Nothing’s Wrong!: A Hare, a Bear, and Some Pie to Share by
- How to Make an Apple Pie and See the World by Marjorie Priceman
- A Charlie Brown Thanksgiving by Charles M. Schulz
- I Know an Old Lady Who Swallowed a Pie by Alison Jackson
- The Night Before Thanksgiving by Natasha Wing
- I Am Thankful: A Thanksgiving Book for Kids by Sheri Wall
- Porcupine’s Pie by Laura Renauld
- Pookie’s Thanksgiving by Sandra Boynton
- Thanksgiving in the Woods by Phyllis Alsdurf
RELATED —> Paper Plate Cherry Pie
Now don’t let the fun stop there!!! At Glued To My Crafts, we have several awesome craft ideas that are perfect for ANY budget this fall season!
Check out our Paper Plate Pie, Square Pumpkin Canvas and Sweeter Than Pie Keepsake craft tutorials!

Cupcake Liner Pumpkin Pie Card
Here’s your checklist of supplies to bring this craft to life:
Prepare your creative haven by laying down a protective cover before the crafting magic begins!
Directions:
- First take ONE large, orange cupcake liner and flatten it out with your hands.1 Cupcake Liner
- Next take that flattened cupcake liner and fold it into thirds/a triangle shape, to create a "PIE" slice shape.
- Glue it down, in the center of a single sheet of white cardstock.Cardstock Paper
- Now trim down that particular cardstock piece to be placed on another colored cardstock card front.Cardstock Cards
- Use the glue stick to attach the two paper pieces together.
- Now grab your brown cardstock and scissors.
- Cut out a small, thin rectangle shape for the pie "crust."
- Secure that piece towards the larger end of the folded cupcake liner. Now you should really see it coming together.
- Now grab the gold glitter glue and draw a squiggle of "cinnamon" on the cupcake liner design.
- To finish off the Cupcake Liner Pie Card - add a white cotton ball on top of the wet glitter glue to make the "whipped cream."1 White Cotton Balls
- Add other embellishments you see fit {maybe some heart stickers} and display/gift away proudly!

CLICK HERE TO PRINT THE DIRECTIONS FOR THIS CRAFT