Add a touch of beauty to your day with this fun and easy craft idea! Have your kids make their own stunning chalk art flowers in mason jars, perfect for brightening up any room!

Our chalk art flowers craft idea has blossoming vibrant colors, the price tag you will like and ordinary materials turned extraordinary! Keep scrolling to check out the full tutorial from us!

While spring flowers are lovely to look at in gardens and bouquets, there’s nothing quite like bringing the beauty of flowers indoors in a unique craft.
For your pint-sized artists at home, try this fun and colorful chalk art flowers in a mason jar craft. Not only will it add a pop of floral beauty to your home, it also nurtures creativity in little hands.
Starting with just plain cardstock paper and a variety of sidewalk chalk crayons, your kids can design their own miniature chalk bouquet to display.
The process is easy enough for their developing skills yet open-ended enough to unleash their artistic imagination.
Mixing colors becomes a sensory experience and arranging the blooms provides a simple lesson in composition. What’s more, crafting their own bouquet ensures your child takes ownership in the finished product with pride.
So grab some leftover sidewalk chalk from the garage and get ready for a flower-filled good time that will have them blooming with joy!


Turn ordinary materials into extraordinary crafts with this chalk art flowers in a mason jar craft! Kids will love the vibrant colors and you’ll love the price tag.
Craft Supplies:
- Mini Mason Jar Printable – from our landing page
- White Cardstock Paper
- Coloring Materials
- Scissors
- Black Cardstock Paper
- Sidewalk Chalk
- Baby Wipes
- Adhesive
Directions:
- First things first – grab our mason jar printable, listed above in the supply list. This will give you TWO mason jar cutouts.
- Next, go ahead and find it on your computer, right click and print out the file on a single sheet of white cardstock. You only need ONE printable to make TWO chalk art flower craft at once. Print as many as you like but only use our file for personal use please.
- Now that you have the printable, go ahead and “draw” in several GREEN flower stems in one of the mason jar designs.
- Once done adding the stem pieces, grab your scissors and trim out that particular vase shape.
- Set aside the remaining paper/extra vase shape to repeat the craft later on.
- Now grab a single sheet of black cardstock and fold it in half.
- Open it back up and use your scissors to cut along the folded line & make TWO equal pieces.
- Set aside one half for later and pull out the other for right now.
- Lay your paper piece on a flat surface in the portrait position.
- Now grab your various pieces of sidewalk chalk for the flowers.
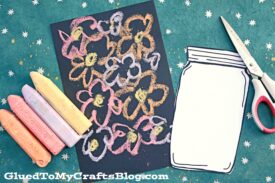
- Make several flower shapes ALL over the black paper {see our image for example} to make your bouquet. Add as many lines and colors that you like. You want it to be nice and full though.
- When done adding the chalk lines, use baby wipes to clean off excess chalk from fingers and hands.
- After your hands are clean, go ahead and grab your vase cutouts from earlier & your glue stick/tape runner.
- Secure the mason jar vase to the bottom of the chalk covered paper, to look like the flowers are blossoming out of it.
- Now add any other embellishments you see fit.
- Then display your chalk art flower vase paper piece proudly for all to see!
RELATED —> Chalk Art Fox

Do you love our latest chalk art flower craft idea? Then you might also enjoy our popular Confetti Field of Flowers, Fork Painted Silly Hair and Confetti Hydrangea Flowerpot craft posts.
All three of which are super easy like today’s chalk art flower vase post and include FREE PRINTABLES to get you started, as well!

Chalk Art Flowers In Mason Jar Craft
Add a touch of beauty to your day with this fun and easy craft idea! Have your kids make their own stunning chalk art flowers in mason jars, perfect for brightening up any room!
Here’s your checklist of supplies to bring this craft to life:
Prepare your creative haven by laying down a protective cover before the crafting magic begins!
Directions:
- First print out our provided printable, in color, on a single sheet of white cardstock paper. You only need one print per craft.
- Next, go ahead and find it on your computer, right click and print out the file on a single sheet of white cardstock. You only need ONE printable to make TWO chalk art flower craft at once. Print as many as you like but only use our file for personal use please.
- Now that you have the printable, go ahead and "draw" in several GREEN flower stems in one of the mason jar designs.
- Once done adding the stem pieces, grab your scissors and trim out that particular vase shape.
- Set aside the remaining paper/extra vase shape to repeat the craft later on.
- Now grab a single sheet of black or gray cardstock paper and fold it in half.Cardstock Paper
- Open it back up and use your scissors to cut along the folded line & make TWO equal pieces.
- Set aside one half for later and pull out the other for right now.
- Lay your paper piece on a flat surface in the portrait position.
- Now grab your various pieces of sidewalk chalk for the flowers.
- Make several flower shapes ALL over the black paper {see our image for example} to make your bouquet. Add as many lines and colors that you like. You want it to be nice and full though.
- When done adding the chalk lines, use baby wipes to clean off excess chalk from fingers and hands.
- After your hands are clean, go ahead and grab your vase cutouts from earlier & your glue stick/tape runner.
- Secure the mason jar vase to the bottom of the chalk covered paper, to look like the flowers are blossoming out of it.
- Now add any other embellishments you see fit.
- Then display your chalk art flower vase paper piece proudly for all to see!


NEED MORE HELP DOWNLOADING OUR FREE PRINTABLES? PLEASE REFER TO OUR FAQ PAGE
If you've enjoyed our content or have any thoughts to share, we'd love to hear from you! Mention @gluedtomycrafts or tag #gluedtomycrafts on Instagram!