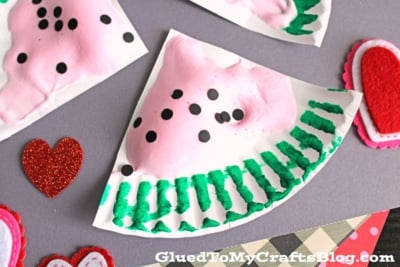
This fun, easy kids craft tutorial is perfect for a rainy day or hot summer day. All you need is shaving cream, school glue and paper plates to bring it to life.
The end result is a fun, textured piece of art that your child will love showing off!
Summer is the perfect time to engage in fun and creative activities with your children, and what better way to beat the heat than by making a cool and colorful watermelon craft?
This Puffy Paint Watermelon Slice art project tutorial is not only easy and entertaining for kids of all ages, but it also allows them to explore their creativity while learning about different shapes and colors.
In this blog post, we will walk you through step-by-step instructions on how to create this adorable watermelon slice using puffy paint, paper plates and cardstock paper. So gather up your supplies and get ready to make some sweet summer memories with this fun craft idea from us!
It only takes about 30 minutes to complete and uses easy to find materials. Your little ones are sure to love decorating their very own “watermelon slices” too on these hot days stuck inside!
Craft Supplies:
- Foaming Shaving Cream – 1 cup
- School Glue – 1 cup
- Red Food Coloring
- Foam Paint Brush
- Small Bowl
- Large Paper Plate
- Scissors
- Green Paint Crayon
- Single Hole Punch
- Black Cardstock Paper
Directions:
- First you will want to make your puffy paint. This is done by placing equal parts of shaving cream and school glue in your small dish.
- Now for the pink coloring. Add ONE drop of red food coloring to the mixture.
- Then mix your three ingredients together until it’s like thick frosting.
- Add more food coloring to get your desired color but remember your puffy paint will dry a shade darker than it looks.
- Set your dish aside.
- Now grab your large paper plate and scissors.
- Cut your paper plate into FOURS. First in half, then each piece in half again.
- Grab your green paint crayon.
- Have children paint the rims of each paper plate slice green.
- Now go ahead and grab your puffy paint mixture and paint brush.
- Have children place a good layer of “frosting” on each paper plate slice, to create the “inner” of the watermelon. Remember to have them lay it on thick so they get that fun texture.
- To finish the Puffy Paint Watermelon Slices craft, have children add some hole punched “watermelon seeds” on top of the puffy paint mixture while it’s still wet.
- Then once done with the craft, set it in an undisturbed area to let it dry completely before displaying proudly!
- FYI – Once dry, the texture of the puffy paint will be bumpy and colors may get darker as it dries!
RELATED —> Fingerprint Watermelon Card
AFFILIATE LINK – PAIR OUR CRAFT IDEA WITH THIS BOOK RECOMMENDATION
Don’t let the crafty fun stop here! We have TONS of craft ideas for you to recreate and pair along with today’s puffy paint watermelon tutorial!
Just check out these posts, listed below, to see what I’m talking about!
- Handprint Watermelon Card
- Craft Foam Watermelon
- Valentine Holding Puppy
- Paper Plate Sloth
- Coffee Filter Watermelon
- Popsicle Stick Watermelon Slices
- Pom Pom Painted Watermelon
Puffy Paint Watermelon Slice Craft Idea For Kids
Here’s your checklist of supplies to bring this craft to life:
Prepare your creative haven by laying down a protective cover before the crafting magic begins!
Directions:
- First you will want to make your puffy paint. This is done by placing equal parts of shaving cream and school glue in your small dish.
- Now for the pink coloring. Add ONE drop of red food coloring to the mixture.
- Then mix your three ingredients together until it’s like thick frosting.
- Add more food coloring to get your desired color but remember your puffy paint will dry a shade darker than it looks.
- Set your dish aside.
- Now grab your large paper plate and scissors.
- Cut your paper plate into FOURS. First in half, then each piece in half again.
- Grab your green paint crayon.
- Have children paint the rims of each paper plate slice green.
- Now go ahead and grab your puffy paint mixture and paint brush.
- Have children place a good layer of “frosting” on each paper plate slice, to create the "inner" of the watermelon. Remember to have them lay it on thick so they get that fun texture.
- To finish the Puffy Paint Watermelon Slices craft, have children add some hole punched "watermelon seeds" on top of the puffy paint mixture while it's still wet.
- Then once done with the craft, set it in an undisturbed area to let it dry completely before displaying proudly!
- FYI - Once dry, the texture of the puffy paint will be bumpy and colors may get darker as it dries!

CLICK HERE TO PRINT THE DIRECTIONS FOR THIS CRAFT


