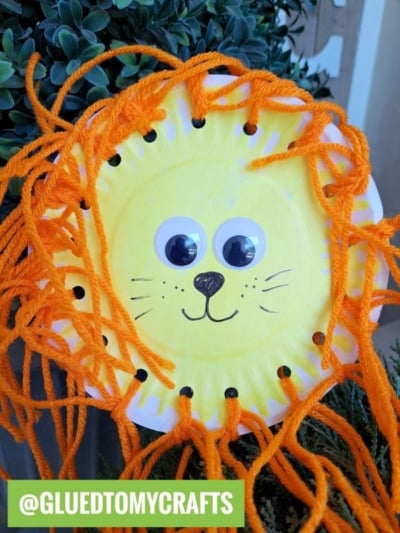
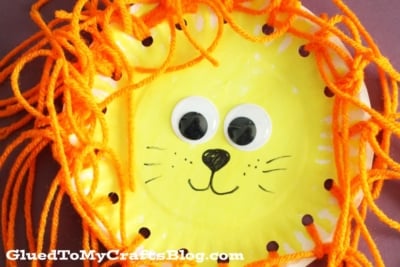
With just a few paper plates, some yarn, and a little imagination, your kids can create their own lion masterpiece! Let the crafting begin!


Unleash your creativity and let your imagination roar with this fun and easy Paper Plate & Craft Yarn Lion tutorial! Perfect for kids and adults alike, this craft combines simple materials like paper plates, yarn, and glue to create an adorable lion that’s as unique as your creativity allows.
Whether you’re looking for a rainy-day activity, a classroom project, or just a way to spend quality time with your little ones, this craft is sure to bring smiles and spark joy.
Not only is this project simple and affordable, but it’s also a great way to encourage fine motor skills, color recognition, and artistic expression in children. With just a few steps, you’ll transform everyday items into a roaring masterpiece that’s perfect for display or imaginative play.
So, gather your supplies, roll up your sleeves, and let’s dive into this “roar-some” crafting adventure!

This craft is a fantastic way to spend quality time with your kids while encouraging creativity and fine motor skills. It’s simple, affordable, and guaranteed to bring smiles all around!
Craft Supplies:
- Large Paper Plate
- Single Handle Hole Punch
- Orange Craft Yarn
- Scissors
- Black Marker
- Large Wiggle Eyes
- School Glue
Directions:
- First have children paint their paper plate completely yellow.
- Once done, set aside to let it dry completely.
- When it’s completely dry, go ahead and hole punch holes {leaving a mall section of space between each} all around the rim of their paper plate. Set aside.
- Now grab your yarn and cut THREE 5″ inch strands of yarn per hole punch on the paper plate.
- Go ahead and thread/tie three stands together in each hole punched hole. This will be the lion’s mane. At this point in time you can also trim down the hair if you like {or add more yarn if desired!}
- To finish off the Paper Plate Yarn Lion, have children draw/glue on eyes and nose to give the lion life.
- You can also add other embellishments they see fit at this point in time.
- When done decorating the paper plate, display it proudly for all to see!!!
RELATED —> Torn Paper Lion Card

AFFILIATE LINK – PAIR OUR CRAFT IDEA WITH THIS BOOK RECOMMENDATION
Love this paper plate and yarn lion tutorial? Be sure to check out our Popsicle Stick Lion kid craft idea as well!!!

Paper Plate and Yarn Lion Craft Idea For Kids
With just a few paper plates, some yarn, and a little imagination, your kids can create their own lion masterpiece! Let the crafting begin!
Here’s your checklist of supplies to bring this craft to life:
Prepare your creative haven by laying down a protective cover before the crafting magic begins!
Directions:
- First have children paint their paper plate completely yellow.1 Large Paper Plate, Craft Paint
- Once done, set aside to let it dry completely.
- When it's completely dry, go ahead and hole punch holes {leaving a mall section of space between each} all around the rim of their paper plate. Set aside.
- Now grab your yarn and cut THREE 5" inch strands of yarn per hole punch on the paper plate.Craft Yarn
- Go ahead and thread/tie three stands together in each hole punched hole. This will be the lion's mane. At this point in time you can also trim down the hair if you like {or add more yarn if desired!}
- To finish off the Paper Plate Yarn Lion, have children draw/glue on eyes and nose to give the lion life.2 Wiggle Eyes
- You can also add other embellishments they see fit at this point in time.
- When done decorating the paper plate, display it proudly for all to see!!!
CLICK HERE TO PRINT THE DIRECTIONS FOR THIS CRAFT
If you've enjoyed our content or have any thoughts to share, we'd love to hear from you! Mention @gluedtomycrafts or tag #gluedtomycrafts on Instagram!