It's the perfect keepsake craft idea to recreate with your graduating star!

Celebrate your little grad’s big accomplishment with this fun and easy paper plate graduation photo frame craft!
This craft isn’t just about the final result; the process itself is a joy for kids. They get to flex their creative muscles, play with colors, and proudly display their work when it’s done. Plus, by turning simple items like paper plates into beautiful keepsakes, it’s a fun lesson in upcycling and creativity.
On that note, are you ready to get started? Gather those supplies and make the most out of this creative, budget-friendly DIY project that’s sure to become a lasting memory!
Craft Supplies:
Before starting, gather the following supplies to ensure the process runs smoothly. Feel free to substitute materials based on what you already have on hand.
- Graduation Cap Printable – from our landing page
- White Cardstock Paper
- Crayons/Markers
- Scissors
- Small Paper Plate
- Craft Paint {any color}
- Foam Paint Brush
- Stapler
- Printed 4×6″ Picture
Directions:
Once you have everything ready, follow these steps to create your masterpiece!
- First things first – paint your paper plate {use the graduate’s school colors, favorite colors, etc.} and set it aside to allow it to dry completely.
- Next up – color in ONE of the graduation cap designs in the provided printable. You can use crayons, markers etc.
- When done coloring, go ahead and trim it out.
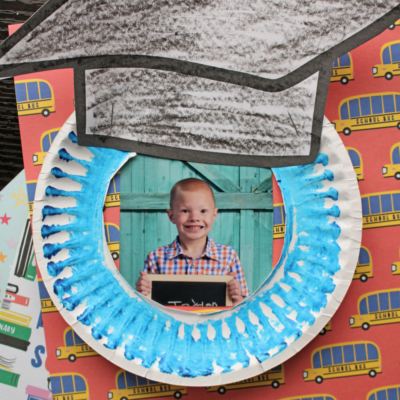
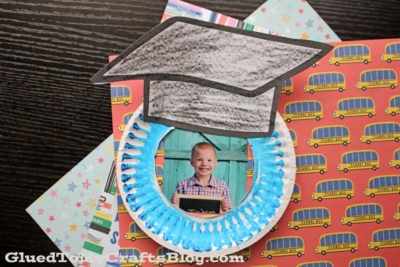
- Once the paper plate is dry enough to touch, we are going to start assembling our picture frame. Grab your painted paper plate and the scissors again.
- Cut out a small circle {large enough for your picture but not too big} from the center of the paper plate. Discard the small piece.
- Go ahead and secure your printed picture inside the cutout.
- Finally, the last step is to staple on the graduation cap to the top of the decorated paper plate.
- Follow that up by adding any other embellishments you see fit. You can also write inspirational quotes or messages like “Class of [Year]” or “Congrats Grad!” on the frame using markers or foam letters.
RELATED —> Handprint “Class of” Keepsake

Encourage kids to add their personality to the project! There is no wrong way to decorate a frame—it’s all about creating something that feels special to the graduate!

Paper Plate Graduation Photo Frame for Kids
It's the perfect keepsake craft idea to recreate with your graduating star!
Here’s your checklist of supplies to bring this craft to life:
Prepare your creative haven by laying down a protective cover before the crafting magic begins!
Directions:
- First things first - paint your paper plate {use the graduate’s school colors, favorite colors, etc.} and set it aside to allow it to dry completely.
- Next up - color in ONE of the graduation cap designs in the provided printable. You can use crayons, markers etc.
- When done coloring, go ahead and trim it out.
- Once the paper plate is dry enough to touch, we are going to start assembling our picture frame. Grab your painted paper plate and the scissors again.
- Cut out a small circle {large enough for your picture but not too big} from the center of the paper plate. Discard the small piece.
- Go ahead and secure your printed picture inside the cutout.
- Finally, the last step is to staple on the graduation cap to the top of the decorated paper plate.
- Follow that up by adding any other embellishments you see fit. You can also write inspirational quotes or messages like “Class of [Year]” or “Congrats Grad!” on the frame using markers or foam letters.


NEED MORE HELP DOWNLOADING OUR FREE PRINTABLES? PLEASE REFER TO OUR FAQ PAGE
If you've enjoyed our content or have any thoughts to share, we'd love to hear from you! Mention @gluedtomycrafts or tag #gluedtomycrafts on Instagram!