
If you want some one-of-kind pieces to show off on the holiday tree, year after year, then look no further than our handmade Air Dry Clay Sequined Christmas Ornaments tutorial below! Then take some time to make your own air dry clay from scratch and recreate our idea this Christmas season!

Clay Ornaments For Kids To Make This Holiday Season!
Christmas is the perfect time for kids {and adults} to get creative.
When the weather is chilly and the mood gets festive – craft projects are a brilliant way to keep little ones busy while getting ready for the holiday season. So on that note – why not make your family’s Christmas a homemade one with these Air Dry Clay Sequined Christmas Ornaments?!
I’m sure you have seen all the homemade DIY Air Dry Clay recipes all over Pinterest.
I was a bit skeptical about it at first but still had to give it a try. Especially since I LOVE the idea of making affordable keepsake ornaments with my Lil Man.
So after a fun afternoon of crafting, I’ve come to the conclusion that this homemade clay ornaments craft idea a MUST DO activity during the winter time. It’s a simple and effective recipe & since I already had all the ingredients on hand {which you probably do too} it was a major score.
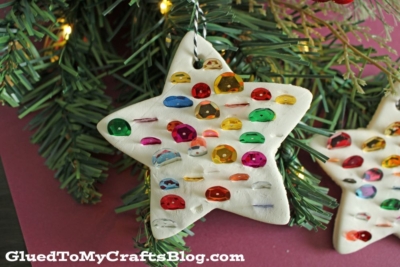
And to really add our special touch to the cookie cutter ornaments, all we did was add some sequins before we laid them out to dry. After a few days we had some beautiful pieces that now adorn your Christmas tree.
So if you want to do the same this holiday season – roll up your sleeves and join us in the fun! You can find the FULL tutorial for these Air Dry Clay Sequined Ornaments below!
Happy crafting, my friends! Don’t forget to share pictures of your clay Christmas ornaments when you are done, on our Facebook page. We LOVE seeing what you come up with! #gluedtomycrafts
RELATED: Scoop Stick Gnome Puppets and Paper Christmas Cookie Sheet

Clay Sequined Christmas Ornaments
These easy, sparkly ornaments are perfect for a handmade Christmas! Kids will love making them and parents will love the festive results.
Craft Supplies:
- 1/2 cup Corn Starch
- 3/4 cup Warm Water
- 1 cup Baking Soda
- Small, Loose Craft Sequins
- Large Christmas Cookie Cutters
- Plastic Straw
Directions:
- Throw all your dry ingredients in a medium sized sauce pan.
- Mix together.
- Place on stove and pour in the warm water, while turning the stove on to medium heat.
- Start stirring until it starts to bubble and come away from the sides of the pan.
- Once it starts to look like a soft play dough consistency, remove from heat and leave it to cool for a few minutes.
- Place clay mixture on your kitchen countertop and knead it until it becomes super soft and pliable.
- Grab a rolling pin and roll out the dough.
- Cut out your shapes with cookie cutters. Be sure to make a hanging hole with your straw.
- To add some bling and color, grab your sequins and gently push them into the clay. Arrange them however you want.
- Once done, place your clay shapes on a cookie sheet or plate.
- Then place in an undisturbed area and let them air-dry for a few days. Depending on the thickness, it may take a bit longer.
- When your Air Dry Clay Sequined Ornaments are completely harden, you can hang them with some ribbon or twine, on the Christmas tree, for everyone to see!
RELATED —> Ribbon Height Ornament


Now isn’t this clay and sequin Christmas ornament idea super fun, right? You can really let your kids go wild on this one by even skipping the sequins, letting the ornaments air dry and THEN painting them instead. OR you can add other embellishments like buttons, feathers, glitter etc.
Now that you have the basic air-dry clay recipe, you can make it a family tradition by making hand-crafted ornaments that you can do & enjoy together – year after year!
RELATED —> Thumbprint Heart Magnets

Air Dry Clay Sequined Christmas Ornaments
Here’s your checklist of supplies to bring this craft to life:
- 1/2 cup Corn Starch
- 3/4 cup Warm Water
- 1 cup Baking Soda
- Craft Sequins
- 1 Plastic Straw
- 1 Medium Sauce Pan
Prepare your creative haven by laying down a protective cover before the crafting magic begins!
Directions:
- First things first - throw all your dry ingredients in a medium sized sauce pan.1/2 cup Corn Starch, 1 cup Baking Soda
- Mix together.
- Place on stove and pour in the warm water, while turning the stove on to medium heat.3/4 cup Warm Water
- Start stirring until it starts to bubble and come away from the sides of the pan.
- Once it starts to look like a soft play dough consistency, remove from heat and leave it to cool for a few minutes.
- Place clay mixture on your kitchen countertop and knead it until it becomes super soft and pliable.
- Grab a rolling pin and roll out the dough.
- Cut out your shapes with cookie cutters. Be sure to make a hanging hole with your straw.
- To add some bling and color, grab your sequins and gently push them into the clay. Arrange them however you want.Craft Sequins
- Once done, place your clay shapes on a cookie sheet or plate.
- Then place in an undisturbed area and let them air-dry for a few days. Depending on the thickness, it may take a bit longer.
- When your ornaments are completely harden, you can hang them with some ribbon or twine, on the Christmas tree, for everyone to see!

Grab our favorite books via our Amazon affiliate link! In our Amazon storefront you will find books, toys and craft supplies we absolutely love using for our Glued To My Crafts tutorials!