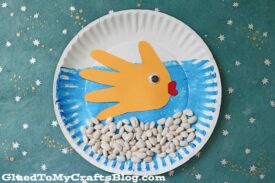
Unleash your little one’s creativity with this fun paper plate fish bowl craft! Simply add a handprint cutout to represent the fish and voila – an adorable kids’ art project they’ll be proud of!
Fish Bowl Paper Plate Craft
As you all know may know but now, my favorite crafts to do and share on Glued To My Crafts involve my son in some form or another.
I just LOVE seeing his face light up, as we do something artsy {and sometimes messy} together. Even if it’s the simplest thing EVER – he thinks it’s pretty grand!
Recently we made this fishbowl craft after watching the movie “Nemo” together. {My son is starting to get an obsession w/fish} Although we aren’t “ready” to take the next step and get a fish bowl of our own – I love our “handprint” fish that is currently hanging out on our fridge for everyone to see.
In case you would like to make this easy Paper Plate Fish Bowl kids craft with your child – today’s post is ALL about how YOU can pull it together and save yourself from a crafty mess too!
Just keep on scrolling to see the full tutorial and supply list below! I just know you are going to love making this fish art project idea with your little crafter today! Happy crafting, my friends!
RELATED —> Mason Jar Fish Bowl

This craft is the simple and affordable way to teach your kids about marine life! See how we made our paper plate & handprint fish bowl craft come to life!
Craft Supplies:
- Large Paper Plate
- Blue Craft Paint
- Painter’s Tape
- Paint Brush
- Cardstock Paper
- Marker
- Wiggle Eyes
- Craft Scissors
- School Glue
- Dried White Beans
Directions:
- First things first – using your painters tape, tape off a small section on the paper plate. {So your fish can come up for air and do backflips – ha!}
- Now have your child paint the paper plate completely blue. Just squirt a small amount on the paper plate and have them move it around with the paint brush.
- When they are done painting the paper plate, set it aside to let it dry completely.
- Next up – the handprint fish. Simply grab your cardstock paper, marker and scissors.
- Pick a hand – any hand!
- Now trace your child’s hand on the cardstock paper.
- Trim out the design you just made.
- Go ahead and decorate it with a wiggle eye so their fish can see!
- Now we are heading towards the last steps. Grab your glue and put a good layer on the bottom half of the painted paper plate.
- Ask your child to place the dried beans on top of the school glue.
- Once done with the “pebbles” glue the handprint fish in place {in the center} and peel off the painter’s tape.
- Now let everything dry completely, before displaying the paper plate fish bowl proudly for ALL to see!
RELATED —> Crinkle Paper Pet Fish
AFFILIATE LINK – PAIR OUR CRAFT IDEA WITH THIS BOOK RECOMMENDATION
We can’t let the fun stop here! QUICK! Click on over to our Bowling Ball Keepsake craft post for another DIY you will want to recreate with your child today! It would pair nicely with today’s paper plate fish bowl tutorial – hint hint! #gluedtomycrafts
FOLLOW US ON PINTEREST SO YOU NEVER MISS A NEW TUTORIAL FROM US!
Paper Plate Fish Bowl w/Handprint Fish Craft Idea
Here’s your checklist of supplies to bring this craft to life:
- 1 Large Paper Plate
- Craft Paint
- Cardstock Paper
- 1 Wiggle Eyes
- Dried White Beans
Prepare your creative haven by laying down a protective cover before the crafting magic begins!
Directions:
- First things first - using your painters tape, tape off a small section on the paper plate.
- Now have your child paint the paper plate completely blue. Just squirt a small amount on the paper plate and have them move it around with the paint brush.
- When they are done painting the paper plate, set it aside to let it dry completely.
- Next up - the handprint fish. Simply grab your cardstock paper, marker and scissors.
- Pick a hand - any hand!
- Now trace your child's hand on the cardstock paper.
- Trim out the design you just made.
- Go ahead and decorate it with a wiggle eye so their fish can see!
- Now we are heading towards the last steps. Grab your glue and put a good layer on the bottom half of the painted paper plate.
- Ask your child to place the dried beans on top of the school glue.
- Once done with the "pebbles" glue the handprint fish in place {in the center} and peel off the painter's tape.
- Now let everything dry completely, before displaying the paper plate fish bowl proudly for ALL to see!

CLICK HERE TO PRINT THE DIRECTIONS FOR THIS CRAFT


