Glued To My Crafts

Join thousands of others who have gotten GLUED to our craft tutorials!

  • Home
  • About Us
  • Safety Guidelines
  • Seasonal Crafts
    • New Years
    • Valentine’s Day
    • St. Patrick’s Day
    • Spring
    • Easter
    • Mother’s Day
    • Summer
    • Father’s Day
    • Patriotic
    • Halloween
    • Thanksgiving
    • Fall
    • Winter
    • Christmas
    • Snowmen
    • Story Time
  • Monthly Themes
    • January Craft Ideas
    • February Craft Ideas
    • March Craft Ideas
    • April Craft Ideas
    • May Craft Ideas
    • June Craft Ideas
    • July Craft Ideas
    • August Craft Ideas
    • September Crafts
    • October Crafts
    • November Crafts
    • December Crafts
  • Amazon Storefront
  • Privacy Policy

Paper Plate Christmas Light Covered Snowman Craft Idea

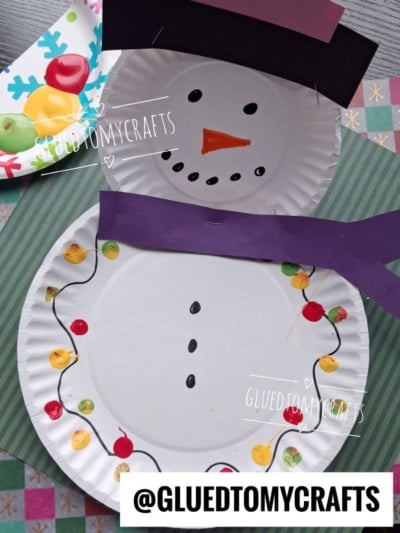
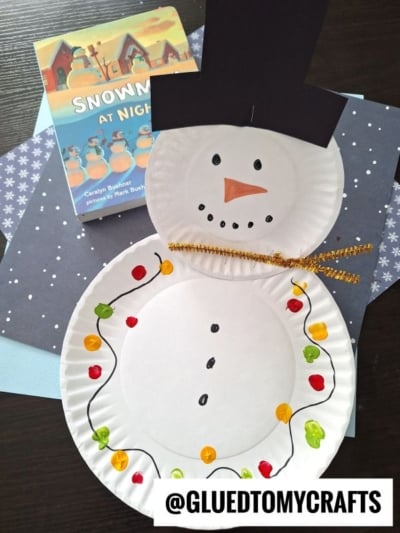
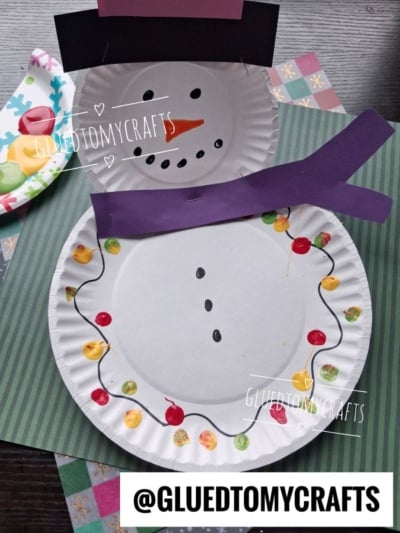
A snowman craft made from two white paper plates, decorated with a purple paper scarf, a black paper hat, and painted colorful string lights.

Snowmen are fun all on their own. Wrap one in a twinkly string of Christmas lights, though, and it becomes the merriest guy on the block! This paper plate snowman craft is simple, cheerful, and perfect for little hands. It pairs beautifully with the beloved picture book Snowmen at Night by Caralyn Buehner, with pictures by Mark Buehner.

If you’ve read the book, you know the story imagines what snowmen get up to while we’re asleep. They sled, skate, and sip cold cocoa under the stars. It’s pure winter magic, and it makes a great springboard for a cozy craft session at home or in the classroom.

Here at @GluedToMyCrafts, we love crafts that start with a good story. This one comes together with basic supplies you probably already have. Kids get to draw, paint, glue, and twist, so it’s packed with fine motor practice too. Let’s build a snowman!

Craft Supplies:

Gather these supplies before you begin:

  • 2 white paper plates (one smaller for the head, one larger for the body)
  • Black marker
  • Orange marker
  • Black construction paper or cardstock (for the hat)
  • Any color construction paper (for the hat band and scarf)
  • Finger paints in red, yellow, and green
  • A spare paper plate to use as a paint palette
  • Stapler (for assembling the snowman)
  • Scissors (for the grown-up to cut the hat and scarf)

Directions:

Step 1: Draw the Snowman’s Face

Use the black marker to draw two round eyes on the smaller plate. Then add a smile made of small dots in a curved line.

Step 2: Add the Carrot Nose

Draw a long, pointy triangle in the center of the face.

Step 3: Make the Top Hat

Cut a tall rectangle from the black construction paper or cardstock for the hat, then cut a wider, flat strip for the brim. Staple the brim horizontally across the top of the head plate. Then staple the tall rectangle on top of the brim. For a fun finishing touch, cut a thin strip out of a colorful piece of paper scrap and staple or tuck it across the band of the hat. It adds a cheerful pop of color!

Step 4: Draw the Light String on the Body

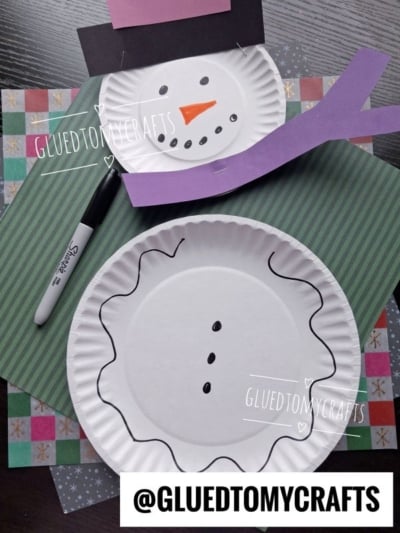
Take the larger paper plate and use the black marker to draw a thin, wavy line around the inside rim. Loop it all the way around until the ends meet. This line is the “wire” for your string of Christmas lights.

Step 5: Draw the Buttons

Use the black marker to draw three solid dots in a straight vertical line down the center of the body plate. These are your snowman’s buttons. Big or small, they all count!

Step 6: Finger Paint the Lights

Set up a small paper plate as your paint palette and squeeze out dollops of red, yellow, and green finger paint. Have your child dip a fingertip into one color and press it onto the wavy line. Keep going, switching colors as you go, until the whole string is covered in bright little bulbs.

Mess-saving tip: Keep a damp paper towel nearby to wipe fingers between colors. That way the reds stay red and the greens stay green.

Step 7: Let the Paint Dry

Set the body plate aside and let the finger-painted lights dry completely before moving on to assembly. This keeps the colors crisp and prevents smudging.

Step 8: Make and Attach the Scarf

Cut a long strip of colored construction paper for the scarf. Snip a small V-shape or two pointed tips into one end to give it that classic scarf look. Staple the scarf horizontally across the neck area — right where the two plates will meet — with the decorative end draping to one side.

Step 9: Staple the Snowman Together

Place the smaller head plate on top of the larger body plate so they overlap slightly at the neck. Staple them together securely, making sure the scarf is sandwiched in between for a tidy finish. Press firmly to make sure everything holds.

Step 10: Admire Your Snowman!

Stand back and take a look at your festive creation. Your Christmas light snowman is all dressed up and ready to brighten the season!

RELATED —> Fingerprint Christmas Light Picture Frame
Two white paper plates being crafted into a snowman, one decorated with a face and hat, and the other with wavy lines and buttons. Three white paper plates decorated for Christmas: one with a snowman face, one with a painted caterpillar, and one with a string of colorful lights painted around the rim. A snowman craft made from two paper plates, featuring a paper top hat, a purple construction paper scarf, and painted buttons and string lights.A paper plate snowman craft with a black paper hat and a string of painted lights, sitting next to the book Snowmen at Night.

GRAB THE BOOK “SNOWMEN AT NIGHT” VIA OUR AMAZON AFFILIATE LINK

This paper plate Christmas light snowman brings together a favorite book, bright colors, and plenty of hands-on fun. It’s the kind of craft that kids are proud to show off and grown-ups love to keep.

So grab your paper plates, open up Snowmen at Night, and let the holiday crafting begin! We’d love to see your colorful creations. Share a photo and tag @GluedToMyCrafts so we can cheer on your sparkly snowmen. Happy crafting, and may your season be merry and bright!

A blue text on a white background, perfect for creating a charming the places you'll go keepsake.


OUR PRIVACY POLICY

OUR COPYRIGHT POLICY

  • Email
  • Facebook
  • Instagram
  • Pinterest
  • Twitter
  • YouTube

Love our crafts?

Follow us on Google

Click & check the box to see us more in your search results!

LOOKING FOR SOMETHING?

EXPLORE OUR SITE:

© 2012–2026 Glued To My Crafts

© All Rights Reserved. All images, artwork, and visual materials contained herein are the exclusive property of the copyright holder and are protected under applicable copyright laws and international treaties. No individual, entity, or organization is authorized to reproduce, distribute, or use any of these images in any manner without express written consent from the copyright holder. The following actions are strictly prohibited: copying, pasting, saving, screenshotting, downloading, or otherwise distributing any images, in whole or in part, by any means or method. Furthermore, it is strictly forbidden to input, upload, submit, or process any of these images through any artificial intelligence system, generative model, machine learning algorithm, neural network, or similar technology for the purpose of creating derivative, modified, reproduced, or newly generated works of any kind. Any output, image, or material generated by artificial intelligence or comparable technology that is derived from, trained upon, or based in any way on these images is likewise subject to this prohibition. Claiming, presenting, or asserting any such AI-generated output as one's own original work is expressly prohibited and constitutes a violation of the copyright holder's rights. Any unauthorized use, reproduction, or exploitation of these images, whether by human or automated means, constitutes copyright infringement. Infringement may result in legal action, including but not limited to claims for damages, injunctive relief, and recovery of legal costs. All rights not expressly granted herein are reserved.

All activities should be supervised by an adult at all times. Please refer to our safety guidelines for more information.


Please note that all the content of the website, including printables, are for classroom and personal use only. This means that any digital item you download from our site can be used for non-commercial use only. We kindly request that you do not reproduce or sell our creations. We appreciate your understanding and cooperation in respecting our content and intellectual property rights.

Accessibility Adjustments

Powered by OneTap

How long do you want to hide the toolbar?
Hide Toolbar Duration
Select your accessibility profile
Vision Impaired Mode
Enhances website's visuals
Seizure Safe Profile
Clear flashes & reduces color
ADHD Friendly Mode
Focused browsing, distraction-free
Blindness Mode
Reduces distractions, improves focus
Epilepsy Safe Mode
Dims colors and stops blinking
Content Modules
Font Size

Default

Line Height

Default

Color Modules
Orientation Modules