
Winter is the perfect time to snuggle up indoors, and bears know this better than anyone. While they curl up for their long winter nap, your little ones can make a cozy bear of their own. This sweet bear cave craft turns a simple black paper plate into a snowy night scene, with a smiling cupcake liner bear peeking out from the drifts.
It’s quick, low-mess, and uses supplies you probably already have. It works well at the kitchen table, in a classroom, or during a daycare craft session. Kids love the soft cotton ball snow and sparkly snowflakes, and grown-ups love how easy it is to set up. Each bear turns out a little different, which makes every one special.
Craft Supplies:
Gather these supplies before you start:
- 1 black paper plate
- 1 brown cupcake liner
- Light-brown construction paper
- Cotton balls
- White glittery snowflake stickers
- Black marker
- Glue (white school glue or a glue stick)
Directions:
Step 1: Prepare the Bear Ears
Start by cutting two small half-circles from the light-brown construction paper. These will be your bear’s ears. Each one should be about the size of a quarter or a little larger, depending on the size of your cupcake liner.
Step 2: Attach the Ears and Cupcake Liner Head
Gently press the cupcake liner flat with your hands. Smooth out the ridges so it looks like a round, fuzzy bear face.
Next, place the liner in the center of the black paper plate to see where it will go. Glue the two ears onto the plate so they sit at the top left and top right of where the head will be. Only the curved part of each ear should peek out.
Now add glue to the back of the cupcake liner and press it down over the flat edges of the ears. This layering makes the ears look like they’re growing right out of the bear’s head. Hold it in place for a few seconds so it sticks.
Step 3: Draw the Facial Features
This is where your bear’s personality comes to life!
- Make the muzzle. Cut a small horizontal oval from the light-brown construction paper. Glue it onto the lower half of the cupcake liner.
- Draw the eyes. Use the black marker to draw two small, tall ovals above the muzzle. Color them in for a bright-eyed look.
- Add the nose. Draw a small rounded triangle or oval near the top of the muzzle and fill it in.
- Give it a smile. Right below the nose, draw a curved “W” shape for a happy bear mouth.
Encourage kids to try their own twist. A wink, rosy cheeks, or eyebrows can give each bear a unique look. Sleepy closed eyes are a fun choice too, since this bear is ready to hibernate!
Step 4: Add Snowflake Stickers in an Arch
Time for some winter sparkle. Peel the glittery snowflake stickers and press them onto the black plate in a gentle arch around the bear’s head. Place one at the top and two on each side.
The dark plate makes the white snowflakes really pop. It looks like snow is softly falling outside the bear’s cave on a quiet winter night.
Step 5: Glue Cotton Ball Snow Along the Bottom
Finish your scene with a cozy snowdrift. Add a line of glue along the bottom curve of the plate. Press cotton balls into the glue, side by side.
Let the cotton balls overlap the bottom of the cupcake liner a little. This makes it look like your bear is nestled deep in the snow, safe and snug in its cave.
Set the plate flat to dry for about 15 to 20 minutes before hanging or displaying it.
RELATED —> Popsicle Stick Hibernating Bear Craft Idea
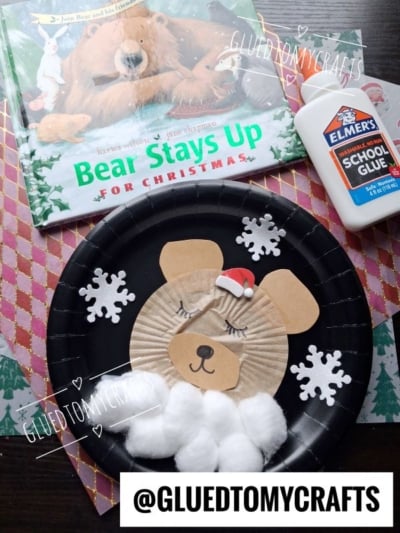
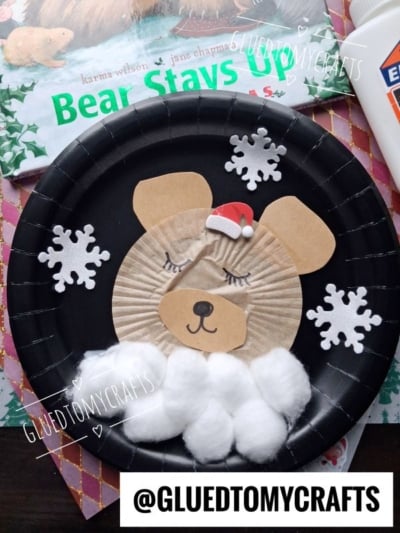
PAIR THIS CRAFT WITH THE BOOK “BEAR STAYS UP FOR CHRISTMAS” – GRAB IT VIA OUR AMAZON AFFILIATE LINK
And just like that, you have a snug little bear tucked into its winter cave! We hope this craft brings plenty of giggles, glitter, and cozy moments to your home or classroom.
We’d love to see how your bears turned out. Snap a photo of your finished craft and share it with friends, family, or fellow crafters. Every bear is one of a kind, just like the little hands that made it.
Happy crafting, and stay warm out there!