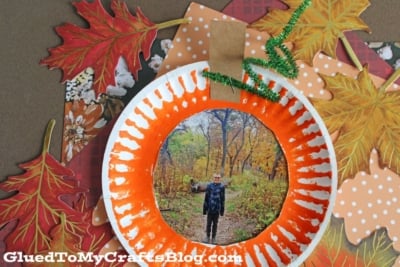
Fall is the perfect time to get creative with crafts, especially for families looking to spend quality time together. This season brings vibrant colors, cozy vibes, and plenty of opportunities to capture memories. What better way to combine all these elements than by making a delightful Paper Plate Pumpkin Picture Frame?
Whether you’re a parent, teacher, or simply a craft enthusiast, this project is a fun and easy way to commemorate your favorite fall moments with a personalized touch.
Get ready to roll up your sleeves and transform ordinary paper plates into charming pumpkin picture frames. By the end of this tutorial, you’ll have a beautiful keepsake that celebrates the season and showcases your cherished memories!
Craft Supplies:
To create your Paper Plate Pumpkin Picture Frame, you will need the following supplies:
- Small White Paper Plate
- 4×6″ Printed Picture
- Scissors
- Orange Craft Paint
- Foam Paint Brush
- Stapler
- Brown Cardstock Paper
- Green Pipe Cleaner
- optional material – ribbon/hot glue gun for hanging
Directions:
- First cut out a circle shape out of the center of your small paper plate {don’t cut the rim though!} to create an opening for your picture.
- Discard the excess paper you just cut out.
- Next up – paint the paper plate shape completely orange.
- Set aside to let it dry a bit.
- Next grab your brown cardstock paper and cut out a stem for on top of your pumpkin.
- At this point in time you should also go ahead and trim down the printed picture to be placed inside the paper plate frame.
- Now we are ready for assembling.
- Go ahead and staple the cardstock piece in place, along with a curled pipe cleaner, on the painted paper plate.
- Follow that up by stapling the picture in last.
- If desired – add other embellishments or hot glue a piece of ribbon to the back for easy hanging.
- Then display proudly for ALL to see!
Perfect for Halloween or Thanksgiving decorations, it’s a great way to capture and display your favorite autumn moments!
RELATED —> Squirrel In Paper Plate Pumpkin
AFFILIATE LINK – PAIR OUR CRAFT IDEA WITH THIS BOOK RECOMMENDATION
By following this tutorial, you’ll create a beautiful keepsake and make lasting memories with your child. Along the way, you’ll also teach valuable lessons and skills.
Ready to start? Gather your materials, set up your craft space, and enjoy the creative process. Happy crafting!
For more fun and tips, subscribe to our newsletter and join our crafting community. Together, we can inspire and nurture the next generation of creative minds!
Paper Plate Pumpkin Picture Frame Craft Idea
Here’s your checklist of supplies to bring this craft to life:
- Small Paper Plate
- Printed Picture
- Craft Paint
- Cardstock Paper
- Pipe Cleaner
Prepare your creative haven by laying down a protective cover before the crafting magic begins!
Directions:
- First cut out a circle shape out of the center of your small paper plate {don't cut the rim though!} to create an opening for your picture.
- Discard the excess paper you just cut out.
- Next up - paint the paper plate shape completely orange.
- Set aside to let it dry a bit.
- Next grab your brown cardstock paper and cut out a stem for on top of your pumpkin.
- At this point in time you should also go ahead and trim down the printed picture to be placed inside the paper plate frame.
- Now we are ready for assembling.
- Go ahead and staple the cardstock piece in place, along with a curled pipe cleaner, on the painted paper plate.
- Follow that up by stapling the picture in last.
- If desired - add other embellishments or hot glue a piece of ribbon to the back for easy hanging.
- Then display proudly for ALL to see!


