Get creative this holiday season with this adorable Popsicle Stick Christmas Frame Ornament! Perfectly festive and oh-so-easy to make!

Get festive with an easy DIY craft! Make a beautiful Popsicle Stick Christmas Frame Ornament that looks as if you put in lots of effort. It’s sure to make your tree look merry & bright this holiday season!

Deck the halls with handmade memories this holiday season! 🎄✨ Our Popsicle Stick Christmas Picture Frame craft is the perfect way to combine creativity and cherished moments into one festive keepsake.
Whether you’re looking for a fun family activity, a thoughtful gift idea, or a unique way to display your favorite holiday photos, this easy DIY project has you covered.
With just a few simple supplies and a sprinkle of holiday cheer, you’ll create a frame that’s as special as the memories it holds. Let’s get crafting and make this Christmas even more magical!

Craft your own special Christmas memory with this easy DIY craft stick Santa picture frame ornament tutorial! Just a few popsicle sticks, some patience and creativity, and you’ll have a beautiful piece for the tree!
Craft Supplies:
- Jumbo Popsicle Sticks – six per craft
- Hot Glue Gun
- Red Craft Paint
- Paint Brush
- Scissors
- Cardstock Paper
- optional – ribbon and embellishments
Directions:
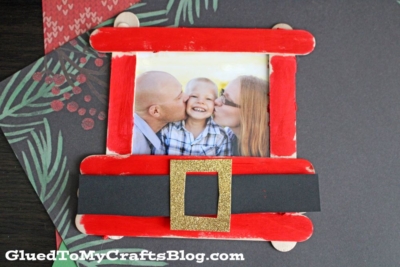
- First things first – hot glue your frame together. You will need SIX jumbo popsicle sticks per craft. The best way I explain this step, is to make a fence but with a large gap in between. Please use my picture above for an example.
- Once you have your piece glued together, it’s time for paint! Paint the front side of your piece completely red. This will represent “Santa.” Set aside.
- While that is drying, go ahead and cut out his belt & buckle from your cardstock paper.
- To finish off the Craft Stick Christmas Frame – glue your cardstock pieces in place, along with your picture in the frame. Go ahead and add any other embellishments you see fit.
- Now you can either prop your ornament as is on the tree or hot glue some ribbon to the back.
- Then set aside to let it dry completely before displaying proudly!
RELATED —> Popsicle Stick Tree Frame Ornaments

As you can see, making your own Super Simple Popsicle Stick Christmas Picture Frame Ornaments is incredibly easy and so rewarding. While it may not take long to make these DIY decorations, the memories associated with creating something special for the holiday season will remain with your family for years to come.
So why not start a new tradition this Christmas and give it a try! With only a few supplies and some ideas and creativity, you too can make beautiful handcrafted Christmas tree ornaments that everyone would be proud to hang on the tree.
Have fun getting creative and making something unique in time for Santa’s arrival!

Popsicle Stick Christmas Picture Frame Ornament
Get creative this holiday season with this adorable Popsicle Stick Christmas Frame Ornament! Perfectly festive and oh-so-easy to make!
Here’s your checklist of supplies to bring this craft to life:
- Jumbo Popsicle Sticks
- Craft Paint
- Cardstock Paper
- Ribbon
- Embellishments
Prepare your creative haven by laying down a protective cover before the crafting magic begins!
Directions:
- First things first - hot glue your frame together. You will need SIX jumbo popsicle sticks per craft. The best way I explain this step, is to make a fence but with a large gap in between. Please use my picture above for an example.
- Once you have your piece glued together, it's time for paint! Paint the front side of your piece completely red. This will represent "Santa." Set aside.
- While that is drying, go ahead and cut out his belt & buckle from your cardstock paper.
- To finish off the Craft Stick Christmas Frame - glue your cardstock pieces in place, along with your picture in the frame. Go ahead and add any other embellishments you see fit.
- Now you can either prop your ornament as is on the tree or hot glue some ribbon to the back.
- Then set aside to let it dry completely before displaying proudly!

CLICK HERE TO PRINT THE DIRECTIONS FOR THIS CRAFT
If you've enjoyed our content or have any thoughts to share, we'd love to hear from you! Mention @gluedtomycrafts or tag #gluedtomycrafts on Instagram!