Get creative with your kids this fall season! Here’s a fun and easy crinkle paper pumpkin craft idea that is sure to bring them joy.
Our latest “crinkle paper jack-o-lantern pumpkin” kid craft idea is for the younger children in your home to recreate this fall season.
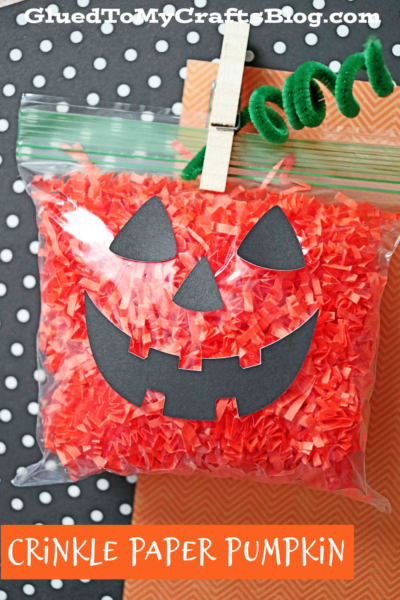
With just a simple plastic baggie, your Cricut Maker 3 and some inexpensive orange crinkle paper you typically find at Dollar Tree this time of year, you too can pull together this DIY with your inspiring little crafter, within minutes!
Not only is this pumpkin themed craft idea super easy for toddlers to make BUT the finished creation makes a great crunchy sound afterwards, as well! There are a lot of win wins with this one!

You’ll be surprised how much color and texture it adds to your Halloween decorations! We hope you give it a try today!
Craft Supplies:
- Sandwich Baggie
- Cricut Smart Paper Sticker Cardstock
- Cricut Maker 3 Machine
- Cricut Design Space App
- Orange Crinkle Paper
- Large Clothespin
- Green Pipe Cleaner
Directions:
- First things first – we are going to cut out the jack-o-lantern face design, using our Cricut Maker 3 and the black sticker cardstock paper. Go ahead and plug in your machine.
- Now, in your Cricut Design Space app, you are going to start a new project, hit add image and type in “jack-o-lantern face” in the search bar. There are several different options to choose from in the app but we decided to go with #M2E2840A3 – Happy Jack-O-Lantern Face Silhouette {feel free to use whatever witch design you like – there are tons to choose from. Just remember to get your child’s input since it’s their creation!}
- I then resized the pumpkin face graphic on my screen, to 3.5 inches wide but you can make it any size you like. You just have to keep in mind that it needs to fit on your sticker cardstock paper AND on the front of your plastic baggie. I would say that you go no bigger than 5 inches for your face.
- Once you have the desired design/size squared away, load the black sticker paper in the machine and hit cut. From there the Cricut will do the rest.
- When it’s done cutting, just pull it out of the machine and set aside till later.
- Next grab your sandwich baggie and orange crinkle paper.
- Open up the sandwich baggie and stuff it with the orange crinkle paper. Just a handful at a time until it’s full.
- Now seal off your baggie at the top. Set aside.
- Grab your green pipe cleaner. Curl it with your fingers.
- If desired, use a marker or paint to make your clothespin brown. If not, move ahead to the next step.
- Pinch your clothespin {the stem} and pipe cleaner {vine} to the top of the baggie.
- Finally – to finish off the Plastic Baggie and Crinkle Paper Pumpkin craft, add your “pumpkin sticker face” that you made earlier with your Cricut Maker 3, to the center of the baggie. Just like a sticker 🙂
- And that’s it! You now have a pumpkin. Go ahead and display it for ALL to see!
RELATED —> Crinkle Paper Witch

Do you love this idea? That’s great news because we are STUFFED with so many great pumpkin themed tutorials for YOU to tackle this fall. Several of which would pair nicely with today’s craft idea – hint hint!
I’ll go ahead and link a few of my favorite below. Check them out and let us know what you think on our Facebook page! I can’t wait to hear from you! #gluedtomycrafts
Paper Plate Pie Tic Tac Toe Game
Pom Pom Stamped Eyeball Wreath
Popsicle Stick Halloween Gnome
