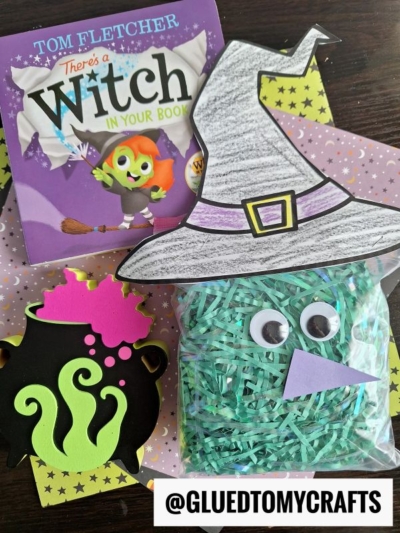
Using just a sandwich baggie & some crunchy paper found at Dollar Tree, you too can pull together this Crinkle Paper Witch idea together!

Today’s “Crinkle Paper Witch” toddler friendly craft idea is something that is NOT scary for the upcoming Halloween season! I can promise you that!
Using just a simple sandwich baggie and some crunchy green colored crinkle paper found at Dollar Tree, you can pull together this DIY with your child, within minutes!

This Halloween, transform simple materials into a magical masterpiece with our Crinkle Paper Witch craft! Using just a sandwich baggie, green crinkle paper, and a few crafty embellishments, you and your little ones can create a whimsical witch that’s perfect for spooky season decor.
This toddler-friendly project is quick, easy, and oh-so-fun, making it the ideal activity for a creative afternoon. So, grab your supplies and let’s conjure up some Halloween magic together! 🧹✨

Are you looking for an easy, fun craft that your kids can make in minutes this Halloween season? This green witch made out of shredded crinkle paper is the perfect October craft project for your creative little one to recreate!
Craft Supplies:
- Sandwich Baggie
- Black Marker
- Adhesive Wiggle Eyes
- Shredded Crinkle Paper
- Hat Printable – on our landing page
- Cardstock Paper
- Scissors
- Adhesive
- Stapler
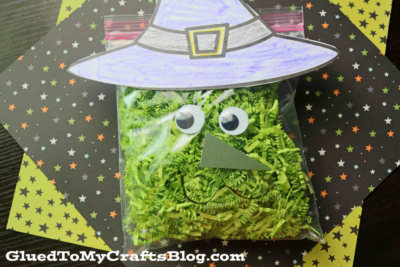
Directions:
- First things first – grab your sandwich baggie, wiggle eyes and black Sharpie marker.
- Draw on a mouth on one side of the sandwich baggie.
- Follow that up by gluing on the wiggle eyes.
- Now grab your choice of colored cardstock paper for the nose.
- Cut out a simple triangle nose for the witch.
- Use your choice of adhesive to adhere the nose onto the baggie.
- Let it dry a bit.
- Next up – stuff the baggie with the green colored crinkle paper. Just a handful inside the bag until it’s full.
- Now seal off your baggie at the top. Set aside.
- Grab your printed {and colored in!} witch hat printable.
- Cut out the design and discard excess paper.
- Finally – to finish off the Plastic Baggie and Crinkle Paper Witch craft, staple the hat piece to the top of the stuffed baggie.
- Add any other embellishments you see fit.
- Then display for ALL to see and don’t forget to share a picture with us on your social media sites! #gluedtomycrafts
RELATED —> Paper Plate Black Cat
Learn how to easily transform ordinary craft supplies into creative art projects that shine bright this Halloween season!
Before you leave, check out our Stuffed Jack-O-Lantern, Yarn Witch and Paper Plate Witch Hat craft tutorials! All three of which are super unique to Glued To My Crafts!

Shredded Crinkle Paper Witch Craft
Using just a sandwich baggie & some crunchy paper found at Dollar Tree, you too can pull together this Crinkle Paper Witch idea together!
Here’s your checklist of supplies to bring this craft to life:
Prepare your creative haven by laying down a protective cover before the crafting magic begins!
Directions:
- First things first - grab your sandwich baggie, wiggle eyes and black Sharpie marker.
- Draw on a mouth with the Sharpie marker.
- Add the wiggle eyes.
- Now grab your purple colored cardstock and scissors.
- Cut out a simple triangle nose for the witch.
- Use your choice of adhesive to adhere the nose onto the baggie.
- Let it dry a bit.
- Next up - stuff the baggie with the green colored crinkle paper. Just a handful inside the bag until it's full.
- Now seal off your baggie at the top. Set aside.
- Grab your black cardstock and scissors again.
- Cut out a witch hat.
- Finally - to finish off the Plastic Baggie and Crinkle Paper Witch craft, staple the hat piece to the top of the stuffed baggie.
- Add any other embellishments you see fit.


NEED MORE HELP DOWNLOADING OUR FREE PRINTABLES? PLEASE REFER TO OUR FAQ PAGE
If you've enjoyed our content or have any thoughts to share, we'd love to hear from you! Mention @gluedtomycrafts or tag #gluedtomycrafts on Instagram!