Let the rainbow bring you a pot of creative fun! Get your kiddos crafting with this DIY chalk art rainbow and pot of gold - their imaginations will thank you!


Will you find a rainbow at the end of our latest & greatest tutorial?! I sure hope so!
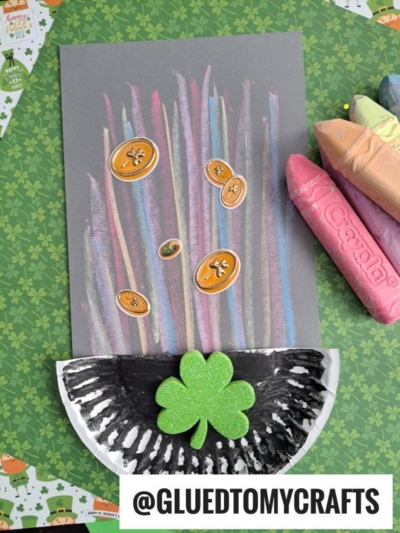
Today’s Paper Plate & Chalk Art Rainbow Pot of Gold craft tutorial is drenched with so much COLORFUL crafty fun! All you need is a few supplies to make it shine bright!
Keep scrolling to see how we made this Paper & Chalk Pot of Gold craft idea come to life with a few simple supplies and steps! I’ll show YOU how easy it really is to incorporate into your St. Patrick’s Day celebrations!

Are you looking for a fun St. Patrick’s Day craft idea for kids? Look no further than this chalk art rainbow pot of gold tutorial!
Craft Supplies:
- Small Paper Plate
- Scissors
- Black Craft Paint
- Paint Brush
- Gray Cardstock Paper
- Sidewalk Chalk
- Baby Wipes
- Adhesive
- Stapler
- Shamrock Stickers
Directions:
- First things first – grab your small paper plate and scissors.
- Cut the paper plate, straight down the center, into TWO equal halves.
- Reserve one half for today’s pot of gold craft and save the other for a rainy day.
- Now grab your black colored craft paint and foam paint brush.
- Squirt some paint in the middle of the paper plate half and move it around with the foam paint brush, until the paper plate is completely covered.
- When done painting, set aside the paper plate to allow it to dry completely.
- Now grab your gray colored cardstock and the scissors again.
- Fold the gray cardstock paper in half and open it back up.
- Use scissors to again to cut straight up the center, to create two equal pieces.
- Reserve one gray paper piece for today’s craft and save the other for another day.
- Now grab your various pieces of colored chalk.
- Make several lines, all over the gray cardstock paper, to recreate a rainbow. Add as much lines {and colors} or as little as you like.
- When done with the chalk, grab your painted paper plate piece and the stapler.
- Staple the painted paper plate half to the bottom of the gray cardstock with the chalk lines.
- Add any other embellishments you see fit {like the a shamrock sticker to the center of the black “pot” to tie the theme together.}
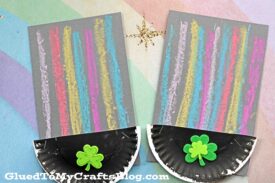
- Then display your custom one-of-a-kind paper chalk art rainbow piece proudly for all to see!
RELATED —> At The End Of My Rainbow Craft
Before you leave to give this fun DIY a tie, be sure to check out our popular Wooden Spoon Leprechaun, Chalk Art Leprechaun and Tissue Paper Pot of Gold craft posts.
All three are super unique to our website and sure to impress the crafty fingers that recreate them this season!
Not to mention, they would pair nicely with today’s Chalk Art Rainbow tutorial – hint hint!

Chalk Art Rainbow Pot of Gold Craft
Let the rainbow bring you a pot of creative fun! Get your kiddos crafting with this DIY chalk art rainbow and pot of gold - their imaginations will thank you!
Here’s your checklist of supplies to bring this craft to life:
- 1 Small Paper Plate
- Craft Paint
- Cardstock Paper
- Sidewalk Chalk
- Embellishments
Prepare your creative haven by laying down a protective cover before the crafting magic begins!
Directions:
- First things first - grab your small paper plate and scissors.1 Small Paper Plate
- Cut the paper plate, straight down the center, into TWO equal halves.
- Reserve one half for today's pot of gold craft and save the other for a rainy day.
- Now grab your black colored craft paint and foam paint brush.Craft Paint
- Squirt some paint in the middle of the paper plate half and move it around with the foam paint brush, until the paper plate is completely covered.
- When done painting, set aside the paper plate to allow it to dry completely.
- Now grab your gray colored cardstock and the scissors again.Cardstock Paper
- Fold the gray cardstock paper in half and open it back up.
- Use scissors to again to cut straight up the center, to create two equal pieces.
- Reserve one gray paper piece for today's craft and save the other for another day.
- Now grab your various pieces of colored chalk.
- Make several lines, all over the gray cardstock, to recreate a rainbow. Add as much lines {and colors} or as little as you like.Sidewalk Chalk
- When done with the chalk, grab your painted paper plate piece and the stapler.
- Staple the painted paper plate half to the bottom of the gray cardstock with the chalk lines.
- Add any other embellishments you see fit {like the a shamrock sticker to the center of the black "pot" to tie the theme together.}Embellishments
- Then display your custom one-of-a-kind paper chalk art rainbow piece proudly for all to see!

CLICK HERE TO PRINT THE DIRECTIONS FOR THIS CRAFT
If you've enjoyed our content or have any thoughts to share, we'd love to hear from you! Mention @gluedtomycrafts or tag #gluedtomycrafts on Instagram!