It's a touch of Dr. Seuss whimsy! All you need is sidewalk chalk, paper and paper plates to bring these two to life!

Step aside boring crafts! With a touch of Dr. Seuss whimsy and my sidewalk chalk frenzy that taken over Glued To My Crafts as of late, today I present to YOU our unique chalk art Thing 1 & 2 craft tutorial!!

This latest Dr. Seuss themed art project idea from us is the seriously the SIMPLEST! No really – all it takes is a little paper cutting and some line strokes on paper with the chalk. That’s it! I’m seriously squealing with so much excitement on this one.
So friends – there is no silly mischief coming from these funny looking friends and their wild hair. I PROMISE you can make it happen for your child at home or in a large classroom setting with a group.
Just keep on scrolling to see how I pulled together this Paper Plate and Sidewalk Chalk Thing 1 & 2 craft idea!
Happy crafting, my friends! May your days be full of love, laughter and craft time!


Get creative with this Thing 1 & 2 craft idea! Bring out the chalk and unleash your child’s inner artist!
Craft Supplies:
- Small Paper Plate
- Scissors
- Black Sharpie Marker
- Red Sharpie Marker
- Black Cardstock Paper
- Blue Sidewalk Chalk
- Baby Wipes
- Adhesive
- Stapler
Directions:
- First things first – grab your small paper plate and scissors.
- Cut the paper plate, straight down the center, into TWO equal halves.
- Reserve one half for today’s Thing 1 craft and save the other for a rainy day.
- Now grab your two Sharpie markers and the paper plate half.
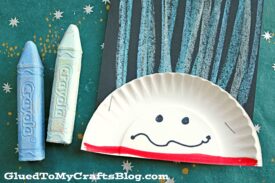
- Start with the red marker and draw a thick line on the straight edge of the paper plate. This is his iconic red costume.
- Follow that up by using the black marker to draw on a simple face in the center of the paper plate.
- When done drawing, set aside the paper plate till the last step.
- Now grab your black cardstock and the scissors again.
- Fold the black cardstock paper in half and open it back up.
- Use scissors to again to cut straight up the center, to create two equal pieces.
- Reserve one black paper piece for today’s craft and save the other for another day.
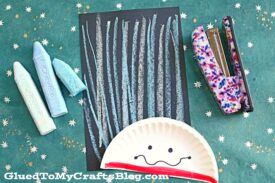
- Now grab your various shades of blue chalk, Make several lines, all over the black cardstock, to recreate Thing 1’s wacky hair. Add as much or as little as you like.
- When done with the chalk, set aside the paper piece and clean your hands off with a few baby wipes.
- Now grab the paper plate piece and your stapler.
- Go ahead and staple your paper plate half to the bottom of the black cardstock with the blue chalk lines. You want it to look like the hair is coming from the paper plate.
- Add any other embellishments you see fit {maybe some glitter or some stickers for a festive look.}
- Then display your custom one-of-a-kind paper chalk art Thing 1 piece proudly for all to see!
- Now repeat the steps above for the second paper plate half to make Thing 2 come to life to be paired with the first one 🙂
- Don’t forget to share pictures of your wacky hair Thing 1 & Thing 2 paper craft with us on your social media sites! #gluedtomycrafts
RELATED —> Chalk Art Fox Craft

At Glued To My Crafts, we share wonderful, easy to follow tutorials to get crafty with your child! Several of which pair nicely with beloved children’s books like today’s fresh new idea!
Do you love our unique Chalk Art Thing 1 & 2 Craft idea? Be sure to check out our Cat in the Hat Puppet and Paint Splat Truffula Trees craft tutorials posts for a few more creative ideas that we recently shared in honor of Dr Seuss!!!
I also love our super popular Paper Plate Fox tutorial that pairs with the book “Fox In Socks” by Dr Seuss. Go check them out!

Chalk Art Thing 1 and 2 Craft Idea
It's a touch of Dr. Seuss whimsy! All you need is sidewalk chalk, paper and paper plates to bring these two to life!
Here’s your checklist of supplies to bring this craft to life:
Prepare your creative haven by laying down a protective cover before the crafting magic begins!
Directions:
- First things first - grab your small paper plate and scissors.
- Cut the paper plate, straight down the center, into TWO equal halves.
- Reserve one half for today's Thing 1 craft and save the other for a rainy day.
- Now grab your two Sharpie markers and the paper plate half.
- Start with the red marker and draw a thick line on the straight edge of the paper plate. This is his iconic red costume.
- Follow that up by using the black marker to draw on a simple face in the center of the paper plate.
- When done drawing, set aside the paper plate till the last step.
- Now grab your black cardstock and the scissors again.
- Fold the black cardstock paper in half and open it back up.
- Use scissors to again to cut straight up the center, to create two equal pieces.
- Reserve one black paper piece for today's craft and save the other for another day.
- Now grab your various shades of blue chalk, Make several lines, all over the black cardstock, to recreate Thing 1's wacky hair. Add as much or as little as you like.

- When done with the chalk, set aside the paper piece and clean your hands off with a few baby wipes.
- Now grab the paper plate piece and your stapler.
- Go ahead and staple your paper plate half to the bottom of the black cardstock with the blue chalk lines. You want it to look like the hair is coming from the paper plate.
- Add any other embellishments you see fit {maybe some glitter or some stickers for a festive look.}
- Then display your custom one-of-a-kind paper chalk art Thing 1 piece proudly for all to see!
CLICK HERE TO PRINT THE DIRECTIONS FOR THIS CRAFT
If you've enjoyed our content or have any thoughts to share, we'd love to hear from you! Mention @gluedtomycrafts or tag #gluedtomycrafts on Instagram!