
Have fun with your little ones this weekend and get creative with this easy paint splat polar bear craft!

Let’s get extra crafty this winter season with our latest Paint Splat Polar Bear craft tutorial!
Did you know that my paint splat ideas are some of the MOST visited tutorials on our site?
YUP! I think it’s because these types of tutorials are super easy to recreate, even for the littlest crafters in the home.
Plus {not to toot my own horn} several of these abstract paint craft ideas are first-seen-here and designed completely by me, to be shared right here on the Glued To My Crafts website. I say it over and over again, I really do strive to make {and share} outside the traditional kids craft tutorials you find on the internet these days. That’s why I highly encourage you to follow us on Pinterest to stay up to date on what I come up with next!
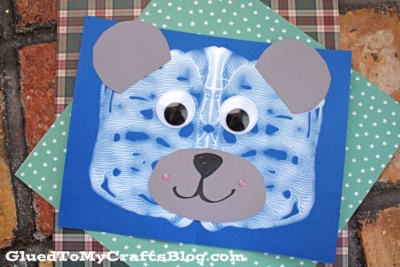
Anyways – back to today’s winter craft tutorial. This is another first-seen-here idea and we are creating polar bear faces with the paint splat technique I love so much!
To recreate this paint splat polar bear face on paper, all I did was take some blue colored cardstock and trusty white Tulip brand puffy paint to make the “head/fur” on the paper. If this is something you would like to recreate today, you can check out the full tutorial below, along with the list of supplies to make it happen. My tip to making this craft EXTRA PERFECT is investing in the Tulip brand puffy paint. It’s what makes the white really pop from the paper!
Well enough chit chat from me – I’ll let you get to it! Find all the details below so you can recreate one of your own today! Then snap a few pictures of what you “design” so you can share it on our Facebook page. Remember – no two pieces will be alike so I can’t wait to see how your paint splat polar bear turns out!
RELATED: Cupcake Liner Polar Bear and Popsicle Stick Bear

Looking for a fun and easy craft project for your kids? Look no further than this paint splat polar bear!
Craft Supplies:
- White Tulip Brand Puffy Paint
- Blue Cardstock Paper
- White Cardstock Paper
- Gray Cardstock Paper
- Black Cardstock Paper
- Basic Craft Scissors
- School Glue
- Black Sharpie Marker
RELATED —> Potato Stamped Polar Bear
Directions:
- First things first – fold your BLUE cardstock paper in half and open it back up.
- Grab your Tulip puffy paint and squirt some white craft paint ON ONE SIDE before closing it up again.
- Once the paper is closed for the second time, gently take your hand and “caress” the paper so the white paint inside, makes a fun symmetrical print design on both sides of the paper {keep in mind – paint might ooze from the sides of the cardstock, so be sure to work in an area that can get dirty!}
- Now you are ready to open it back up and see the BEGINNING of what your polar bear’s head will eventually be. From there you decorate it to bring it to life and give it life.
- Next up, grab the remaining sheets of cardstock paper and your scissors.
- Out of the white cardstock, cut TWO half moon circle ears.
- Out of the gray cardstock, cut out a large circle for his nose.
- Out of the black cardstock, cut out two small eyes and his nose.
- Use the Sharpie marker to draw on more details for the gray nose paper piece.
- Finally – the last step in completing this polar bear paper craft is to glue down ALL the cardstock cutout pieces, on top of the paint splat design. I would highly suggest starting with the nose in the center.
- Then {if desired} you can also take random scrapbook paper pieces, glitter, glitter glue, rhinestones etc. – whatever you want to bring it to life in a custom form. Maybe your teddy bear wants a bow or a bowtie? Or maybe you just want to add some sparkle? Go for it!
- Once finished with your custom polar bear masterpiece, then set aside to let it dry completely, before displaying proudly! And of course – repeat as many times as you like! No two pieces will be the same and I think that’s what makes it even more fun!
- Be sure to also check out out Washi Tape Bear In Sweater tutorial to pair with today’s tutorial as well!
RELATED —> Paint Splat Unicorn Hair

Hopefully you are thrilled to give this polar bear kid craft idea a chance today!
And if you do really enjoy recreating it with your child, be sure to also head on over to our Paint Splat Snails craft post.
It’s just like today’s puffy paint polar bear idea with the paint splat technique but we added some inexpensive paper plates to the mix, to change it up!

Paint Splat Polar Bear Craft
Here’s your checklist of supplies to bring this craft to life:
- School Glue
Prepare your creative haven by laying down a protective cover before the crafting magic begins!
Directions:
- First things first - fold your BLUE cardstock paper in half and open it back up.
- Grab your Tulip puffy paint and squirt some white craft paint ON ONE SIDE before closing it up again.Tulip Puffy Paint
- Once the paper is closed for the second time, gently take your hand and "caress" the paper so the white paint inside, makes a fun symmetrical print design on both sides of the paper {keep in mind - paint might ooze from the sides of the cardstock, so be sure to work in an area that can get dirty!}
- Now you are ready to open it back up and see the BEGINNING of what your polar bear's head will eventually be. From there you decorate it to bring it to life and give it life.
- Next up, grab the remaining sheets of cardstock paper and your scissors.
- Out of the white cardstock, cut TWO half moon circle ears.
- Out of the gray cardstock, cut out a large circle for his nose.Cardstock Paper
- Out of the black cardstock, cut out two small eyes and his nose.
- Use the Sharpie marker to draw on more details for the gray nose paper piece.
- Finally - the last step in completing this polar bear paper craft is to glue down ALL the cardstock cutout pieces, on top of the paint splat design. I would highly suggest starting with the nose in the center.
- Then {if desired} you can also take random scrapbook paper pieces, glitter, glitter glue, rhinestones etc. - whatever you want to bring it to life in a custom form. Maybe your teddy bear wants a bow or a bowtie? Or maybe you just want to add some sparkle? Go for it!
- Once finished with your custom polar bear masterpiece, then set aside to let it dry completely, before displaying proudly!

CLICK HERE TO PRINT THE DIRECTIONS FOR THIS CRAFT