Craft a paper bag polar bear with your kids! This fun and creative winter DIY project is perfect for little hands and brings cozy seasonal crafting to life.

Get creative with your kids this weekend! Make a cute and cuddly paper bag polar bear craft – it’s an easy and fun activity that will keep your little ones entertained for hours!

Paper bag puppet crafts are one of the simplest and most engaging craft projects for kids.
They’re perfect for winter months when there’s not a lot else to do, and they’re really easy to customize so each child can make their puppets look just the way they want.
This particular project is perfect for classroom activities, scout meetings, or simply creative fun at home. The best part is that there’s hardly any prep work required – just gather a few simple supplies and you’re ready to go!
Keep reading for step-by-step instructions on how to make your very own paper bag polar bear puppet. There’s even a FREE printable for you to enjoy today! Let’s get started!

This is a great paper bag white polar bear kids craft idea that will keep them entertained for hours.
It’s simple to make and you only need a few basic supplies like brown lunch sacks, white craft paint, and a plastic fork. Let the fun begin!
Craft Supplies:
- Bear Head – on our landing page
- White Cardstock Paper
- Paper Lunch Bag
- White Craft Paint
- Small Paper Plate
- Plastic Fork
- Scissors
- Glue Stick
- Markers
- Googly Eyes
Directions:
- First things first! If you haven’t already – be sure to grab the free file {listed above} and print it out on a single sheet of WHITE cardstock paper.
- Next grab your scissors and trim out ONE of the head shapes from the printable..
- Glue on the two googly eyes, the provided spaces, on your cutout so your bear can see.
- Go ahead and also cut out TWO bear paws from the remaining white paper.
- Use the marker to add the paw prints.
- Set aside your decorated paper pieces, along with the remaining second head piece for later.
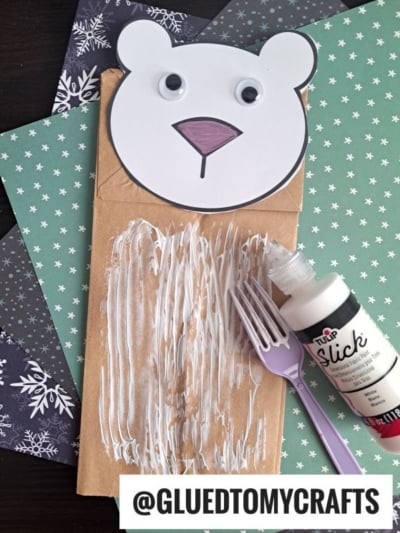
- Next up – squirt a small amount of white craft paint on the paper plate.
- Lay the brown paper bag on a flat surface, with the flap facing up.
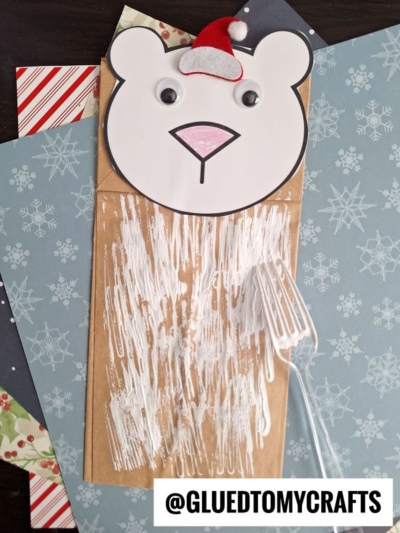
- You are going to want to paint the larger side {not the flap} with the plastic fork to give the bag a “fur” texture. You can add as much or as little as you like!
- When you are done painting, it’s time for the final step! Go ahead and glue the decorated head cutout piece from earlier, to the empty flap piece of the paper bag.
- Follow that up by gluing down the two bear paws towards the bottom.
- Finish it up by adding any other embellishments you see fit.
- Then let your finished craft dry completely before you display the finished Paper Bag Polar Bear craft piece proudly or play with it like a puppet.
RELATED —> Potato Stamped Polar Bear
If you like this paper bag polar bear puppet craft, you may also enjoy our Fork Painted Polar Bear craft idea that has gone VIRAL on the internet as of late!
We also have an amazing Crafts For The Month of January roundup post, that is FULL of inspiring ideas for you this winter season!

Paper Bag Polar Bear Craft
Craft a paper bag polar bear with your kids! This fun and creative winter DIY project is perfect for little hands and brings cozy seasonal crafting to life.
Here’s your checklist of supplies to bring this craft to life:
- Cardstock Paper white
- Bear Printable - Landing Page
- 1 Paper Lunch Bag brown
- Craft Paint white
- Small Paper Plate
- 2 Googly Eyes
Prepare your creative haven by laying down a protective cover before the crafting magic begins!
Directions:
- First things first! If you haven't already - be sure to grab the free file {listed above} and print it out on a single sheet of WHITE cardstock paper.
- Next grab your scissors and trim out ONE of the head shapes from the printable..
- Glue on the two googly eyes, the provided spaces, on your cutout so your bear can see.
- Go ahead and also cut out TWO bear paws from the remaining white paper.
- Use the marker to add the paw prints.
- Set aside your decorated paper pieces, along with the remaining second head piece for later.
- Next up - squirt a small amount of white craft paint on the paper plate.
- Lay the brown paper bag on a flat surface, with the flap facing up.
- You are going to want to paint the larger side {not the flap} with the plastic fork to give the bag a "fur" texture. You can add as much or as little as you like!
- When you are done painting, it's time for the final step! Go ahead and glue the decorated head cutout piece from earlier, to the empty flap piece of the paper bag.
- Follow that up by gluing down the two bear paws towards the bottom.
- Finish it up by adding any other embellishments you see fit.
- Then let your finished craft dry completely before you display the finished Paper Bag Polar Bear craft piece proudly or play with it like a puppet.


NEED MORE HELP DOWNLOADING OUR FREE PRINTABLES? PLEASE REFER TO OUR FAQ PAGE
If you've enjoyed our content or have any thoughts to share, we'd love to hear from you! Mention @gluedtomycrafts or tag #gluedtomycrafts on Instagram!