
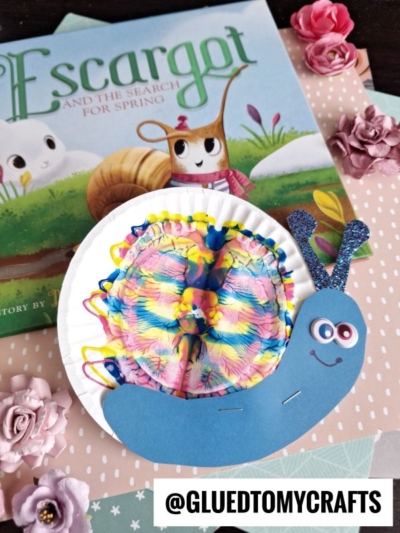
Snails may be slow in real life BUT this Paint Splat Snail kids craft tutorial is quick, easy and totally re-creatable for ANY skill-level!!!

Paper Plate Snail Craft Idea
It may be MONDAY today but that’s not slowing us down on Glued To My Crafts! We are kicking off the week with hopes of TONS of new kid friendly craft ideas to get you inspired in no time! Stay tuned because I have A LOT to share! But for now – Paint Splat Snails!!!
If you have been a long time of follower of us, you probably already know that paint splat crafts are becoming my FAVORITE as of late. It’s basically a “symmetrical” craft where you squirt various paint on a folded sheet of paper, squish together and open up to reveal a fun, marbled design inside.
Then we take those paint splat masterpieces and make them even better with some added crafting techniques! Like with today’s snail craft idea – adding cardstock embellishments to make it into a rainbow colored shelled friend within minutes!
So today I present to YOU our Paper Plate Paint Splat Snails kid craft idea! Still just as easy as my past tutorials you will find on our site BUT in my opinion – more fun since no two will ever be alike! Simply follow the full step-by-step snail art project tutorial below, to see what I’m talking about! I’m sure you are going to love it as much as I do!
Happy crafting this spring season, my dear friends! #gluedtomycrafts
RELATED —> Popsicle Stick Snails


Keep those little ones entertained with this easy and fun Paper Plate & Paint Marbled Snail craft idea!
Craft Supplies:
- White Paper Plates
- Color Cardstock Paper
- Craft Scissors
- Tulip Puffy Paint
- Small Wiggle Eyes
- Markers
- Office Stapler
- Baby Wipes
- Embellishments
Directions:
- Please make sure you have a good working area that can get dirty because paint will squeeze out of the sides of this craft!!!
- First fold your paper plate in half {one per snail craft you want to make.}
- Unfold and squirt some paint on one side of the paper plate {I like the Tulip Puffy Paint for this particular step since it’s in a nice controlled squirt bottle} Be sure to keep the paint inside the paper plate and not place too much down.
- Once the paint is down, go ahead and fold/squish your paper plate together again. Be sure to rub your hand all over the folded piece, so the paint will cover your the inside nicely {paint WILL more than likely squeeze out the sides, so be sure to pay attention to that and clean up with baby wipes!}
- Now carefully unfold your piece to reveal your design inside. Sprinkle some glitter/rhinestones on top of the wet paint if desired.
- Set aside your piece to allow it to dry completely.
- To finish the Paper Plate Splat Snails – cut/staple a snail body out of the cardstock to the paper plate.
- Then cut/staple on some cardstock antennas and glue on wiggle eyes for your snail to see.
- Set aside to let it dry completely before displaying proudly.
RELATED —> Paint Splat Unicorn Hair

AFFILIATE LINK – PAIR OUR CRAFT IDEA WITH THIS BOOK RECOMMENDATION
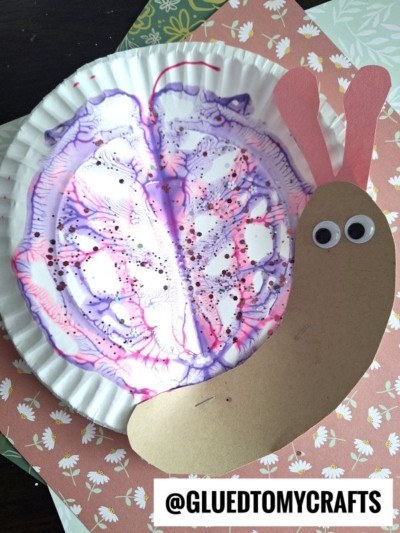
Do you love our super unique and colorful Paint Splat Snail craft? Do you by chance want to continue the crafty fun today? Then be sure to also check out our Paint Splat Butterflies and Easter Egg Snail craft tutorials!
Both of which are a great craft idea for spring and would pair nicely with today’s DIY snail art project post!!!

Paper Plate & Paint Splat Snails
Here’s your checklist of supplies to bring this craft to life:
Prepare your creative haven by laying down a protective cover before the crafting magic begins!
Directions:
- Please make sure you have a good working area that can get dirty because paint will squeeze out of the sides of this craft!!!
- First fold your paper plate in half {one per snail craft you want to make.}
- Unfold and squirt some paint on one side of the paper plate. Be sure to keep the paint inside the paper plate and not place too much down.
- Once the paint is down, go ahead and fold/squish your paper plate together again. Be sure to rub your hand all over the folded piece, so the paint will cover your the inside nicely {paint WILL more than likely squeeze out the sides, so be sure to pay attention to that and clean up with baby wipes!}
- Now carefully unfold your piece to reveal your design inside. Sprinkle some glitter/rhinestones on top of the wet paint if desired.
- Set aside your piece to allow it to dry completely.
- To finish the Paper Plate Splat Snails - cut/staple a snail body out of the cardstock to the paper plate.
- Then cut/staple on some cardstock antennas and glue on wiggle eyes for your snail to see.
- Set aside to let it dry completely before displaying proudly.

CLICK HERE TO PRINT THE DIRECTIONS FOR THIS CRAFT