Glued To My Crafts

Join thousands of others who have gotten GLUED to our craft tutorials!

  • Home
  • Privacy Policy
  • Craft Safety Guidelines
  • Seasonal Themes
    • New Years
    • Valentine’s Day
    • St. Patrick’s Day
    • Spring
    • Easter
    • Mother’s Day
    • Summer
    • Father’s Day
    • Patriotic
    • Halloween
    • Thanksgiving
    • Fall
    • Winter
    • Christmas
    • Snowmen
    • Story Time
  • Favorite Craft Materials
    • Cupcake Liners
    • Torn Paper Crafts
    • Paper Plates
    • Popsicle Sticks
    • Sidewalk Chalk
    • Clothespin Crafts
    • Tulip Puffy Paint
    • Paper Bags
    • Craft Foam Hearts
    • Puffy Paint
  • About Us
  • Monthly Themes
    • January Craft Ideas
    • February Craft Ideas
    • March Craft Ideas
    • April Craft Ideas
    • May Craft Ideas
    • June Craft Ideas
    • July Craft Ideas
    • August Craft Ideas
    • September Crafts
    • October Crafts
    • November Crafts
    • December Crafts

Paper Envelope Gingerbread House

When engaging in craft activities, it is important for young children to have adult supervision at ALL times. It is also recommended to use supplies that are suitable for your child's age. Feel free to modify materials or steps to meet your specific requirements. Please refer to our safety guidelines for more information.

As an Amazon Associate I earn from qualifying purchases. This post may contain affiliate links. For more information, please see our disclosure policy.

It’s a home anyone would want to come home to after a long night of working! Keep scrolling to see how I made this Paper Envelope Gingerbread House tutorial come to life within minutes.

It’s sure to bring some awesome crafty memories your way this Christmas season!

Paper Santa's Gingerbread House - Kid Craft Idea

This easy Christmas craft is perfect for when you need a break from all of the holiday decorating.

It’s simple, quick, and sure to bring a smile to your face. Plus, it’s a great way to use up those scraps of paper lying around your house.

RELATED: Christmas Tree Gnome and Peeking Christmas Puppy

Paper Santa's Gingerbread House - Kid Craft Idea Paper Santa's Gingerbread House - Kid Craft IdeaPaper Santa's Gingerbread House - Kid Craft Idea

Envelope Gingerbread House

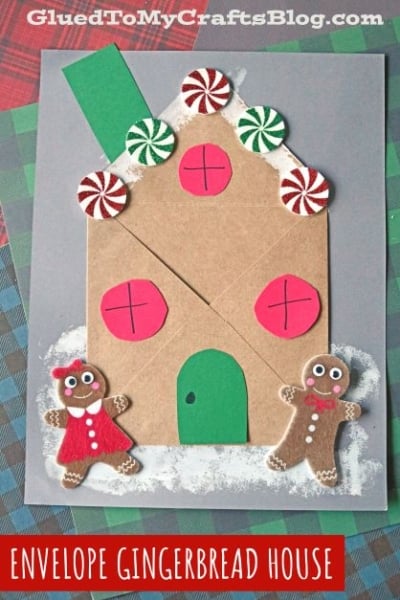
This gingerbread house craft is made out of paper envelopes! It’s a quick and easy way to get into the Christmas spirit. All you need are some basic crafting supplies and a few minutes to spare. Come see how it’s done!

Craft Supplies:

  • Colored Cardstock Paper
  • White Cardstock Paper
  • Red Craft Paint
  • Foam Paint Brush
  • Small Paper Plate
  • Baby Wipes
  • Square Envelopes
  • Paper Craft Scissors
  • White Tulip Puffy Paint
  • School Glue or Glue Stick
  • Christmas Themed Stickers
  • Tiny Craft Pom Poms

Directions:

  • The directions are simple but we will start with the handprint Santa cutout first. Gather your white cardstock, red craft paint, foam paint brush and small paper plate.
  • Squirt the red craft paint on your paper plate.
  • Pick a hand {any hand!} and paint your palm completely red, so you can press it down on a single sheet of white cardstock.
  • Carefully lift up your hand to reveal the stamped design underneath.
  • Remove excess red paint from your hand with a baby wipe and a quick trip to the sink.
  • Use scissors to trim out the painted shape you just made. This will be Santa’s body.
  • Discard excess paper and set aside the handprint to allow it to dry completely. We will come back to it later towards the end of the craft.
  • Now grab your blue and another sheet of white cardstock, along with kraft colored square envelope.
  • Go ahead and tear your white cardstock to make the “snowy ground” to set the screen of your craft. It doesn’t need to be that big. Maybe half the page.
  • Use adhesive to secure the white piece in place on the blue piece of paper.
  • Now grab the blank envelope.
  • Open the lid up of the envelope and lay it flat so it looks like a house.
  • Next glue it in place, on the decorated blue sheet of colored cardstock, with the opening of the envelope facing you. This way you can slip the handprint “Santa” cutout from earlier, inside the opening.
  • Now the embellishments for the paper gingerbread house! Go to town on decorating it however you like. You can add a few circular window cutouts, a door, a chimney etc – whatever your craft heart desires! I highly encourage you to go to town with the white “royal icing” tulip puffy paint and then add some candy stickers & small pom poms on the roof, as well.
  • When done decorating the house, set it aside side to dry completely.
  • Now grab your painted handprint from earlier.
  • We are going to decorate it to look like Santa. So grab some skin tone paper and the cotton balls to make his face. Bring him to life as you see fit!
  • When ready – slip your handprint Santa in the fully decorated paper gingerbread workshop and stand back to admire the hard work you just did!
  • When done – snap a few pictures to share with us of your Santa’s gingerbread house creation and then display your masterpiece proudly in your home, for ALL to see! #gluedtomycrafts

RELATED —> Paper Plate Gingerbread Man

gingerbread-house-craft-idea-with-a-paper-envelope-gluedtomycrafts

We want YOU to have the craftiest Christmas EVER with the help of us at Glued To My Crafts!

Before you leave our Santa’s Gingerbread Workshop & House kids craft tutorial post, be sure to check out our super popular Christmas Palm Trees, Christmas Bear and Caravan Ornament craft posts!

All three are super fun, extra easy and great for ANY skill level to conjure this season! Plus they would pair nicely with today’s Handprint Santa idea – hint hint!

stacey-signature-2023

Craft Activity Safety Guidelines:

Always Ensure Adult Supervision - Young children should be supervised at all times when engaging in craft activities. This is essential to keep them safe and ensure materials are used correctly. Use Age-Appropriate Supplies - Choose craft supplies that are suitable for your child’s age. Check labels for recommendations and avoid items with small parts or sharp edges for younger children. Modify as Needed - Feel free to adapt materials or steps to meet your child's abilities and safety needs. For example, substitute scissors with safety scissors if necessary. Keep an Eye on Allergies - Be mindful of potential allergens in craft materials like glue, paint, or certain fabrics. Opt for non-toxic and hypoallergenic options whenever possible. Organize and Secure Supplies - Keep all craft tools and materials organized. Store sharp objects, small parts, and potentially hazardous items out of reach when not in use. Following these guidelines will ensure that crafts remain fun, creative, and, most importantly, safe for everyone involved!


OUR PRIVACY POLICY

  • Email
  • Facebook
  • Instagram
  • Pinterest
  • Twitter
  • YouTube

LOOKING FOR SOMETHING?

EXPLORE OUR SITE:

© 2012–2025 Glued To My Crafts
All activities should be supervised by an adult at all times. Please refer to our safety guidelines for more information.


Please note that all the content of the website, including printables, are for classroom and personal use only. This means that any digital item you download from our site can be used for non-commercial use only. We kindly request that you do not reproduce or sell our creations. We appreciate your understanding and cooperation in respecting our content and intellectual property rights.