Glued To My Crafts

Join thousands of others who have gotten GLUED to our craft tutorials!

  • Home
  • Privacy Policy
  • Craft Safety Guidelines
  • Seasonal Themes
    • New Years
    • Valentine’s Day
    • St. Patrick’s Day
    • Spring
    • Easter
    • Mother’s Day
    • Summer
    • Father’s Day
    • Patriotic
    • Halloween
    • Thanksgiving
    • Fall
    • Winter
    • Christmas
    • Snowmen
    • Story Time
  • About Us
  • Our Amazon Storefront
  • Monthly Themes
    • January Craft Ideas
    • February Craft Ideas
    • March Craft Ideas
    • April Craft Ideas
    • May Craft Ideas
    • June Craft Ideas
    • July Craft Ideas
    • August Craft Ideas
    • September Crafts
    • October Crafts
    • November Crafts
    • December Crafts

Popsicle Stick Witch Craft Idea For Halloween

When engaging in craft activities, it is important for young children to have adult supervision at ALL times. It is also recommended to use supplies that are suitable for your child's age. Feel free to modify materials or steps to meet your specific requirements. Please refer to our safety guidelines for more information.

As an Amazon Associate I earn from qualifying purchases. This post may contain affiliate links. For more information, please see our disclosure policy.

UPDATE FOR 2026 - To reduce storage costs and download fees, we recently made some changes to our website. The password for all our files this year is GLUEDTOMYCRAFTS2026. No sign-up is required to download our free printables! You can enjoy our printables without creating an account or paying for Box.com. Simply follow the download instructions on our FAQ PAGE.

Three popsicle stick Sanderson Sisters crafts inspired by Hocus Pocus, featuring vibrant hats and hair, displayed on a purple patterned background. Text reads popsicle stick sanderson sisters and GluedToMyCraftsBlog.com.

Halloween is just around the corner, and it’s time to get crafty! If you’re looking for a fun, easy, and creative way to celebrate the spooky season, our unique popsicle stick witch tutorial is the perfect project.

Whether you’re crafting with kids or simply want to add a handmade touch to your Halloween decor, these bewitching creations will cast a spell on anyone who sees them.

In this blog post, we’ll take you through everything you need to know to create charming popsicle stick witches. From gathering materials to step-by-step instructions, we’ve got you covered. By the end, you’ll have a delightful collection of DIY witches ready to haunt your home!

Two triangle-shaped witch faces, inspired by the popsicle stick Sanderson sisters, are crafted from sticks, paper, and markers. With closed eyes, red lips, orange hair, and black hats, they rest on a purple patterned surface with green and purple borders.

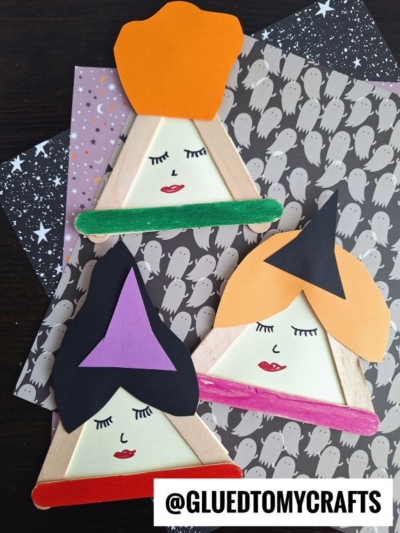
Unleash your inner witch! Get crafty with this fun Popsicle Stick Sanderson Sisters project. Perfect for showing your love of the classic Hocus Pocus movie!

Craft Supplies:

Before you start, gather all the materials you’ll need. Having everything at hand will make the crafting process smooth and enjoyable. Here’s a list of basic supplies:

  • Jumbo Popsicle Sticks
  • School Glue
  • Craft Paint – Winifred {green} Sarah {purple} and Mary {red}
  • Foam Paint Brushes
  • Paper Plate
  • Skin Tone Cardstock Paper
  • Cardstock Paper – Winifred {orange} Sarah {yellow} and Mary {black}
  • Craft Scissors
  • Sharpie Markers
  • Embellishments

Directions:

Ready to get started? Follow these simple steps to create your very own popsicle stick witches. Remember, there’s no right or wrong way to make these—feel free to get creative and add your unique touch!

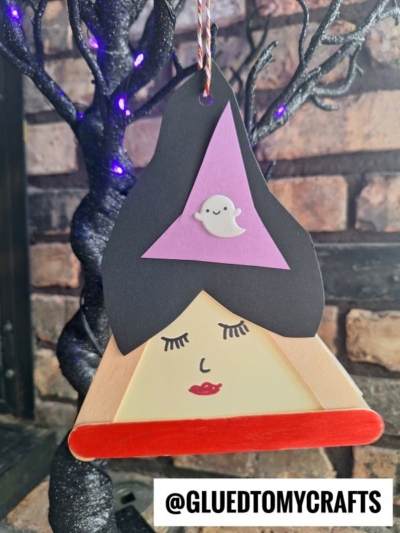
  • First grab three popsicle sticks {three per witch} and glue them together to look like a triangle. If you are doing all three sisters at once, repeat this step three times.
  • Set aside them all aside to allow them to dry completely.
  • While those are drying, grab your skin tone cardstock paper and cut a triangle that will fit inside the popsicle stick design. This will be the witch’s face.
  • At this time you should also grab the other cardstock paper and cut out their hair – for Winifred {orange} Sarah {yellow} and Mary {black}
  • Now back to the popsicle stick piece. Grab your paper plate, craft paint and paint brushes.
  • Squirt your paint on the paper plate.
  • Use your paint brush to paint one side {one popsicle stick} of the triangle shape you made earlier. This will give the look of a “dress” that each witch is wearing – Winifred {green} Sarah {purple} and Mary {red}
  • I went ahead and added some “X” stitching each one of mine, with some white craft paint, for added details. You can of course skip this step.
  • To finish off the Popsicle Stick Sanderson Sisters – glue all your paper pieces in place, on the popsicle stick shape. The skin tone triangle piece goes on the back of the popsicle stick shape, while the hair goes on the front.
  • Take your Sharpie markers on draw on eyes and red lips on the skin tone paper piece.
  • Add any other embellishments to give it that custom look. I added some witch hat stickers from Dollar Tree on mine, to really give that “witchy” feel.
  • Once done, set aside to let it dry completely before displaying proudly!
  • Don’t forget to share pictures of your craft stick witches with us on Facebook! #gluedtomycrafts

RELATED —> Paint Splat Cauldron

Three popsicle stick Sanderson Sisters crafts inspired by Hocus Pocus, featuring vibrant hats and hair, displayed on a purple patterned background.

Come one, come all! I’m constantly BREWING up new idea and our site is FULL of amazing witch themed craft tutorials for Halloween!

Be sure to click on over to our roundup post for MORE witch-y ideas to recreate today! My personal favorite craft from that collection is our Paper Plate Witch craft post!

And before you click away – I wanna be BFF’s on Facebook with you! Come join our private Facebook group and get crafty with us! This is also a great place to share pictures of your Sanderson witch sisters – hint hint!

stacey-signature-2023

Craft Activity Safety Guidelines:

Always Ensure Adult Supervision - Young children should be supervised at all times when engaging in craft activities. This is essential to keep them safe and ensure materials are used correctly. Use Age-Appropriate Supplies - Choose craft supplies that are suitable for your child’s age. Check labels for recommendations and avoid items with small parts or sharp edges for younger children. Modify as Needed - Feel free to adapt materials or steps to meet your child's abilities and safety needs. For example, substitute scissors with safety scissors if necessary. Keep an Eye on Allergies - Be mindful of potential allergens in craft materials like glue, paint, or certain fabrics. Opt for non-toxic and hypoallergenic options whenever possible. Organize and Secure Supplies - Keep all craft tools and materials organized. Store sharp objects, small parts, and potentially hazardous items out of reach when not in use. Following these guidelines will ensure that crafts remain fun, creative, and, most importantly, safe for everyone involved!


OUR PRIVACY POLICY

OUR COPYRIGHT POLICY

  • Email
  • Facebook
  • Instagram
  • Pinterest
  • Twitter
  • YouTube

LOOKING FOR SOMETHING?

EXPLORE OUR SITE:

TRENDING TODAY:

  • A pink hand-shaped bookmark with red heart stickers and star confetti surrounds a round note that reads a heartfelt message about love and reading. The image is from GluedToMyCraftsBlog.com. Handprint Bookmark Keepsake: A Gift That Holds Your Spot
  • A colorful craft project featuring a yellow felt moon, sparkly stars, and heart shapes, with glue and a heartfelt message. Torn Paper Love You To The Moon and Back Card Craft Idea For Kids
  • A handmade card with a rocket drawing, hearts, and messages of love. Felt hearts and an envelope are around it. Handprint Rocket Keepsake - I Love You Because
  • A vibrant Valentine's Day craft showcasing a torn-paper bumblebee with googly eyes on a white sheet, accompanied by the text "MY VALENTINE!" The scene is decorated with felt hearts, heart-shaped gems, and patterned papers, with a glue bottle and crafting supplies adding to the creative atmosphere. Torn Paper Bee My Valentine Card Craft Idea For Valentine's Day
  • A flat lay of handmade Valentine’s Day cards and decorations, including paper flowers, felt hearts, an envelope, and printed cards with romantic poems, arranged on a gray and pink background. Capture Memories With These 6 Handprint Flower Poems
  • Flat lay of a torn paper dandelion craft featuring a white sheet with a black dandelion outline. Torn yellow, pink, and purple paper pieces are glued to the dandelion head, simulating seeds. Surrounding the craft are Elmer's glue, felt hearts, paper flowers, and patterned scrapbook paper. The text 'MAKING WISHES, ONE PIECE OF PAPER AT A TIME.' and 'GluedToMyCraftsBlog.com' are printed on the white sheet. Torn Paper Dandelion Craft: Making Wishes, One Piece at a Time
  • A playful torn paper cactus craft with hearts and flowers. Includes glue and felt hearts. Torn Paper Cactus Card: A Sweet Mother's Day Craft
  • A colorful handprint craft made from purple paper with glitter edges sits on a multicolored polka dot background. A round tag with a poem is attached below, tied with red and white string. Flowers are visible in the corner. Easy Handprint Flower Craft with Poem – Perfect Spring DIY for Kids
  • A purple paper butterfly made from handprint cutouts is decorated with glitter and a smiling face. A round poem about sending love is in the center. The background is colorful and the GluedToMyCraftsBlog.com watermark is visible. Handprint & Popsicle Stick Butterfly Poem Keepsake
  • A craft project with yellow crepe paper fries in a red-striped paper container, a label reading Youre UN-FRY-GETTABLE!, red heart decorations, Elmers glue, and a roll of yellow crepe paper on a purple background. Torn Crepe Paper Fries Craft Idea For Kids

© 2012–2026 Glued To My Crafts
All activities should be supervised by an adult at all times. Please refer to our safety guidelines for more information.


Please note that all the content of the website, including printables, are for classroom and personal use only. This means that any digital item you download from our site can be used for non-commercial use only. We kindly request that you do not reproduce or sell our creations. We appreciate your understanding and cooperation in respecting our content and intellectual property rights.

Accessibility Adjustments

Powered by OneTap

How long do you want to hide the toolbar?
Hide Toolbar Duration
Select your accessibility profile
Vision Impaired Mode
Enhances website's visuals
Seizure Safe Profile
Clear flashes & reduces color
ADHD Friendly Mode
Focused browsing, distraction-free
Blindness Mode
Reduces distractions, improves focus
Epilepsy Safe Mode
Dims colors and stops blinking
Content Modules
Font Size

Default

Line Height

Default

Color Modules
Orientation Modules