Perfect for spring celebrations and/or to give mom on the upcoming Mother's Day holiday!

Have your kids been cooped up inside all winter long? Are you looking for an easy and whimsical craft they can make to welcome the arrival of spring? Look no further than this popsicle stick and pom pom hyacinth bouquet craft!

Hyacinths are one of the first flowers to bloom in early spring, filling the air with their sweet fragrance.
Their clusters of bell-shaped blooms come in a beautiful rainbow of colors, from pure white to rich purple.
For this project, your kids can tap into their creativity and imagination as they construct their very own bouquet using only a few basic supplies.
They’ll love watching their bouquet take shape petal by petal, and you’ll love how it adds a dash of nature’s beauty inside your home as winter reluctantly lifts its hold.
Read on to discover just how simple it is for little hands to craft this cheery reminder that warmer days are ahead! Happy crafting, my friends!

A simple handmade gift idea to make today for mom!
Craft Supplies:
Before you jump headfirst into your crafting adventure, make sure you’re all set up for fun!
- Jumbo Popsicle Sticks – 3 per flower bouquet
- Small Purple Pom Poms
- Tacky Glue
- Green Craft Paint
- Paint Brush
- Medium Sized Circular Paper Doily
Directions:
A clean, spacious area is essential for crafting success. Clear away any clutter and give yourself plenty of room to let your creativity flow.
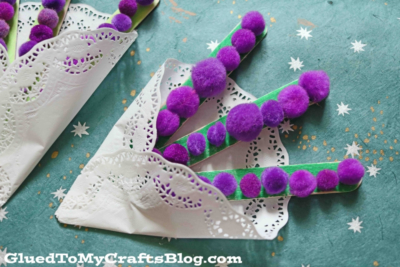
- First first things, you will want to paint your THREE jumbo popsicle sticks completely green.
- Set them aside to let them dry completely.
- Once those are dry, glue them together to look like a bouquet of stems. Think of it as a “W” shape.
- Next up – the flower part. Glue several purple pom poms, in a line, on each painted popsicle stick piece. Just keep in mind, to not glue them too far down the sticks or too many in one spot. You will want the paper doily to be able to fold over and be secured with glue so keep that in mind when gluing.
- Now for the final step. The paper doily “wrap.” All I did was fold and glue it around my flowers stems, towards the bottom of the craft. I would say it’s like a triangle.
- Once done and you are happy with the outcome, allow it to dry completely in an undisturbed area.
- When it’s completely dry, gift and/or display your “pom pom hyacinth bouquet” proudly!
- Don’t forget to snap a few pictures of the finished flower craft, to share with us on our Facebook page afterwards!
RELATED —> Thumbprint Dandelion

Create thoughtful gifts inspired by Glued To My Crafts! If you love this pom pom hyacinth bouquet craft, be sure to check out these fun posts below, for even MORE crafty inspiration from us!
Handprint and Footprint Roundup
Handprint I Love You Mom Keepsake

Popsicle Stick and Pom Pom Hyacinth Bouquet Craft Idea
Perfect for spring celebrations and/or to give mom on the upcoming Mother's Day holiday!
Here’s your checklist of supplies to bring this craft to life:
Prepare your creative haven by laying down a protective cover before the crafting magic begins!
Directions:
- First first things, you will want to paint your THREE jumbo popsicle sticks completely green.
- Set them aside to let them dry completely.
- Once those are dry, glue them together to look like a bouquet of stems. Think of it as a "W" shape.
- Next up - the flower part. Glue several purple pom poms, in a line, on each painted popsicle stick piece. Just keep in mind, to not glue them too far down the sticks or too many in one spot. You will want the paper doily to be able to fold over and be secured with glue so keep that in mind when gluing.
- Now for the final step. The paper doily "wrap." All I did was fold and glue it around my flowers stems, towards the bottom of the craft. I would say it's like a triangle.
- Once done and you are happy with the outcome, allow it to dry completely in an undisturbed area.
- When it's completely dry, gift and/or display proudly!

CLICK HERE TO PRINT THE DIRECTIONS FOR THIS CRAFT
If you've enjoyed our content or have any thoughts to share, we'd love to hear from you! Mention @gluedtomycrafts or tag #gluedtomycrafts on Instagram!