Glued To My Crafts

Join thousands of others who have gotten GLUED to our kids craft tutorials!

  • Home
  • Themes
    • New Years
    • Valentine’s Day
    • St. Patrick’s Day
    • Spring
    • Easter
    • Summer
    • Patriotic
    • Halloween
    • Thanksgiving
    • Fall
    • Winter
    • Christmas
    • Snowmen
    • Story Time
    • Rainy Days
    • Paper Plates
    • Popsicle Sticks
  • Gift Ideas
    • Christmas Ornaments
    • Mother’s Day
    • Father’s Day
    • Handprint Art
    • Keepsakes
  • Handprint Art
  • About Us
    • Where To Start
    • Get To Know Us
    • Most Popular
    • Advertise With Us
    • Disclosures/Sponsorship
      • Policies & Disclosures
      • Advertising Policy
  • Favorite Craft Supplies
    • Dollar Tree Supplies
    • Cupcake Liner
    • Sidewalk Chalk
    • Clothespin Crafts
    • Tulip Puffy Paint
    • Cupcake Liners
    • Paper Bags
    • Craft Foam Hearts
  • Amazon Storefront
  • Most Popular

Puffy Paint Brains Craft On Paper

PRINT THE INSTRUCTIONS FOR THIS CRAFT -


Puffy Paint Brains - Halloween Kid Craft

Glue & Shaving Cream Puffy Paint Brains Craft Idea

Although today’s Puffy Paint Brains Halloween kid craft idea “might” be outside the norm – I still thought it was a clever kids craft idea to share with my readers. I’m all about being “different” and standing out a bit, so I hope you all understand my creativity 🙂

So if you aren’t grossed out {or offended} and are looking for a different “spooky” themed kid craft idea to do with the kids today, I hope you check out the full puffy paint tutorial below! There’s even a FREE BRAIN PRINTABLE to get your started!!!

Maybe you can even tie all this together for a “mad scientist” themed craft day – wouldn’t that be fun?!

Be sure to share pictures of your masterpieces with us, by using the hashtag #gluedtomycrafts on your various social media channels! Seeing those images really make my day and inspire me to make even more awesome posts on Glued To My Crafts!

Happy crafting, my friends!!!

RELATED —> Stained Glass Halloween Lantern
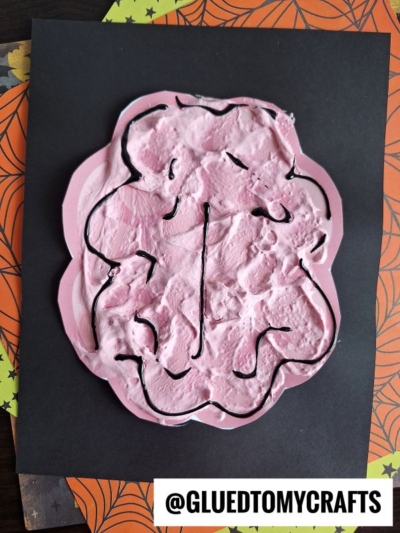
Puffy Paint Brains - Halloween Kid Craft

Craft Supplies:

  • Brains Printable – on our landing page
  • White Cardstock Paper
  • Color Printer
  • White Shaving Cream
  • White School Glue
  • Pink Craft Paint
  • Small Mixing Bowl
  • Foam Paint Brush
  • Loose Craft Glitter
  • Black Puffy Paint from Tulip

Directions:

  • First print the FREE BRAINS PRINTABLE. You will want to print this file in color on thick cardstock and print one printable per child.
  • Now you are ready to make your puffy paint! Place equal amounts of shaving cream and glue in a small dish. Mix together. Now add a dollop of pink craft paint and mix until you have a shade of pink you like {remember, your puffy paint will also be a shade darker when completely dried}
  • Once you have the consistency and color you like, have children “paint” their brain in the provided printable. They will want to stay within the lines.
  • After children are done with the puffy paint step, have them sprinkle glitter on top, while it’s still wet.
  • Now the next step is completely OPTIONAL but I felt like the black paint on top of the craft, really “defined” it. Simply have children outside the brain/add some lines in the middle with the Black Puffy Paint From Tulip {affiliate link above} You can also use a black Sharpie when the piece is COMPLETELY DRY.
  • Then set aside the masterpieces to let them dry completely before displaying proudly!

PAIR YOUR PUFFY PAINT CRAFT WITH OUR —> Paper Plate Haunted House

Do you love our Puffy Paint Brains idea? Then be sure to also check out our Paper Plate Eyeball post!

It would pair nicely with today’s Halloween theme – hint hint!

Stacey

Haunted Halloween Candy Bucket Craft
EVERY trick-o-treater needs a candy bucket on Halloween night and we have the perfect craft idea for you to BREW up!
READ MORE
Haunted Halloween Candy Bucket Craft
Puffy Paint Brains - Halloween Kid Craft

Puffy Paint Brains Craft Idea

This spooky paper and paint brain craft is perfect for Halloween! It's a great way to get kids excited about the holiday and teach them some science too.
5 from 1 vote
Print This Tutorial Pin This Tutorial Share on Facebook
  • Color Printer
  • 1 Small Mixing Bowl
  • 1 Foam Paint Brush
  • Cardstock Paper
  • Halloween Printable - on our landing page
  • White Shaving Cream
  • White School Glue
  • Pink Craft Paint
  • Loose Craft Glitter

Instructions
 

  • First print out our provided printable, in color, on a single sheet of white cardstock paper. You only need one print per craft.
  • Now you are ready to make your puffy paint! Place equal amounts of shaving cream and glue in a small dish. Mix together. Now add a dollop of pink craft paint and mix until you have a shade of pink you like {remember, your puffy paint will also be a shade darker when completely dried}
  • Once you have the consistency and color you like, have children "paint" their brain in the provided printable. They will want to stay within the lines.
  • After children are done with the puffy paint step, have them sprinkle glitter on top, while it's still wet.
  • Now the next step is completely OPTIONAL but I felt like the black paint on top of the craft, really "defined" it. Simply have children outside the brain/add some lines in the middle with the Black Puffy Paint From Tulip {affiliate link above} You can also use a black Sharpie when the piece is COMPLETELY DRY.
  • Then set aside the masterpieces to let them dry completely before displaying proudly!
Want to show off your creations?Mention @gluedtomycrafts or tag #gluedtomycrafts on Instagram!
Halloween Eyeball Frame
Using some green paint, school glue & tons of wiggle eyes - my son was able to make a "one of a kind" Halloween Eyeball Frame within minutes
READ MORE
Halloween Eyeball Frame

JOIN OUR NEWSLETTER:

Handprint Ghost In Haunted House Craft
Get ready to spook up the house this season with an easy and fun haunted house craft!
READ MORE
haunted-house-gluedtomycrafts

Love it? Share it with your friends!

  • Click to email a link to a friend (Opens in new window)
  • Click to share on Facebook (Opens in new window)
  • Click to share on LinkedIn (Opens in new window)
  • Click to share on Twitter (Opens in new window)
  • Click to share on Pinterest (Opens in new window)
  • Click to share on Reddit (Opens in new window)

Related

OUR PRIVACY POLICY

LOOKING FOR SOMETHING?

NEVER MISS A CRAFT!

EXPLORE OUR SITE:

FIND US ON FACEBOOK

FOLLOW US ON PINTEREST

© 2012–2023 Glued To My Crafts
All activities should be supervised by an adult. As an Amazon Associate, I earn from qualifying purchases. Our tutorials may contain affiliate links.