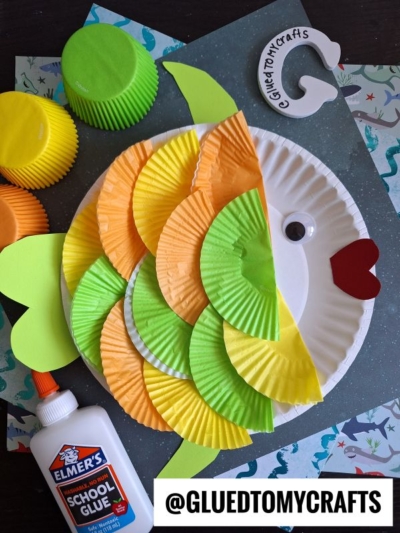
Using simple materials, you too can pull this fish-tastic cupcake liner fish craft idea together with your child in no time!

Using simple materials, you too can pull this fish-tastic cupcake liner and paper plate fish craft idea together with your child in no time!

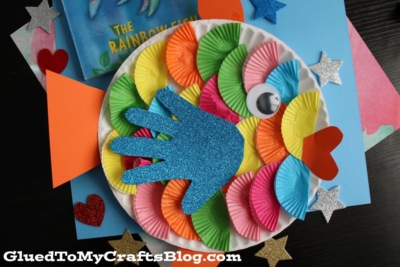
Today I’m swimming by with a super fun {and easy peasy!} paper plate and cupcake liner rainbow fish craft idea that everyone in the family can get excited about!
Using simple materials like colorful cupcake liners, a paper plate and tons of glue – you too can pull this fish-tastic craft together with your child in no time!
Now what are you waiting for? With just a little pinch of creativity, you too can pull it off!
So let’s grab those craft supplies and whip up a colorful rainbow fish piece that is simple to make but impressive to show off! You can find all the crafty details you need to know, in the full paper plate fish tutorial below! Happy crafting, my friends!

This easy kids craft is perfect for a fun summer afternoon! All you need are some paper plates and cupcake liners to bring this rainbow fish to life today!
Craft Supplies:
- Large Paper Plate – 1 per craft
- Mini Cupcake Liners
- Cardstock Paper
- Large Googly Eye – 1 per craft
- School Glue
- Scissors
- Stapler
Directions:
- First have children pick out what color mini cupcake liner cups they want to use to make the scales on their fish. You can do all one color or do multiple colors like we did. You will need approximately 20-30 cupcake liners per paper plate fish you make.
- Once you have your different colors of cupcake liners picked out – it’s time to make them into scales! Simply have children flatten each cupcake liner and then fold in half with some glue in the center, to create one fish scale.
- Repeat for each cupcake liner and set them all aside.
- Next take your paper plate and put a good amount of glue all over it.
- Have children place the finished cupcake liner pieces on top of the glue, until the paper plate is completely covered {if you need to – add more glue to secure the liners to the plate.}
- Once done, set it aside to let it dry completely.
- Next it’s time to give our fish a personalized look. Grab your cardstock and marker.
- Carefully trace around your child’s hand.
- Trim out. This is a fin for the fish.
- With the remaining cardstock, cut out a mouth and a fish tail to complete the look.
- To finish off the Cupcake Liner Fish craft – staple/glue the cardstock pieces in their designated spots on the paper plate. Go ahead and also glue on the googly eye as well.
- Then display proudly your finished fish craft creation {or add other embellishments to really make it your own!}
RELATED —> Handprint Fish Puppets


AFFILIATE LINK – PAIR OUR CRAFT IDEA WITH “THE RAINBOW FISH” BOOK
So what are you waiting for? Are you going to “dive” right into this easy rainbow fish craft idea, while making some memorable moments for your family today? I sure hope so!
BE SURE TO FOLLOW US ON PINTEREST SO YOU NEVER MISS A NEW TUTORIAL FROM US!
RELATED —> Paper Doily Fish Card

Paper Plate & Cupcake Liner Rainbow Fish Craft
Using simple materials, you too can pull this fish-tastic cupcake liner fish craft idea together with your child in no time!
Here’s your checklist of supplies to bring this craft to life:
- School Glue
Prepare your creative haven by laying down a protective cover before the crafting magic begins!
Directions:
- First have children pick out what color mini cupcake liner cups they want to use to make the scales on their fish. You can do all one color or do multiple colors like we did. You will need approximately 20-30 cupcake liners per paper plate fish you make.Cupcake Liners
- Once you have your cupcake liners picked out - it's time to make them into scales! Simply have children flatten each cupcake liner and then fold in half with some glue in the center, to create one fish scale. Repeat for each cupcake liner and set them all aside.
- Next take your paper plate and put a good amount of glue all over it.1 Large Paper Plate
- Have children place the finished cupcake liner pieces on top of the glue, until the paper plate is completely covered {if you need to - add more glue to secure the liners to the plate}
- Once done, set it aside to let it dry completely.
- Next it's time to give our fish a personalized look. Grab your cardstock and marker. Carefully trace around your child's hand. Trim out. This is a fin for the fish.Cardstock Paper
- With the remaining cardstock, cut out a mouth and a fish tail to complete the look.
- To finish off the Cupcake Liner Fish craft – staple/glue the cardstock pieces in their designated spots on the paper plate. Go ahead and also glue on the googly eye as well.
- Then display proudly {or add other embellishments to really make it your own!}

CLICK HERE TO PRINT THE DIRECTIONS FOR THIS CRAFT
If you've enjoyed our content or have any thoughts to share, we'd love to hear from you! Mention @gluedtomycrafts or tag #gluedtomycrafts on Instagram!