

Are you looking for a creative way to celebrate St. Patrick’s Day or simply bring some good luck into your home? This popsicle stick four-leaf clover craft is the perfect family-friendly activity!
Whether you’re a craft enthusiast, a parent searching for an easy project to do with your kids, or someone looking to add a festive touch to your surroundings, this DIY clover project is simple, fun, and bursting with charm.
Grab your popsicle sticks and green paint—we’re about to create something magical! This guide will take you step-by-step through the process, complete with tips, materials, and ideas to customize your four-leaf clover craft.

These Popsicle Stick Green Clovers are not only super easy and inexpensive but they are perfect for St. Patty’s Day craft time with the kids!
Craft Supplies:
Before we jump into the step-by-step instructions, gather these basic materials. You may already have many of these items at home or in your crafting stash.
- Jumbo Popsicle Sticks – 5 per craft
- School Glue
- Green Craft Paint
- Small Paper Plate
- Paint Brush
Directions:
Follow these easy steps, and you’ll have a four-leaf clover masterpiece in no time:
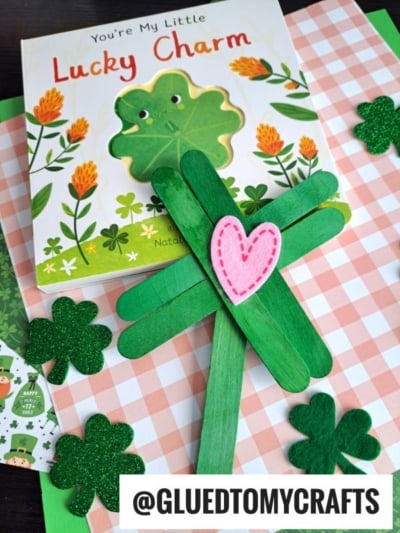
- First things first – grab your popsicle sticks {five per clover flower you are making today.}
- You will want to glue FOUR of them together in an “X” design and then finish with the fifth as the stem in the center.
- Once done, set it aside to let it dry completely.
- Repeat for each clover you want to make today.
- Now you are ready for the paint. Squirt some green craft paint on your paper plate and grab the foam paint brush.
- Have children paint the front of their clover however they like.
- To finish off the Popsicle Stick Clover Craft – have children add ANY other embellishments they see fit before setting aside again, to let it dry completely before displaying proudly!
Ideas for Using Your Finished Piece:
Not sure what to do with your newly crafted clover? Check out these creative ideas:
- Holiday Decor: Use your lucky clover as a decoration for St. Patrick’s Day. Hang it on your door, or add it to your holiday-themed mantle or centerpiece.
- Gift Tags: Attach a small clover to gift wrapping as a personal and charming touch.
- Wall Art: Create a set of clovers in different colors and sizes, and arrange them on a wall for a chic DIY art display.
- Classroom Projects: Teachers can use this craft as part of a St. Patrick’s Day lesson about Irish culture.
Craft Like a Pro with These Extra Tips:
- Double-Check Glue Placement: When assembling your clover, make sure the glue is applied evenly to prevent pieces from falling apart later.
- Use a Protective Workspace: Paint and glue can get messy. Cover your workspace with newspaper or an old tablecloth to make cleanup easier.
- Experiment with Sizes: Use mini popsicle sticks for smaller clovers or jumbo sticks for larger decorations.
RELATED —> Paper Plate Clover

AFFILIATE LINK – PAIR OUR CRAFT IDEA WITH THIS BOOK RECOMMENDATION
With your beautiful four-leaf clover complete, you’re ready to share your creation with family and friends! Take photos of your craft and share them on social media to inspire others. You can even turn this into a crafting party activity for a group of friends or your child’s classmates.
If you are looking for even MORE easy kid craft ideas that are perfect for St. Patrick’s Day, be sure to check out these fun posts listed below for more inspiration. All of which are on the Glued To My Crafts website right now!
- Shamrock Love Plant
- Bucket of Luck Craft
- Cupcake Liner Shamrock
- Wooden Spoon Leprechaun
- Leprechaun Gnome
- Cupcake Liner Shamrock
- Puffy Paint Shamrock

Popsicle Stick Four Leaf Clover Craft Idea
Here’s your checklist of supplies to bring this craft to life:
- 5 Jumbo Popsicle Sticks
- Craft Paint
- Embellishments
- School Glue
Prepare your creative haven by laying down a protective cover before the crafting magic begins!
Directions:
- First things first - grab your popsicle sticks {five per clover flower you are making today.}
- You will want to glue FOUR of them together in an "X" design and then finish with the fifth as the stem in the center.
- Once done, set it aside to let it dry completely.
- Repeat for each clover you want to make today.
- Now you are ready for the paint. Squirt some green craft paint on your paper plate and grab the foam paint brush.
- Have children paint the front of their clover however they like.
- To finish off the Popsicle Stick Clover Craft – have children add ANY other embellishments they see fit before setting aside again, to let it dry completely before displaying proudly!


CLICK HERE TO PRINT THE DIRECTIONS FOR THIS CRAFT