
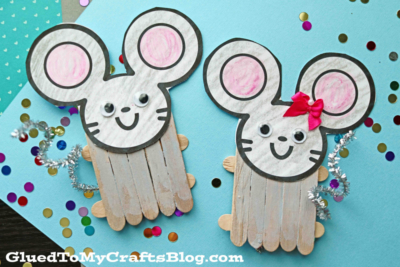
This fun and easy craft is perfect for kids of all ages! With just a few simple materials, you can make your own popsicle stick mouse.
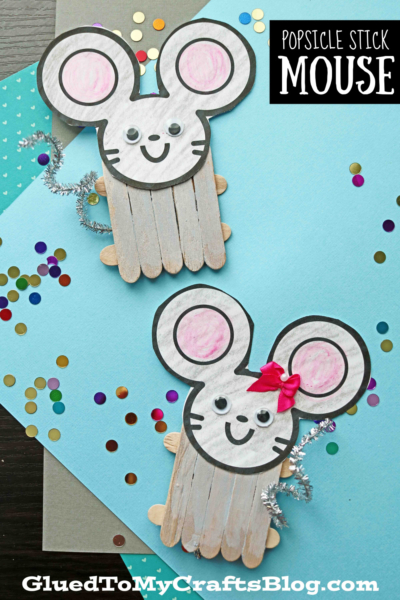
Mice Made From Popsicle Sticks
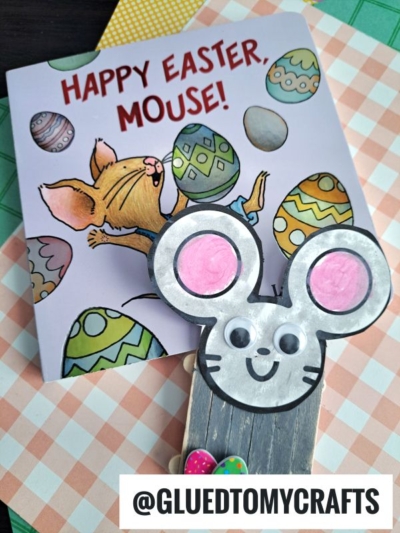
Our Popsicle Stick Mouse craft activity is actually inspired by the children’s book “If You Give A Mouse A Cookie” by Laura Numeroff.
“This book is a great first introduction to Mouse, the star of the If You Give… series and a perennial favorite among children. With its spare, rhythmic text and circular tale, If You Give a Mouse a Cookie is perfect for beginning readers and story time. Sure to inspire giggles and requests to “read it again!”
The award-winning If You Give a Mouse a Cookie, one of the most beloved children’s books of all time, is from the #1 New York Times bestselling team Laura Numeroff and Felicia Bond.”
We have ALWAYS been a huge fan of her series {we have many crafts centered around her books} and I’m so excited to be adding today’s craft tutorial to the blog archives!
So if you are looking for a super easy story time craft to add to your collection – look no further because today’s wood craft stick mouse post is as simple as it gets! It’s inexpensive, super simple to recreate and really festive too! So grab those craft supplies and get to work my friends {don’t forget to read the book afterwards in celebration!}
Happy crafting, my friends! Don’t forget to share pictures of your pretend play piece made out of popsicle sticks, with us! We can’t wait to see your mouse creations in action! #gluedtomycrafts
RELATED TUTORIALS: Christmas Tree Gnome and Christmas Carolers

This easy popsicle stick mouse craft is perfect for kids! It’s a great way to teach them about animals, shapes, and colors.
Craft Materials:
- Mini Popsicle Sticks – 7 per craft
- Low-Temp Hot Glue Gun
- Gray Craft Paint
- Paper Plate
- Paint Brush
- White Cardstock Paper
- Mouse Printable – on our landing page
- Scissors
- Crayons, Markers or Coloring Pencils
- Small Wiggle Eyes
- Silver Pipe Cleaners
Directions:
- First get the glue gun hot and ready!
- Grab your SEVEN mini popsicle sticks.
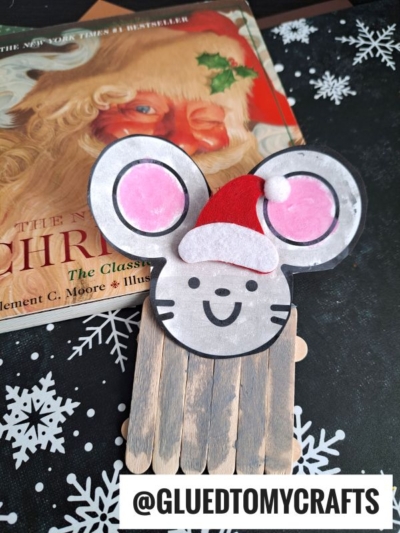
- Assemble the base of your mouse by gluing your mini popsicle sticks together to look like a fence {five next to each other and two across.}
- Repeat for each mouse puppet you want to make today.
- Next have children paint the front of their popsicle stick shape completely. Simply squirt some craft paint on the paper plate and hand over the paint brush.
- When they are done painting, set it aside to let it dry completely.
- Now grab the printable and the coloring materials.
- Color in ONE of the mice’s heads in the printable.
- Go ahead and also glue the wiggle eyes in place.
- Now cut out the decorated head piece from the paper.
- When ready, hot glue that paper piece, to the painted popsicle stick shape from earlier.
- To finish off the Popsicle Stick Mouse, hot glue a curled pipe cleaner to the back for it’s tail.
- At this point in time you can add other small embellishments like a small bow, glitter, stickers etc. to tie the mama bear theme together.
- When done completely with the craft, set it aside to allow it to dry completely before displaying and/or gifting away proudly!!!
- One last step – don’t forget to share pictures of your completed craft, with us, on your social media sites! #gluedtomycrafts
RELATED —> Paper Bag Mouse
I just love how this popsicle stick mice craft came together so nicely {and easy!!} We hope you like it too!
By chance, do you want to make the Glued To My Crafts fun continue in your home today? Then be sure to also check out our Paper Plate Mouse and Paper Plate Cheese posts for more craft ideas to recreate with your child today!!!

Popsicle Stick Mouse Craft Idea For Kids
Here’s your checklist of supplies to bring this craft to life:
Prepare your creative haven by laying down a protective cover before the crafting magic begins!
Directions:
- First get the glue gun hot and ready!
- Grab your SEVEN mini popsicle sticks.
- Assemble the base of your mouse by gluing your mini popsicle sticks together to look like a fence {five next to each other and two across.}
- Repeat for each mouse puppet you want to make today.
- Next have children paint the front of their popsicle stick shape completely. Simply squirt some craft paint on the paper plate and hand over the paint brush.
- When they are done painting, set it aside to let it dry completely.
- Now grab the printable and the coloring materials.
- Color in ONE of the mice's heads in the printable.
- Go ahead and also glue the wiggle eyes in place.
- Now cut out the decorated head piece from the paper.
- When ready, hot glue that paper piece, to the painted popsicle stick shape from earlier.
- To finish off the Popsicle Stick Mouse, hot glue a curled pipe cleaner to the back for it's tail.
- At this point in time you can add other small embellishments like a small bow, glitter, stickers etc. to tie the mama bear theme together.
- When done completely with the craft, set it aside to allow it to dry completely before displaying and/or gifting away proudly!!!


NEED MORE HELP DOWNLOADING OUR FREE PRINTABLES? PLEASE REFER TO OUR FAQ PAGE