
This bubble wrap & paper starfish craft idea is a wonderful indoor summer project for kids to recreate today.
I’ve even included a free star shaped printable template to get you started within a matter of minutes!

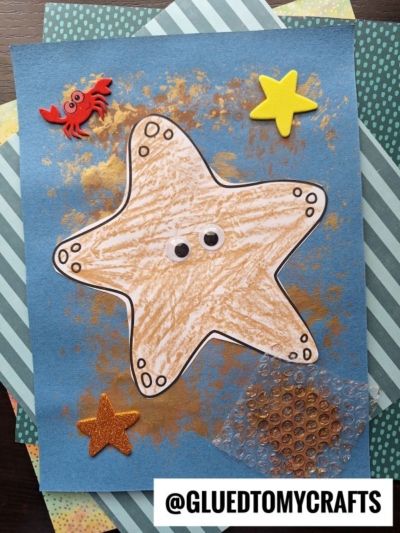
Bubble Wrap Stamped Starfish Craft
Today I’m sharing how we recently made these awesome paper starfishes come to life on our kitchen table.
My favorite part of this starfish craft is the bubble wrap “sand” element we added to the paper background. No need to head to the beach and get covered in sand for this one {which is another favorite part of mine LOL!}
If you would like to recreate this sandy art project with your child, you can find all the details below. Then grab the free provided file, a few pieces of paper and bring it to life with craft paint, crayons and glue! Super easy and no excuses!
I’ll stop talking now and let you get to crafting your own beachy starfish craft scenes today!
Please don’t forget to share pictures of your creations. You can find us on Instagram for easy tagging. I can’t wait to see what you all create. Happy crafting, my friends! #gluedtomycrafts
RELATED —> Pipe Cleaner Starfish


Crafting with the kiddos is one of my favorite things to do! This bubble wrap and paper starfish craft is so much fun and easy to make.
Craft Supplies:
- Starfish Printable – ON OUR LANDING PAGE
- White Cardstock Paper
- Crayons, Pencils, Markers etc.
- Wiggle Eye Stickers
- Scissors
- Blue Cardstock Paper
- Brown Craft Paint
- Small Paper Plate
- Small Piece of Bubble Wrap
- Loose Gold Craft Glitter
- Glue Stick or Tape Runner Adhesive
- Ocean Themed Stickers
Directions:
- First things first – download our free starfish printable, listed above in the supply list.
- Next, go ahead and find it on your computer, right click and print the file on a single sheet of white cardstock. One print equals one starfish craft. Print as many as you like but only use our file for personal use only please.
- Now that you have the starfish paper cutout printable, go ahead and color in the star design, however you like.
- At this point in time you can add on a face with the wiggle eyes!
- When done coloring in the piece, use your craft scissors to trim it out.
- Now grab a single sheet of blue colored paper and your paint supplies.
- Use the bubble wrap to make sand “prints” all over the blue paper. Simply squirt some brown paint on the paper plate and dip the bubble wrap in it.
- While the paint is still wet, sprinkle some loose gold glitter on top for added sparkle.
- When you are done with the bubble wrap step, discard the painting supplies and set aside your painted piece to allow it to dry a bit.
- When ready – adhere the decorated starfish piece to the center of the painted blue cardstock.
- Then display your custom one-of-a-kind paper starfish art piece proudly for all to see!
RELATED —> Starfish Wishes Card
Do you need one more ocean themed craft idea to tackle with the kids today?!
Maybe you want something to pair with today’s paper and bubble wrap print starfish craft?
Then be sure to click on over to our popular Paper Plate Mermaid House tutorial. It’s another download, print and make idea that I’m super proud of as of late! #gluedtomycrafts

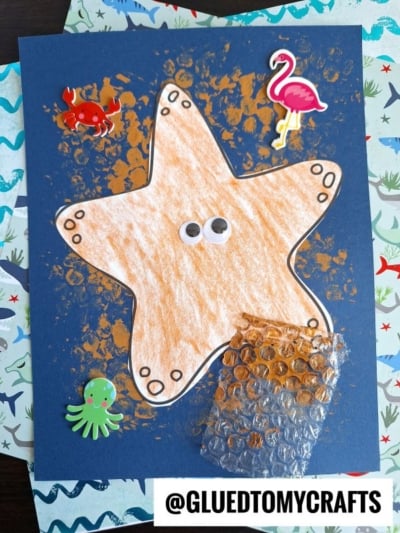
Starfish Craft with Bubble Wrap Stamping
Here’s your checklist of supplies to bring this craft to life:
- 1 Scissors
Prepare your creative haven by laying down a protective cover before the crafting magic begins!
Directions:
- First print out our provided printable, in color, on a single sheet of white cardstock paper. You only need one print per craft.Cardstock Paper
- Now that you have the starfish paper cutout printable, go ahead and color in the star design, however you like.
- At this point in time you can add on a face with the wiggle eyes!
- When done coloring in the piece, use your craft scissors to trim it out.
- Now grab a single sheet of blue colored paper and your paint supplies.
- Use the bubble wrap to make sand "prints" all over the blue paper. Simply squirt some brown paint on the paper plate and dip the bubble wrap in it.
- While the paint is still wet, sprinkle some loose gold glitter on top for added sparkle.Loose Craft Glitter
- When you are done with the bubble wrap step, discard the painting supplies and set aside your painted piece to allow it to dry a bit.
- When ready - adhere the decorated starfish piece to the center of the painted blue cardstock.
- Now add the ocean stickers and wiggle eyes.2 Wiggle Eyes, Embellishments
- Then display your custom one-of-a-kind paper starfish art piece proudly for all to see!

NEED MORE HELP DOWNLOADING OUR FREE PRINTABLES? PLEASE REFER TO OUR FAQ PAGE