Summer craft adventures await! Come see our Sandpaper Starfish Card tutorial come to life with a surprise material and free printable too!

Make summer magical with our Starfish Wishes Card craft! Use sandpaper, cardstock, and a free printable to create a fun, beach-inspired DIY project.

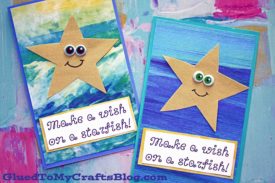
Dive into a sea of creativity with this Starfish Wishes Card craft! Perfect for summer fun, this unique project combines the unexpected texture of sandpaper with colorful cardstock and scrapbook paper to create a whimsical starfish-themed card.
Whether you’re crafting for a birthday, a “just because” moment, or simply to brighten someone’s day, this easy-to-make card is sure to bring smiles.
With a free printable and simple supplies, you’ll be making starfish wishes come true in no time. Let’s get started and make some summer magic!

Create whimsical summer memories with our Starfish Wishes Card craft! This easy DIY combines sandpaper, cardstock, and a free printable for a fun, beach-themed project.
Craft Supplies:
- Starfish File – ON OUR LANDING PAGE
- White Cardstock Paper
- Black Marker
- Scissors
- Sandpaper
- Paper Trimmer
- Colored Cardstock Paper
- Scrapbook Paper
- Glue Stick
- Wiggle Eye Stickers
- Embellishments
Directions:
- First things first – print our FREE starfish card printable listed above in the supply list. You only need one printable to make THREE cards in one sitting.
- Once you have the starfish printable printed out, go ahead and grab your scissors.
- You are going to cut out the star shape in the printable and this will become your reusable tracing template for the sandpaper starfish.
- Next go ahead and trim out each rectangle “starfish wishes” written piece. Feel free to trim it up so it will fit on your card better. You will only need one of these per card.
- Set them all aside.
- Now grab your small paper star cutout, marker and sandpaper.
- Trace your star shape on the back of your sandpaper and trim it out with scissors. Again, you only need one star shape per card.
- Set the star pieces aside and discard excess sandpaper.
- Grab one sheet of colored cardstock {any color you like!}
- Go ahead and fold it in half to make a simple card.
- Now grab your beach themed scrapbook paper.
- Using a paper trimmer, trim it down a bit {in a rectangle shape} so it will fit on the front of the cardstock card you just made.
- Go ahead and glue it down to the front of the cardstock card.
- Now grab your sandpaper starfish paper piece and glue it to the center of the card front.
- Follow that up by adding the “words” you cut out earlier, below the starfish design.
- Finally – glue on some wiggle eyes to the starfish shape and give him a big ole’ smile with your Sharpie marker.
- Add anything else you see fit to the front of the card, then write something sweet in the inside and get ready to give it to someone special today!
RELATED —> Paper Plate Fish

At Glued To My Crafts, we have a “slight” obsession with sharing handmade card ideas!
So if you are like us, and you want a few more ideas to recreate with your child today, you should click on over to our Cupcake Liner Unicorn, Llama Fabulous and Paper Teacup tutorial posts!
All three of these paper card ideas are sure to bring smiles to the receiver AND maker of them!
FOLLOW US ON PINTEREST SO YOU NEVER MISS A NEW TUTORIAL FROM US!

Paper and Sandpaper Starfish Wishes Card
Summer craft adventures await! Come see our Sandpaper Starfish Card tutorial come to life with a surprise material and free printable too!
Here’s your checklist of supplies to bring this craft to life:
Prepare your creative haven by laying down a protective cover before the crafting magic begins!
Directions:
- First print out our provided printable, in color, on a single sheet of white cardstock paper. You only need one print per craft.
- Once you have the starfish printable printed out, go ahead and grab your scissors.
- You are going to cut out the star shape in the printable and this will become your reusable tracing template for the sandpaper starfish.
- Next go ahead and trim out each rectangle "starfish wishes" written piece. Feel free to trim it up so it will fit on your card better. You will only need one of these per card.
- Set them all aside.
- Now grab your small paper star cutout, marker and sandpaper.
- Trace your star shape on the back of your sandpaper and trim it out with scissors. Again, you only need one star shape per card.
- Set the star pieces aside and discard excess sandpaper.
- Grab one sheet of colored cardstock {any color you like!}
- Go ahead and fold it in half to make a simple card.
- Now grab your beach themed scrapbook paper.
- Using a paper trimmer, trim it down a bit {in a rectangle shape} so it will fit on the front of the cardstock card you just made.
- Go ahead and glue it down to the front of the cardstock card.
- Now grab your sandpaper starfish paper piece and glue it to the center of the card front.
- Follow that up by adding the "words" you cut out earlier, below the starfish design.
- Finally - glue on some wiggle eyes to the starfish shape and give him a big ole' smile with your Sharpie marker.
- Add anything else you see fit to the front of the card, then write something sweet in the inside and get ready to give it to someone special today!


NEED MORE HELP DOWNLOADING OUR FREE PRINTABLES? PLEASE REFER TO OUR FAQ PAGE
If you've enjoyed our content or have any thoughts to share, we'd love to hear from you! Mention @gluedtomycrafts or tag #gluedtomycrafts on Instagram!