Are you looking for the perfect hands-on activity to pair with your fall reading list? Halloween story time offers a wonderful opportunity to blend literacy with creativity. One of the most beloved autumn characters for young readers is Spookley the Square Pumpkin. His story teaches children about acceptance, diversity, and the beauty of being unique.
To bring this wonderful story to life, we put together a simple, engaging art project that toddlers and preschoolers will absolutely love. This torn paper pumpkin craft captures the spirit of Spookley while keeping the mess to a minimum. You do not need complicated tools or expensive supplies to make this happen.
In this tutorial, you will learn exactly how to set up and execute this adorable Halloween craft. We will cover the specific materials you need, the developmental benefits for your children, and a complete step-by-step guide to building your very own square pumpkin. Let us dive into the craft table and get started.
Materials You Will Need
You likely already have most of these supplies hiding in your craft closet or classroom storage. The beauty of this project lies in its simplicity. Here is exactly what you need to gather before story time begins:
- Black construction paper: This serves as your base canvas. The dark background makes the bright orange colors pop beautifully.
- Orange construction paper: You will need a few sheets of this for tearing into strips.
- Green construction paper: This is used for tracing and cutting out the child’s handprints.
- Brown construction paper: You only need a small scrap of this to create the pumpkin stem.
- Large googly eyes: Two large plastic googly eyes give the pumpkin its playful, cartoonish character.
- School glue: A standard bottle of washable liquid glue (like Elmer’s) works perfectly.
- Scissors: You will need these to cut out the handprints and the stem.
- Pencil or washable marker: Use this for tracing the child’s hands.
Step-by-Step Instructions for Your Pumpkin
Setting up this craft is incredibly straightforward. You can prep the materials ahead of time or let older children handle the preparation themselves. Follow these simple steps to build your torn paper character.
Step 1: Prep the Background and Stem
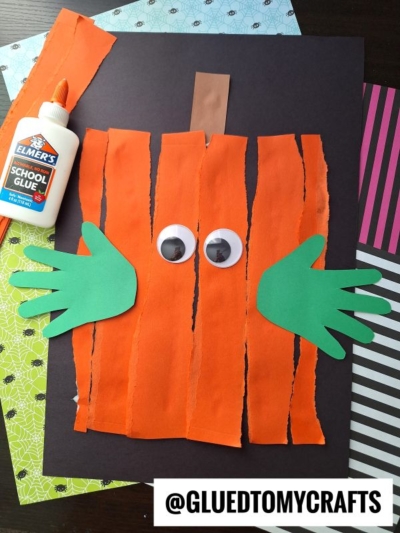
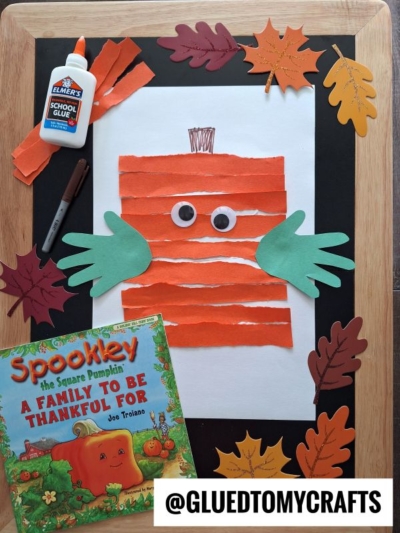
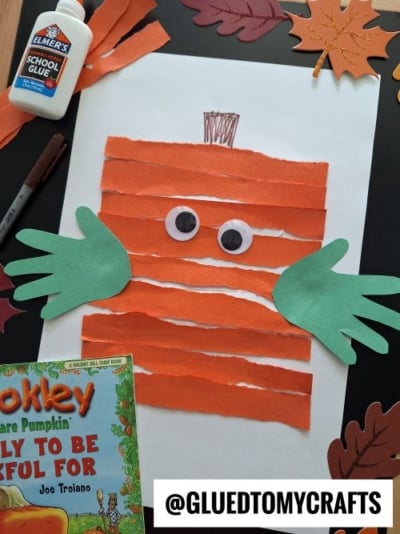
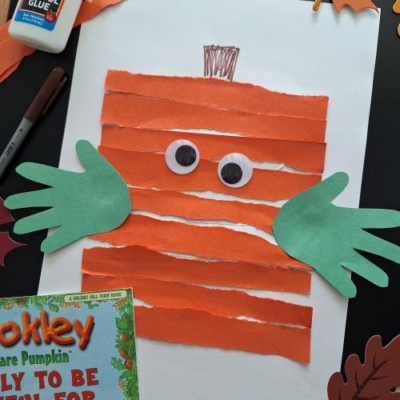
First, lay your black construction paper flat on the table. This is your primary workspace. If you want to add some festive flair, you can layer this black paper over decorative scrapbooking paper, like a spiderweb or striped pattern.
Next, grab your brown construction paper and cut out a small rectangle. This will serve as your pumpkin’s stem. Glue the brown rectangle near the top center of your black paper.
Step 2: Tear the Orange Paper
Now comes the fun part for the kids. Hand them the sheets of orange construction paper and instruct them to tear the paper into long, vertical strips.
Encourage them to make the strips roughly the same width, but do not worry about perfection. The jagged, uneven edges of the torn paper give the craft an excellent rustic texture. You will need about six to nine strips, depending on the width of the tears and the size of your background paper.
Step 3: Build the Square Pumpkin
Once you have a good pile of torn orange strips, it is time to assemble the pumpkin body. Show your child how to apply a line of liquid glue down the back of an orange strip.
Have them place the first strip vertically, right below the brown stem. Continue gluing the orange strips side-by-side until you form a large, square shape. Remind the kids that Spookley is a square pumpkin, so we want our strips to form a boxy shape rather than a round one.
Step 4: Add the Handprint Leaves
While the orange strips dry slightly, take your green construction paper. Use a pencil to trace your child’s left and right hands.
Carefully cut out the two green handprints. These handprints will act as the pumpkin’s leaves or arms. Glue one green handprint to the left side of the orange square, pointing outward. Glue the second handprint to the right side, doing the same. It should look like the pumpkin is reaching out for a warm hug.
Step 5: Bring Spookley to Life
The final step is giving your pumpkin a face. Take your two large googly eyes and place a dab of liquid glue on the back of each. Press them firmly into the upper middle section of the orange square.
Allow the entire craft to sit flat and dry completely. Liquid school glue can be a bit heavy, so give it an hour or two before hanging your masterpiece on the refrigerator or classroom bulletin board.
RELATED —> Torn Paper Leaf Craft Idea
Creating a torn paper Spookley pumpkin craft is a delightful way to spend a crisp autumn afternoon. It bridges the gap between reading and doing, helping children process the story while building vital motor skills.
Gather your materials, read a great book, and watch as your children proudly assemble their very own square pumpkins. You will end up with a wonderful autumn keepsake and a memorable afternoon of creative play. Keep exploring new ways to pair your favorite books with hands-on art projects, and enjoy every moment of this spooky season. Happy crafting, my friends!

Torn Paper Spookley Pumpkin Craft Idea
Here’s your checklist of supplies to bring this craft to life:
- School Glue
Prepare your creative haven by laying down a protective cover before the crafting magic begins!
Directions:
- First, lay your black construction paper flat on the table. This is your primary workspace. If you want to add some festive flair, you can layer this black paper over decorative scrapbooking paper, like a spiderweb or striped pattern.
- Next, grab your brown construction paper and cut out a small rectangle. This will serve as your pumpkin's stem. Glue the brown rectangle near the top center of your black paper.
- Now comes the fun part for the kids. Hand them the sheets of orange construction paper and instruct them to tear the paper into long, vertical strips.
- Encourage them to make the strips roughly the same width, but do not worry about perfection. The jagged, uneven edges of the torn paper give the craft an excellent rustic texture. You will need about six to nine strips, depending on the width of the tears and the size of your background paper.
- Once you have a good pile of torn orange strips, it is time to assemble the pumpkin body. Show your child how to apply a line of liquid glue down the back of an orange strip.
- Have them place the first strip vertically, right below the brown stem. Continue gluing the orange strips side-by-side until you form a large, square shape. Remind the kids that Spookley is a square pumpkin, so we want our strips to form a boxy shape rather than a round one.
- While the orange strips dry slightly, take your green construction paper. Use a pencil to trace your child's left and right hands.
- Carefully cut out the two green handprints. These handprints will act as the pumpkin's leaves or arms. Glue one green handprint to the left side of the orange square, pointing outward. Glue the second handprint to the right side, doing the same. It should look like the pumpkin is reaching out for a warm hug.
- The final step is giving your pumpkin a face. Take your two large googly eyes and place a dab of liquid glue on the back of each. Press them firmly into the upper middle section of the orange square.
- Allow the entire craft to sit flat and dry completely. Liquid school glue can be a bit heavy, so give it an hour or two before hanging your masterpiece on the refrigerator or classroom bulletin board.
CLICK HERE TO PRINT THE DIRECTIONS FOR THIS CRAFT