Get ready to bring a touch of the tropics into your home with a fun and easy craft project! This Paper Plate & Crepe Paper Flamingo is the perfect activity for a rainy afternoon, a classroom project, or just some creative family time. Using simple materials you likely already have in your craft bin, you can create a charming and colorful flamingo friend.
This tutorial will guide you through every step, from forming the elegant neck to creating the fluffy, feathery body. We will use basic supplies like paper plates, crepe paper, and glue to make an adorable piece of art. It’s a wonderful way for kids to practice their fine motor skills while having a blast. Let’s gather our supplies and get ready to craft!
Here is the full list of what you’ll need:
- Large Pink Paper Plate: One plate will make two flamingos!
- Extra Large White Construction Paper: A sturdy base for our flamingo’s head and neck.
- Pink Crepe Paper: This will create the beautiful, textured feathers.
- Black Cardstock Paper: For crafting the flamingo’s distinct beak.
- Small Googly Eye: To give your flamingo some personality!
- School Glue: A simple, washable glue is perfect for this.
- Pencil: For drawing our initial shape.
- Scissors: For cutting the paper plate and beak.
Step-by-Step Flamingo Craft Tutorial
Now for the fun part! Follow these simple instructions to assemble your paper plate flamingo. This is a great opportunity for kids to get hands-on with tearing, gluing, and creating.
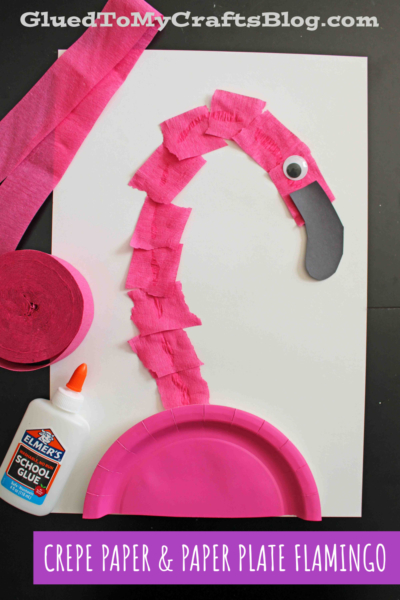
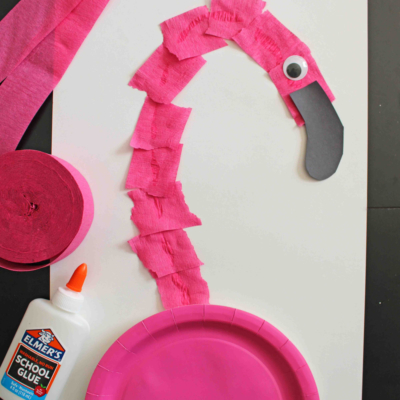
Step 1: Draw the Flamingo’s Head and Neck
First, take your sheet of white construction paper. Using a pencil, draw a shape that looks like an upside-down candy cane. This will form the elegant, curved neck and the small head of your flamingo. Don’t worry about making it perfect; every flamingo is unique! This simple shape provides the perfect foundation for our craft.
Step 2: Add the Crepe Paper Feathers
Next, grab your roll of pink crepe paper. Tear it into small, rectangular pieces. Tearing the paper instead of cutting it gives the final craft a softer, more feathery texture. Once you have a good pile of torn paper, it’s time to start gluing.
Apply a generous amount of school glue all over the candy cane shape you drew. Then, have your child stick the torn crepe paper pieces onto the glue, completely covering the pencil lines. Overlapping the pieces will create a lovely, textured look for the flamingo’s neck and head. Let it dry completely.
Step 3: Create the Flamingo’s Body
While the neck is drying, we can prepare the body. Take your large pink paper plate and a pair of scissors. Carefully cut the paper plate directly in half. One half will become the body for your first flamingo. You can save the other half for a second flamingo or another fun project!
Step 4: Assemble Your Flamingo
Once the glue on the neck is dry, it’s time to put all the pieces together. Apply a line of glue along the straight, cut edge of your paper plate half. Gently press the bottom of the crepe paper neck onto the glue. Position it so the paper plate looks like the flamingo’s round, feathery body.
Step 5: Add the Finishing Touches
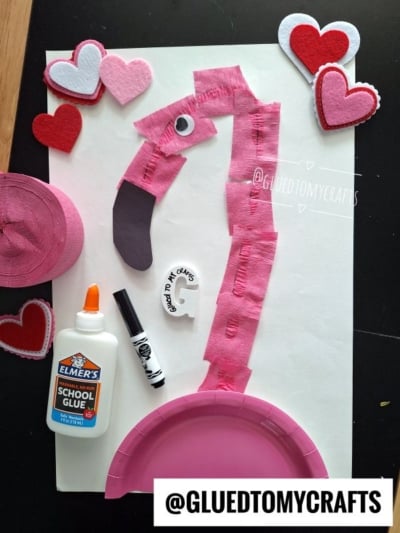
No flamingo is complete without its eye and beak! First, cut a small, triangular shape from your black cardstock paper. This will be the beak. Glue it to the tip of the flamingo’s head.
Next, give your flamingo some character by adding a googly eye. Simply peel and stick, or use a small dot of glue to secure it in place on the head, just above the beak.
Decorate and Display Your Creation
Your paper plate flamingo is now complete! But the fun doesn’t have to stop here. Encourage your child to add some extra decorations. You can glue on colorful felt hearts, add a sprinkle of glitter for some sparkle, or use markers to draw a fun background scene.
These flamingos look wonderful displayed on a bulletin board, taped to a bedroom door, or even turned into a puppet by attaching a craft stick to the back. It’s a cheerful and vibrant piece of art that you and your child will be proud to show off. We hope you had a fantastic time bringing this tropical bird to life!
RELATED —> “F” is for Flamingo Craft Idea For Kids

Torn Crepe Paper Flamingo Craft Idea
Here’s your checklist of supplies to bring this craft to life:
- Construction Paper
- Crepe Paper
- Cardstock Paper
- Wiggle Eyes
- School Glue
Prepare your creative haven by laying down a protective cover before the crafting magic begins!
Directions:
- First, take your sheet of white construction paper. Using a pencil, draw a shape that looks like an upside-down candy cane. This will form the elegant, curved neck and the small head of your flamingo. Don't worry about making it perfect; every flamingo is unique! This simple shape provides the perfect foundation for our craft.
- Next, grab your roll of pink crepe paper. Tear it into small, rectangular pieces. Tearing the paper instead of cutting it gives the final craft a softer, more feathery texture. Once you have a good pile of torn paper, it’s time to start gluing.
- Apply a generous amount of school glue all over the candy cane shape you drew. Then, have your child stick the torn crepe paper pieces onto the glue, completely covering the pencil lines. Overlapping the pieces will create a lovely, textured look for the flamingo's neck and head. Let it dry completely.
- While the neck is drying, we can prepare the body. Take your large pink paper plate and a pair of scissors. Carefully cut the paper plate directly in half. One half will become the body for your first flamingo. You can save the other half for a second flamingo or another fun project!
- Once the glue on the neck is dry, it's time to put all the pieces together. Apply a line of glue along the straight, cut edge of your paper plate half. Gently press the bottom of the crepe paper neck onto the glue. Position it so the paper plate looks like the flamingo's round, feathery body.
- No flamingo is complete without its eye and beak! First, cut a small, triangular shape from your black cardstock paper. This will be the beak. Glue it to the tip of the flamingo's head.
- Next, give your flamingo some character by adding a googly eye. Simply peel and stick, or use a small dot of glue to secure it in place on the head, just above the beak.
CLICK HERE TO PRINT THE DIRECTIONS FOR THIS CRAFT