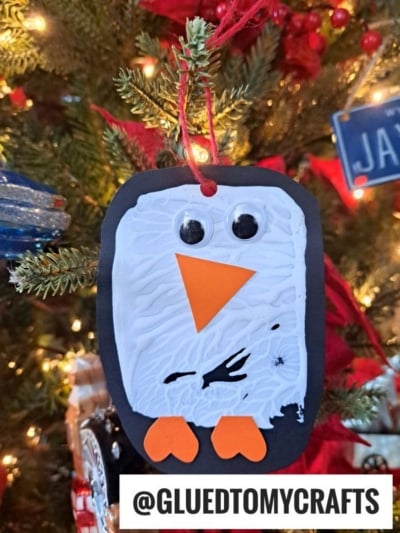
There’s something about penguins that makes winter feel cozy. Maybe it’s their little waddle or their tuxedo coats. Maybe it’s the way they huddle together to stay warm. Whatever it is, kids adore them, and that makes penguins perfect for a winter craft session.
This spatula stamped penguin is simple, playful, and a little bit messy in the best way. Instead of using a brush, kids press a craft spatula into white paint to create a textured, feathery belly. Every penguin turns out different, and that’s half the fun. Hang yours on the tree as a handmade ornament, or turn it into a punny greeting card that will make Grandma smile.
Craft Supplies:
Gather these supplies before you start so the fun keeps flowing:
- Black cardstock for the penguin body
- Orange paper (construction paper or cardstock) for the beak and feet
- White acrylic craft paint
- Kitchen spatula (the flat kind)
- Googly eyes (two per penguin)
- Glue (a glue stick for paper and craft glue for the eyes)
- Scissors
- Craft Yarn
Directions:
Step 1: Stamp the Textured White Belly
This is the most exciting part — and it comes first!
Start with a full sheet of black cardstock. Don’t cut anything yet. You’ll stamp the white paint first and trim the penguin shape out afterward.
- Squeeze a small puddle of white acrylic paint onto a paper plate.
- Dip the straight edge of your spatula into the paint. You want a nice, even coat along the edge — not a big glob.
- Press the painted edge firmly onto the black cardstock, then lift it straight up. You’ll see a crisp white line with a lovely ridged texture.
- Keep stamping, row by row, working down to build up a solid white patch. Overlap the lines slightly so the belly looks full and fluffy.
- Keep the stamped area in a rough oval or jellybean shape — this will become the penguin’s white belly once you cut it out.
Set the cardstock aside and let the paint dry completely — about 15 to 20 minutes. Don’t rush this step. Cutting into wet paint will smear and spoil the texture.
Step 2: Cut Out the Penguin Body
Once the paint is fully dry, it’s time to bring your penguin to life with scissors!
Look at your white stamped area and picture a chubby penguin belly. Now cut around it, staying about half an inch outside the white painted edge. This black border you leave behind is key: it becomes the penguin’s dark outer body, framing the white belly just like a real penguin’s coat.
Step 3: Cut and Add the Orange Beak and Feet
While the paint was drying, you could have prepped these — but now’s the time if you haven’t!
For the beak: Cut a small triangle from orange paper, about the size of a fingernail.
For the feet: Cut out two small hearts. Here’s a fun trick: fold a small square of orange paper in half, draw half a heart along the fold, and cut. Open it up for a perfect heart. Do it twice for two matching feet.
Glue the beak near the top of the white belly, pointing the tip downward for a classic look — or to the side for a curious penguin.
Flip the hearts upside down so the pointed ends face up, then glue them along the bottom edge of the penguin body so they peek out just a little. Suddenly those hearts become perfect webbed penguin feet!
Step 4: Glue On the Googly Eyes
Add a dot of craft glue to the back of each googly eye. Place them just above the beak, near the top of the white belly.
Give the glue a few minutes to set before moving the finished bird.
Step 5: Thread the Red Yarn for an Ornament
To turn your penguin into a tree ornament, punch a small hole at the top center of the body. Keep it about a quarter inch from the edge so the paper doesn’t tear.
Cut a piece of red yarn about 8 inches long. Thread it through the hole and tie the ends together in a knot.
Now your penguin is ready to waddle onto a branch! The bright red yarn pops against green pine needles and looks extra festive under twinkling lights.
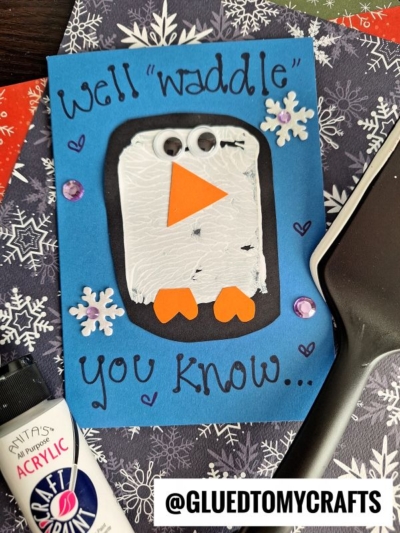
Bonus: Make a “Well ‘Waddle’ You Know…” Greeting Card
Skip the yarn and turn your penguin into a winter card instead. It’s a lovely way to send a little cheer to a friend, teacher, or relative.
- Prep the card. Fold a sheet of light blue cardstock in half, or use a flat rectangle for a postcard style.
- Write the message. Across the top, write well “waddle” in big, bubbly letters. At the bottom, write you know… to finish the pun.
- Add your penguin. Glue the finished penguin in the center of the card.
- Decorate. Stick a snowflake embellishment near the penguin’s head and another near its feet. Add purple gemstones to the snowflake centers and a few around the edges of the card.
- Doodle some love. Draw a few small purple hearts around the card for a sweet finishing touch.
Inside, kids can finish the joke with a message like “…I think you’re pretty cool!” or “…I’m so glad you’re my friend!”
RELATED —> Paper Plate Santa Belly Craft Idea For Christmas

This spatula stamped penguin proves that a few simple supplies can turn into something truly special. Kids get to explore a fun stamping technique, practice their cutting and gluing skills, and walk away with a keepsake they made all by themselves.
So clear off the table, squeeze out some paint, and let the penguin parade begin. Whether your little ones hang their creations on the tree or tuck them into cards for loved ones, these cheerful birds are sure to warm up the coldest winter day.
Give it a try this week, and don’t forget to snap a photo of your finished penguins. We’d love to see the adorable flock your crafters create! Happy crafting, my friends!
