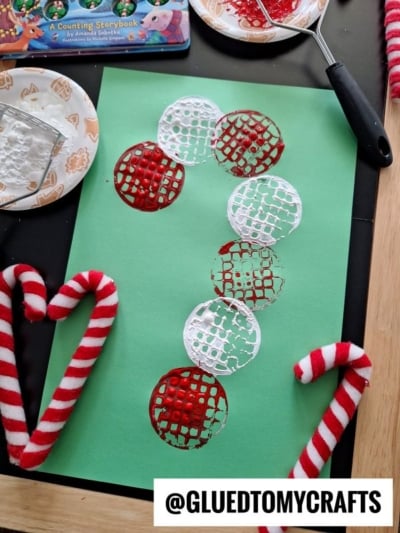
Some of the best holiday crafts start in the kitchen drawer. This one turns an ordinary potato masher into a stamp that makes waffle-textured circles. Line them up in red and white, and your little one has made a candy cane design all by themselves (with a tiny bit of help from you).
This craft is perfect for toddlers and preschoolers. There’s no cutting and no fine detail work. Kids just dip, press, and lift. It also works well for classrooms, holiday parties, or a cozy afternoon at home. Pair it with a favorite holiday storybook for a sweet seasonal activity.
Craft Supplies:
- Construction paper {black or green is perfect!}
- Red and White craft paint (washable tempera works great)
- Paper plates (one for each color)
- Two metal potato mashers (one for red, one for white)
- Pencil or white crayon
Directions:
Step 1: Set Up Your Craft Space
Cover your table with a craft mat, plastic tablecloth, or newspaper. Slip a smock or old shirt over your little artist’s clothes. Paint is part of the fun, but it’s nice when it stays on the paper!
Step 2: Prepare Your Paint Plates
Squeeze a generous puddle of red paint onto one paper plate and white paint onto the other. Spread each puddle out a bit so it’s wide enough for the bottom of a potato masher to sit flat.
Step 3: Place a Potato Masher on Each Plate
Set one potato masher in the red paint and the other in the white paint. Keeping one masher per color stops the colors from mixing into pink. (Though if they do, that’s okay too!)
Step 4: Adult Draws the Candy Cane Outline
This is the secret to a candy cane that really looks like a candy cane!
Before kids start stamping, an adult lightly draws the candy cane outline on the construction paper. Use a pencil or a white crayon, and press gently so the lines stay soft.
Here’s how to draw it:
- Turn the paper so it’s tall (portrait style).
- Start near the bottom center and draw a straight line up toward the top of the page.
- At the top, curve the line over to the left, like an upside-down letter “J.”
- Finish the hook by bringing the tip down slightly, so it looks like the top of a cane.
Step 5: Stamp the First Red Circle
Now it’s the kids’ turn! Have your child pick up the red potato masher, give it a gentle wiggle in the paint, and lift it straight up. Then press it firmly onto the bottom of the candy cane outline.
Lift it straight up again to reveal the fun grid pattern.
Step 6: Add a White Stamp Next
Switch to the white potato masher. Dip, wiggle, and stamp it just above the red circle, right along the outline.
Step 7: Keep Alternating Red and White
Continue up the line, switching colors each time:
Red, white, red, white…
Say the pattern out loud together as you go. It turns the craft into a mini learning game, and kids love calling out what comes next.
Step 8: Follow the Curve of the Hook
When you reach the top, keep stamping along the curved part of the outline. Little ones may need a gentle reminder to “follow the line around the bend.” Finish with one last stamp at the tip of the hook, pointing down.
Step 9: Let It Dry
Set the artwork somewhere flat and safe to dry. Tempera paint usually dries within 30 minutes to an hour, depending on how thick it is.
Step 10: Show It Off!
Once it’s dry, hang it up, add your child’s name and the date, or turn it into a festive card for grandparents. This little candy cane makes a sweet holiday keepsake.
RELATED —> Torn Paper Candy Cane Card Craft for Kids


The real magic of this craft isn’t in getting a perfect candy cane. It’s in the giggles, the paint-smudged fingers, and the proud little faces when they lift that masher and see what they made. So grab your potato mashers, squeeze out some paint, and enjoy a festive afternoon of making memories together. Happy crafting, my friends!
